The Queen’s Soup

Actually, this post should be called Potage à la Reine, or even better Koninginnensoep. Before looking at the details, let’s first talk about Dutch Royalty.

The first Dutch Queen (Koningin) was Wilhelmina who reigned from 1898 until 1948. She was succeeded by Queen Juliana and later Queen Beatrix. Their birthdays were always a reason for festivities with lots of food (and lots of beer nowadays). One of the favourite dishes was a soup called Koninginnensoep: a rich, creamy chicken soup with carrots and garden peas. Not very refined, but perfect for the occasion.

The recipe of this soup goes back to France, to chef François Pierre de La Varenne (1618-1678). He is probably the first chef who documented and prepared Potage à la Reine. The soup is made with two kinds of stock (one made with almonds, the other one with partridge or capon), bread, lemon and it is garnished with pomegranate and pistachios. It was prepared in the honour of Queen Marguerite de Navarre.

The Dutch Koninginnensoep is a simplified version of the Potage à la Reine. Some recipes suggest replacing the bread with rice; most suggest making a roux and adding eggs and cream to thicken the soup. The pomegranate is replaced by carrot and the pistachios by garden peas. A practical cheap, Dutch approach…

Enough details, let’s start preparing our version of this traditional soup. After all, today, April 27th, we’re celebrating the King’s birthday! Hurray!

What You Need
  • For the stock
    • Organic Chicken (bones and meat)
    • Carrot
    • Leek
    • Onion
    • Bouquet Garni (Thyme, Parsley, Bay Leaf)
    • Mace (small piece)
    • Olive Oil
  • Flour
  • Almond Flour
  • Butter
  • One Egg Yolk
  • Cream
  • White Pepper
  • Carrot
  • Green peas
What You Do
  1. Gently fry the sliced leek, the chopped carrot and the chopped onion in olive oil
  2. After a few minutes add the chicken
  3. Leave for a few minutes
  4. Add cold water, the bouquet garni, the mace and a piece of carrot
  5. Leave to simmer for one or two hours
  6. Pass through a sieve
  7. Cool the stock and remove the fat. You could do this the day before
  8. Remove the skin and bones from the meat and make cubes the size of garden peas
  9. Same for the carrot
  10. Set aside. 
  11. Combine 30 grams of flour with 10 grams of almond flour and 30 grams of butter (depending on the amount of stock, these quantities are for one liter)
  12. Make a roux and thicken the soup
  13. Leave on low heat for 60 minutes.
  14. Beat the egg yolk, add cream, mix some more
  15. Add the warm soup to the liquid, one spoon at a time
  16. This is known as marrying the soup and the eggs
  17. When done, add the chicken and leave on low heat for 10 minutes
  18. Stir gently
  19. Add white pepper
  20. In parallel quickly cook the garden peas (one minute will be fine) and warm the carrot cubes.
  21. Garnish the soup with peas and carrot

Garnish the soup with carrot and garden peas.

The Queen's Soup ©cadwu
The Queen’s Soup ©cadwu

Takes 5

You can’t have enough cookbooks. Some make you think back of a holiday, others are written by chefs you admire, and some are technical or about specific ingredients. There is always room for just one extra cookbook.

Once in a while, when you’re looking for inspiration, you browse through a number of books, look at the pictures, read recipes and you think: ‘far too many ingredients, far too complicated’ for a not very inspired evening.

James Tanner

Fortunately, you remember one very special cookbook: James Tanner Takes 5: Delicious Dishes Using Just 5 Ingredients with over 90 recipes, ranging from Roasted Red Bell Peppers with Anchovies to Scones. Short shopping lists, easy recipes and tasty results: what more can you ask for! Isn’t it great, Chocolate Mousse, Figs with Honey or Toad-in-the-hole. 

James Tanner (1976) is a British chef and author. Together with his brother Chris he runs a restaurant in Kent, The Kentish Hare. He appeared as a tv-chef on shows like Ready Steady Cook (remember The Quickie Bag? Green Pepper and Red Tomato?).

Favourite

Our personal favourite is a small chicken (preferably a coquelet, a young rooster) with a paste made of red peppers, pure creamed coconut (santan), lime and cilantro. It’s easy to make and the result is very tasty. Serve it with some bok choy in oyster sauce and you have a lovely meal. He enjoys it with a cold beer, we prefer a glass of rosé, for instance Chiaretto di Bardolino DOC made by Monte del Frà from Italy. A pale, pink wine with floral and fruity aromas. Dry with medium acidity, limited tannins and delicate flavours. Excellent with the chicken and the coconut.

Takes 5: Delicious Dishes Using Just 5 Ingredients was published in 2010 and is available (probably second hand) via the well-known channels for something like 20 US dollar or Euro.

Asparagus à la Flamande

One of the classic ways of serving asparagus is à la Flamande (Op Vlaamse wijze) with melted butter, boiled eggs, parsley and nutmeg. The nutmeg is an essential element of the dish. It enhances the flavour of the asparagus, and it’s a bridge between the egg mixture and the asparagus.
There are two main variations: the first one is to serve the asparagus with small potatoes. Not a great idea, unless you’re hungry, because the potatoes soften, weaken the flavour of the asparagus. The dish is about enjoying asparagus, so why would you add potatoes?
The second variation is to add lemon to the butter and egg mixture. This makes the dish a bit lighter and fresher. If you want to do so, be careful with the wine you serve. You need to balance the acidity in the wine and the food.

Wine Pairing

Serve the asparagus à la Flamande with a dry, white wine. We enjoyed a glass of Silvaner produced by the German Winery Thörle. The wine comes with freshness, some acidity, minerality and fruit (pear, green apples). Excellent with our asparagus.

What You Need

  • 4 Asparagus per person
  • 3 Eggs
  • Parsley
  • Butter
  • Nutmeg
  • White Pepper

What You Do

  1. We use our Russel and Hobbs food steamer to prepare this classic dish. An essential kitchen aid for only 50 euro or US dollar
  2. Clean and peel the asparagus
  3. Steam them for 10+5+5 minutes
  4. After 10 minutes add the eggs to the steamer basket
  5. After 5 minutes, turn the eggs upside down
  6. Another 5 minutes later the asparagus and the eggs are ready
  7. If you like your asparagus softer, then steam for 12-15 minutes.
  8. The eggs should be hard. Depending on the size you may need to steam them a bit longer
  9. In parallel heat a very generous amount of butter
  10. Chop the parsley
  11. Peel the egg and mash with a fork, creating a ‘mimosa’ of egg
  12. Combine mimosa and parsley
  13. Add some white pepper and freshly grated nutmeg
  14. Add the mixture to the butter and combine
  15. Spoon the egg mixture on top of the asparagus
Asparagus a la Flamande ©cadwu

Pasta with Mushrooms and Bell Pepper

Udon is such a wonderful noodle. What better comfort food than a warm soup made with dashi, vegetables, tofu, udon and thinly sliced spring onions? Perhaps some tempura on top of the soup? Or would you prefer a very simple dish, called Mori Udon? The cold udon is served with a sauce of mirin, dashi and soy sauce on the side.
Udon is also a great alternative to Italian pasta, for instance with Caesar’s Mushrooms.

In this recipe we combine udon with roasted bell pepper and Trompettes de la Mort. We’re not sure why, but this combination works really well. Is it because of the smokey aroma of the roasted bell pepper mixed with the aromas of the mushroom? The crispy pancetta in combination with the soft textures of the other ingredients, including the udon? The overall richness and umami thanks to the Trompettes de la Mort?

Wine Pairing

We enjoyed our pasta with a glass of Bianco di Custoza, made by Monte del Frà from Italy. It is a well-balanced, dry white wine, with a fruity nose. Its colour is straw yellow, with pale green highlights. A glass of Soave, made from the Garganega grape, will also be an excellent choice. In general you’re looking for a fresh, aromatic dry white wine. 

What You Need

  • 1 Red Bell Pepper
  • 1 Bunch of Udon
  • 100 grams of Trompettes de la Mort
  • 1 Glove of cooked Garlic
  • 4 slices of Pancetta
  • Black pepper
  • Olive Oil

What You Do

Clean the bell pepper and cut in 4. Transfer to the oven and grill or roast for 10 minutes or until well charred. When still hot, put the bell pepper in a plastic container and close it. After one hour it’s easy to remove the skin of the bell pepper. Slice lengthwise to make nice strips. Set aside.
Slice the mushrooms in two and clean them with a soft brush. Check carefully for grit and other things you don’t like to eat.
Fill a large pan with water (no salt!) and bring to a boil. Add the udon and cook it according to the instruction. When nearly done, add some cooking liquid to a cup and set aside. Drain the udon.
In parallel heat a large heavy iron skillet, add olive oil and fry the mushrooms. Once they become a bit dryer, add the sliced bell pepper. Add the cooked garlic, crush it with a fork and mix. Now add the udon and continue mixing. Add cooking liquid until the pasta is sufficiently moist.
Also in parallel: grill the strips of pancetta (perhaps 5 minutes).
Add some black pepper to the pasta and serve with the grilled pancetta.

Pasta with Mushrooms and Bell Pepper ©cadwu

Classic White Asparagus

One of the classic ways of serving white asparagus is with melted butter, boiled eggs, ham and parsley. Preparing the asparagus this way, will allow you to taste the slight bitterness and sweetness of the asparagus. The butter and egg bring a velvety feeling to your palate, and the parsley and white pepper give a touch of sharpness to the dish. A great way to celebrate spring!

We use our Russel and Hobbs food steamer to prepare this classic dish. An essential kitchen aid for only 50 euro or US dollar. In this case the steamer cooks the asparagus, boils the eggs and heats the butter. Amazing!

A few years ago we enjoyed white asparagus with béarnaise and a small veal schnitzel accompanied by a glass of Silvaner at Café Heider in Potsdam, Germany. When we ordered we were asked how we would like our asparagus. Al dente, of course! If you like them more cooked, then steam them for an extra 5 minutes. 

Wine Pairing

Preferably serve the white asparagus with a dry Muscat from the Elzas. The delicate, slightly sweet but dry taste, the hint of bitterness and the rich aromas work very well with the asparagus. Muscat to us means the smell of fresh fruit. When drinking it is if you’re tasting the original grape. Wonderful wine and wonderful combination.
Or a glass of Silvaner of course. Just make sure the white wine has a touch of sweetness and is aromatic.

What You Need
  • 3 or 5 white asparagus per person
  • 2 Eggs
  • 100 grams Organic Cooked Ham
  • Parsley
  • Butter
  • White Pepper
What You Do
  1. Clean and peel the asparagus
  2. Chop the parsley.
  3. add the butter to a cup
  4. Steam them for 10+5+5 minutes
  5. After 10 minutes add the eggs to the steamer basket
  6. After 5 minutes, add a cup with cold butter
  7. Another 5 minutes later everything is ready; the eggs will be medium: the yolk is not set but also not running.
  8. Peel the egg and cut in four
  9. Serve the asparagus and eggs on a plate
  10. Pour the warm butter over the asparagus
  11. Dress the plate with ham (please make sure it has a bit of fat) and perhaps some extra butter
  12. Add some white pepper
  13. Sprinkle the parsley over the plate
Classic white Asparagus ©cadwu

Oden

A traditional Japanese dish, often enjoyed in winter. It is tasty, light and full of surprises. Oden is a meal that requires a bit more work (and of course time) then you would expect. It also requires some shopping, given some of the ingredients are not easy to find. We enjoyed our first Oden at the Taishunken restaurant in the famous Sankeien Garden in Yokohama. Loved it!
We are not from Japan so we humbly present our version of this classic. We hope it inspires you to cook Oden and enjoy it as much as we did.

Pairing

A cup of Japanese green tea is the obvious choice.
You could also combine your oden with a glass of Chardonnay (with a touch of oak perhaps), for instance if you serve it for dinner. Oden is rich in flavours, umami of course, but not spicy, so we would not suggest a Gewürztraminer or a Sauvignon Blanc.
A glass of cold, dry sake will also be great.

What You Need
  • For the Dashi
    • 1 litre of Water
    • 20 grams of Dashi Kombu (Rishiri Kombu)
    • 20 grams of Katsuobushi (Bonito Flakes)
  • For the Stew
    • One Daikon
    • One Pack of Konnyaku
    • 1 sheet of Hayani Kombu
    • Chikuwa Fish Cakes
    • One Pack of Gobo Maki Burdockroot Fish Cakes
    • 2 boiled eggs
    • Abura Age Fried Tofu
    • Mochi (Sticky Rice Cake)
    • Soy Sauce (preferably one with less salt)
    • Mirin
  • Karashi
  • Rice with ginger
What You Do
  1. Peel the daikon and slice it (2 centimeters is best)
  2. Use a sharp knife to plane of the edge of the daikon. This improves the presentation, and it is supposed to stop the daikon from falling apart
  3. Cook the daikon for one hour in water
  4. Drain and set aside
  5. In parallel: cut the konnyaku in triangles and cook these in water for 15 minutes. Konnyaku is made from the konjac plant and is specific for the Japanese cuisine
  6. Also in parallel: cook the sheet of Hayani Kombu for 5 minutes. This is young kombu and edible, different for the one you use when preparing dashi. Let cool a bit, slice and knot ribbons. Not sure why but is looks great when you serve it. (Yes, well spotted, it’s not in the picture; unfortunately, we couldn’t find Hayani when we prepared our oden.)
  7. Make 1 liter of dashi. This seems simple but requires precision. Clean the kombu with a wet cloth and put into one litre of cold water. Gently raise the temperature to 80 °C or 175 °F. Remove and discard the kombu. Bring the liquid to a boil, add the katsuobushi, bring to a boil and immediately set heat to zero. Wait 5 minutes or so. The katsuobushi will sink to the bottom of the pan. Now very gently pass the liquid through a wet towel or a sieve. Do not squeeze, just give it time. The result will be a great, clean dashi.
  8. Now it’s time to add the dashi to the pan (should be a clay pot, but we stick to our Le Creuset)
  9. Add one tablespoon of mirin
  10. One (or two, depending on your taste) of light soy sauce
  11. Add the daikon, the konnyaku, the chikuwa fish cakes and the gobo maki burdockroot fish cakes
  12. Allow to simmer for at least 2 hours
  13. 30 minutes before serving add boiled eggs, two Hayani ribbons, fried tofu and mochi
  14. The last two ingredients must be combined by putting the mochi into the tofu
  15. Serve with karashi (Japanese mustard, which is different from wasabi by the way) on the side
  • Oden ©cadwu
  • Oden with names of Ingredients ©cadwu

Confit of Duck: a home made alternative

The traditional way of making Confit of Duck is not complex. It’s a bit time consuming and it requires some planning, that’s all. The principle is to cure the meat in salt with various herbs (thyme, cumin, rosemary) and garlic. After 24 hours or so the duck is washed with water, patted dry and then slow cooked in goose or duck fat for several hours. When ready cool and store in fat.

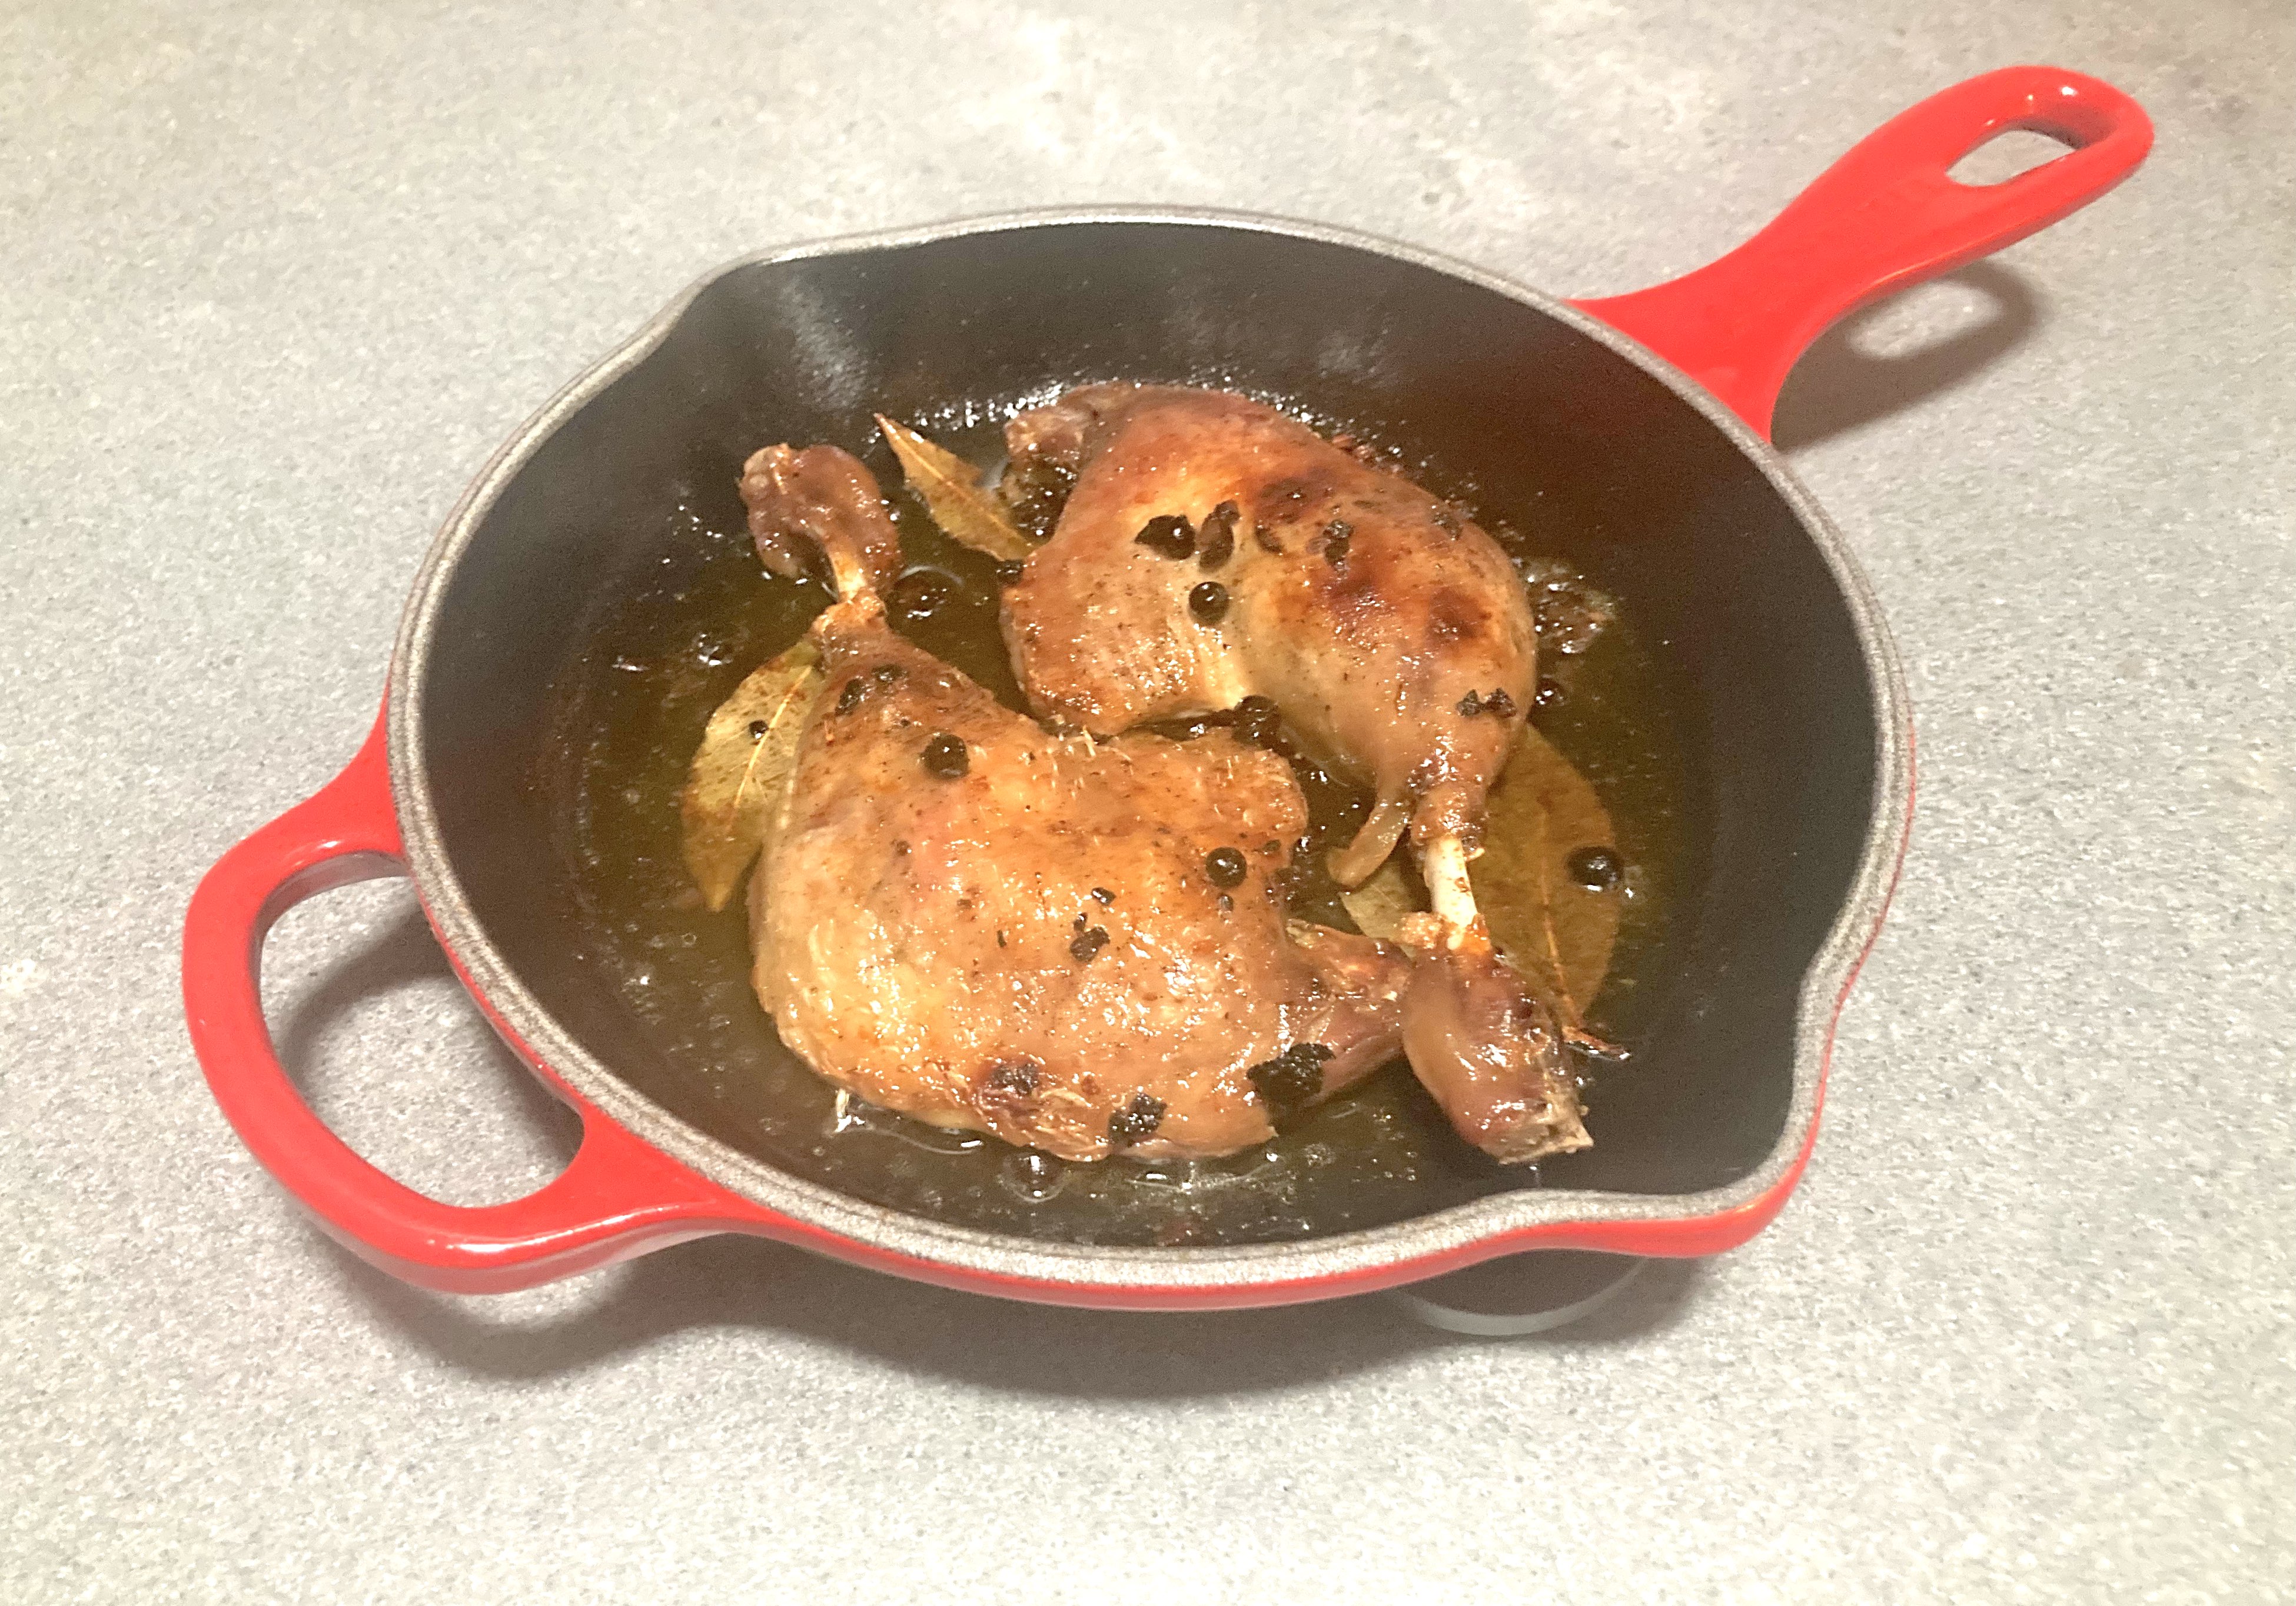
We take a different approach by slow cooking the duck legs in olive oil. The result is remarkable: juicy, full of flavours and aromas, provided you use first class duck (label rouge for instance). If not, the meat can become dry and tough. Another benefit: we don’t cure the meat so it’s not salty at all.
We serve the confit with celeriac mash. It’s light, nutty and refreshing compared to a mash made with potatoes.

Wine Pairing

Best choice is a full bodied, red wine with ripe fruit and smoothness. We decided to open a bottle of Herdade de São Miguel Colheita Seleccionada 2020 as produced by Casa Relvas. Such a pleasure! Its colour is deep ruby and the aromas made us think of ripe black fruit and dark cherries with some spiciness. The wine is well balanced with a nice structure and smooth tannins. Works very well with the juicy duck and the mash with its creamy texture and lemonish, celery flavours.

What You Need

  • For the Confit
    • 2 Duck Legs
    • Juniper berries
    • 4 Bay Leaves
    • Olive Oil
    • (optional) Garlic
  • For the Celeriac Mash
    • 1 Celeriac
    • Slice of Lemon
    • Cream
    • White Pepper
    • Nutmeg

Confit

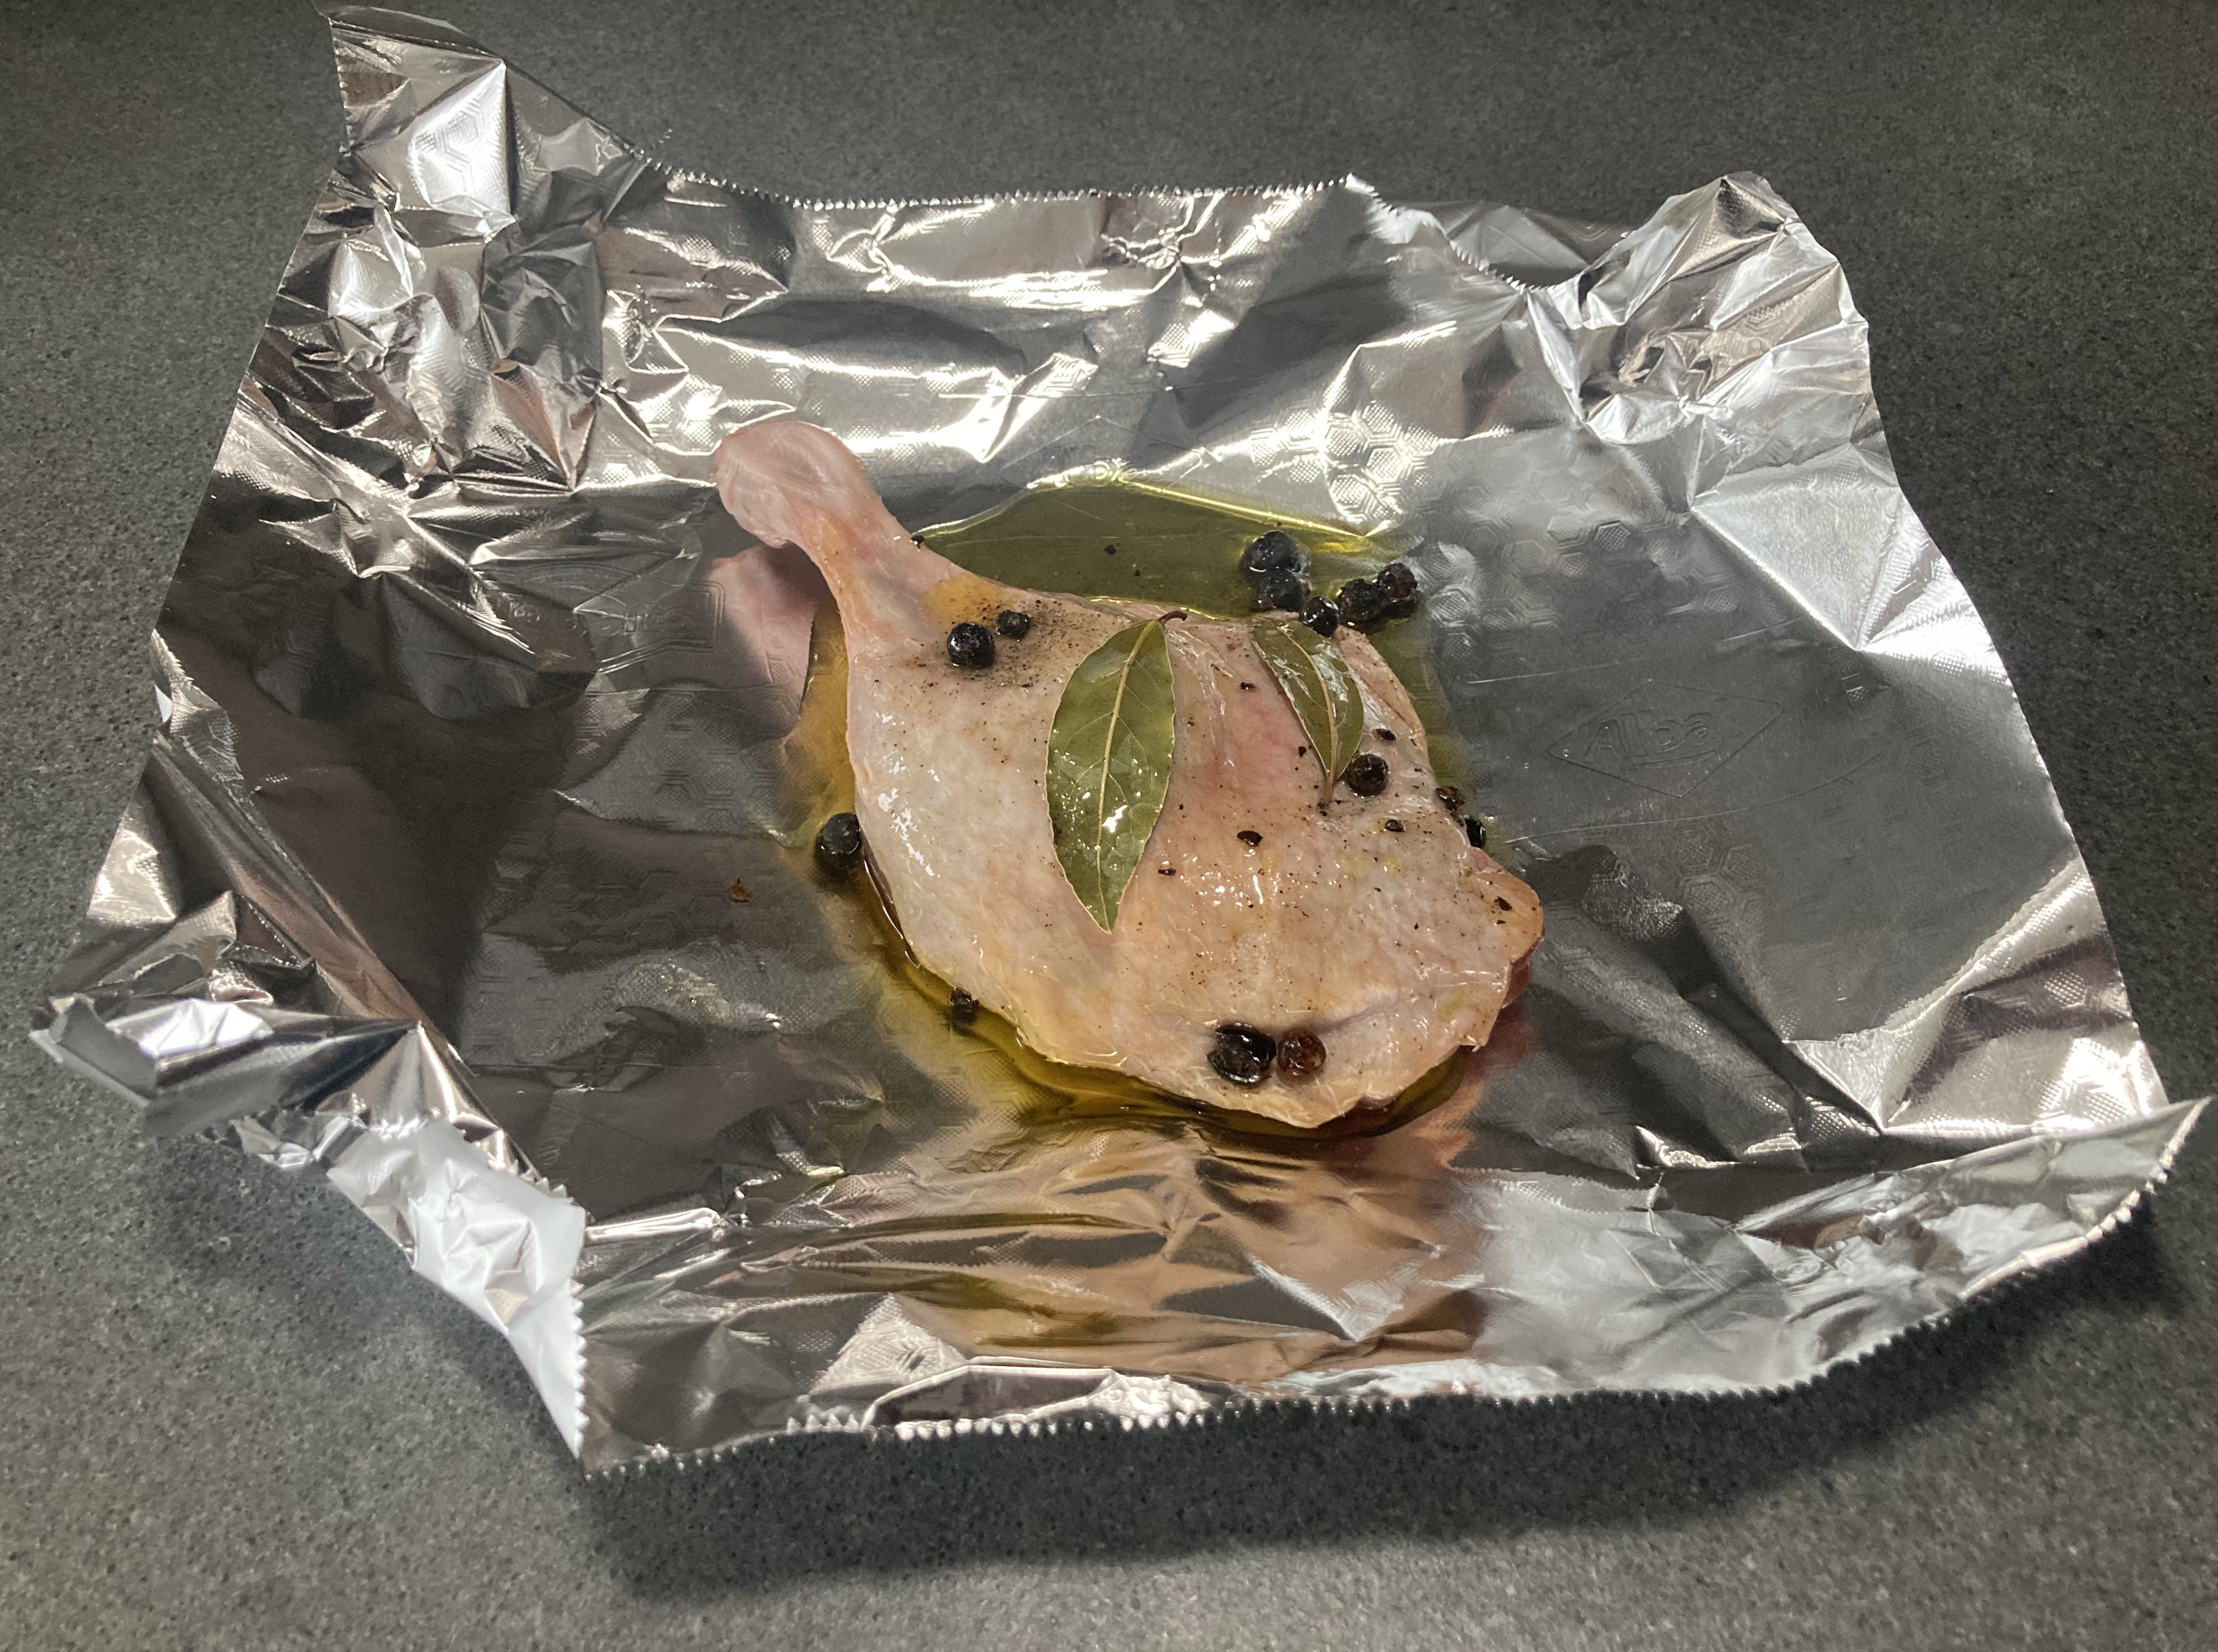
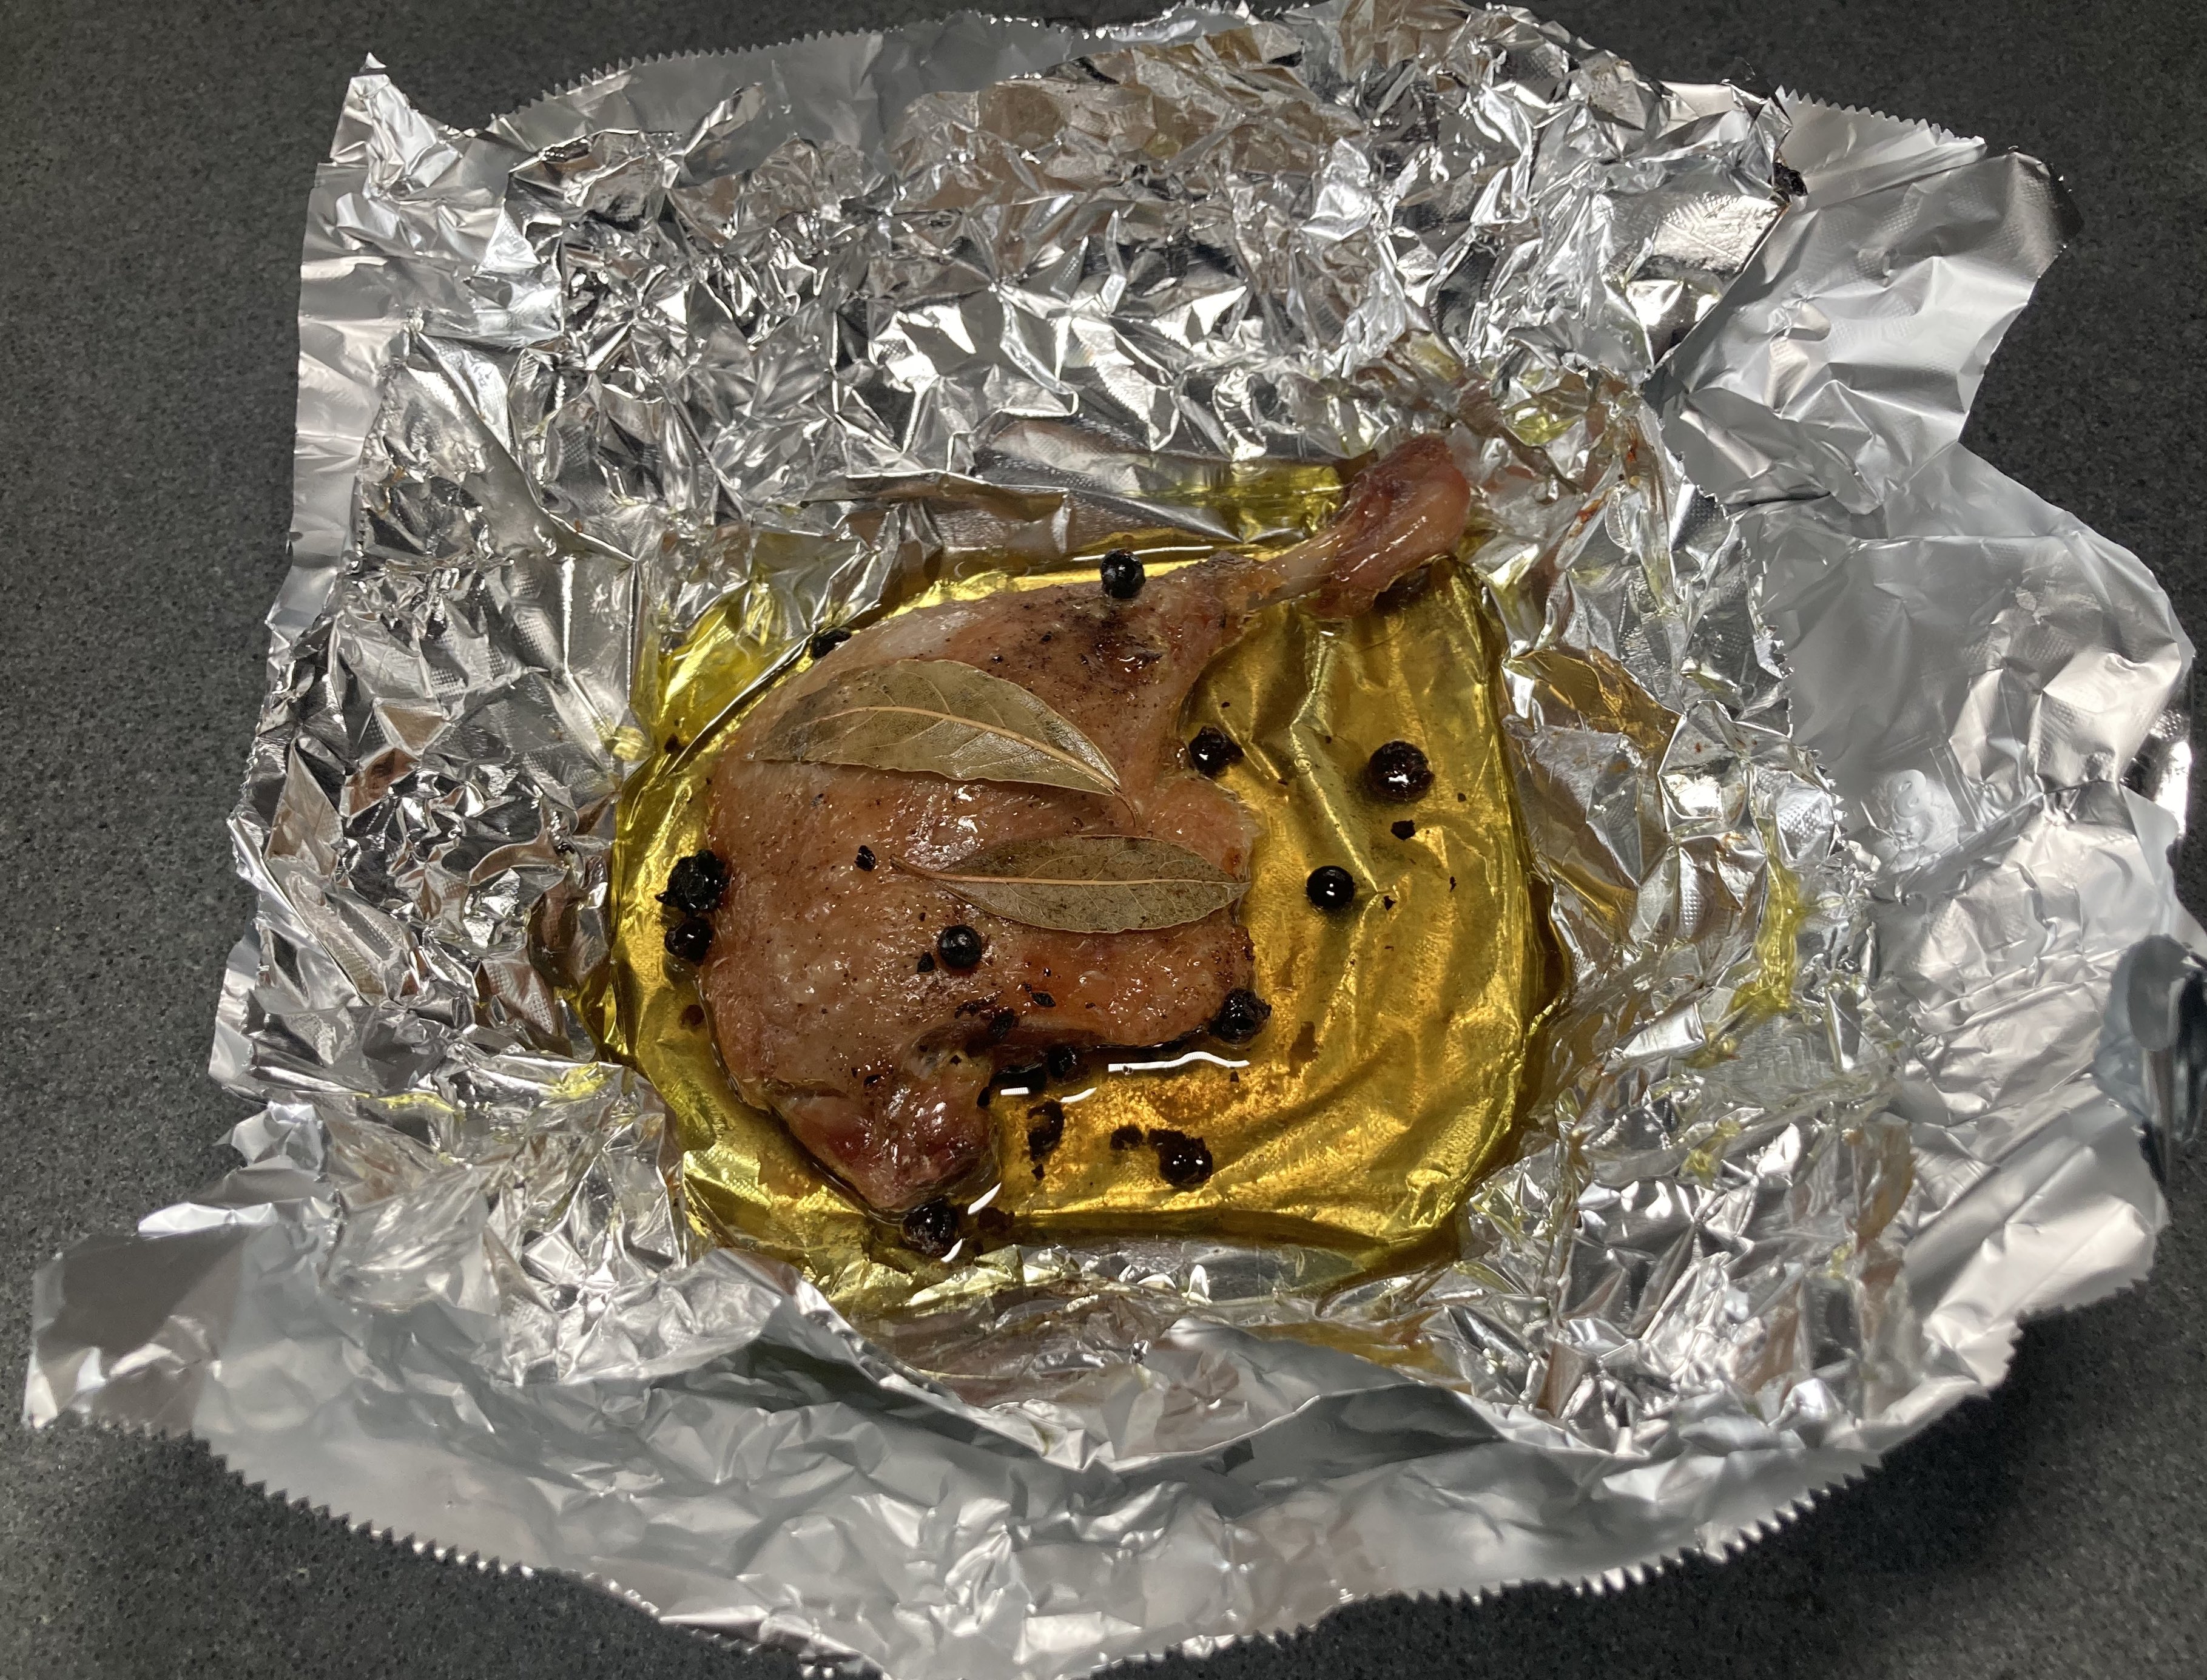
Take a sheet of aluminium foil and place the leg in the middle. Add lightly crushed juniper berries and two bay leaves. Perhaps some crushed garlic. Add a generous amount of olive oil and make sure everything is covered. Wrap foil around the duck. Take a second sheet of foil and wrap it around the package, making sure it’s closed. Repeat with the second leg. Transfer both packages to an oven at 120 °C or 240 °F. After one hour reduce the heat to 100 °C or 210 °F. After in total 4 to 5 hours, depending on the size of the legs, remove the legs from the oven, open the package and let cool. Then transfer to the refrigerator for use later on.

Heat the oven to 200 °C or 390 °F. Put the legs in an iron skillet, transfer to the oven and 15-20 minutes later the legs are ready. If the skin is not yet crispy, use the grill for 2 or 3 minutes.
Another idea is to pull the meat and use it to top a salad.

Mash

The Celeriac Mash: clean and dice the celeriac. Cook in minimum water with a nice slice of lemon until nearly done. Remove the lemon and drain. Add cream. Put on low heat for a few minutes; the celeriac should absorb the cream. When the celeriac is done, use a blender to create the puree. Pass through a sieve. Perhaps add extra lemon or cream. Just before serving add white pepper. Serve with freshly grated nutmeg.

Fish Cakes by Jean Beddington

Jean Beddington: a culinary, passionate creative! She was chef at five restaurants, owned her own successful restaurant, and still is an inspiration to many. One of her motto’s is ‘seemingly simple’, not with the intention to impress but with the intention to surprise and enhance the sensation when enjoying her food and the way it is presented.

Background

In her book Absolutely Jean Beddington she writes about her background, her youth in England, her eagerness to cook, the holidays with her father when they would stay at budget hotels and eat at Michelin Star restaurants, her travels, her years in Japan and her education (she studied Arts and Chemistry). When she moved to the Netherlands, she decided to become a chef, which is the obvious choice for someone with such a talent. She was one of the first to bring new ingredients to the classic French cuisine. For instance, she began using cilantro and yuzu. She was also inspired by the Japanese way of presenting food: beautifully designed and served on a variety of plates. She began doing this when most guests still expected bread and garlic butter at the beginning of their lunch or dinner.

Books

She published several books. One is dedicated to stock: the basis of soups, sauces and dishes. She explains how to make stock and how to create delicious food, for instance green vegetables in stock with couscous, yogurt and harissa sauce. 

Her book Absolutely Jean Beddington is very dear to us. It has three main chapters: the first one is called Glossy with beautifully presented food, the second one is called Real Time with food as you could expect to eat at her restaurant (which is closed, unfortunately) and our favourite chapter is called Daily. Indeed, recipes that are easy to follow and help prepare tasty, wonderful food, every day.

Fish Cakes

We prepared her fish cakes with a beetroot, ginger, apple and onion chutney. The fish cakes are intriguing and the chutney is the perfect accompaniment. Yummy!

Belgian Endive with Cheese Sauce and Ham

When asked for a typical Flemish dish, award winning chef Jeroen Meus immediately mentioned Belgian Endive with Cheese Sauce and Ham.
At home we found the recipe in my mother’s kookschrift, a notebook with recipes she learned as a young woman. She would cook the dish often, typically on a Sunday evening, and serve it with mashed potatoes. Her recipe is fairly straightforward: wash and clean the Belgian endive and cook it for 30 minutes (the recipe is from 1950!) in salted water. Then make a béchamel sauce, add cheese, wrap the endive in ham, spoon the sauce over the vegetables, add butter and breadcrumbs and transfer the combination to the oven for 15-20 minutes. Done!

Actually, her recipe is not very different from how Jeroen Meus prepares the dish. He doesn’t use breadcrumbs and he adds nutmeg and a splash of lemon to the sauce. He suggests steaming or braising the endive.

Most recipes mention removing the bitter core of the Belgian endive. Perhaps that was necessary in 1950, but today’s Belgian endive is not as bitter, so there is no need to do that. Belgian endive must have some bitterness.

Wine Pairing

Enjoy your Belgian Endive with a nice glass of red wine, one with a bite and not too complex. For instance a blend of Cabernet Sauvignon and Syrah from France, a Carmenère from Chili or a Spanish Rioja (Crianza or Joven). 

What You Need

  • For the Endive
    • 4 Belgian Endive
    • 4 slices of Excellent Organic Cooked Ham
    • For the Cheese Sauce
      • 20 grams of Flour
      • 20 grams of Butter
      • Milk
      • 75 grams of grated Cheese (preferably a combination of Gruyère and Emmentaler)
      • optional: one Egg Yolk
    • Nutmeg
    • White pepper
  • For the Mash
    • Root Parsley
    • Parsnip
    • Nutmeg
    • Fresh Parsley
    • White Pepper

What You Do

  1. Chop the bottom of the base of the endive and remove the outer leaves if they don’t look great
  2. Steam the endive or braise in butter. We prefer braising in butter, which may take 30 minutes on low heat. This way you keep all the flavors and the texture. If steamed: make sure you squeeze the endives gently to get rid of the water excess
  3. Make the cheese sauce with flour, butter and milk, adding most of the grated cheese when the béchamel is ready
  4. Add grated nutmeg and white pepper to taste
  5. You could turn it into a classic Sauce Mornay by adding one egg yolk to the sauce
  6. Preheat the oven (200°C or 390 °F). Wrap a piece of ham around each endive and arrange in a shallow baking dish. You don’t want any space between the endive
  7. Spoon the sauce over the endive
  8. Sprinkle remainder of the cheese over the sauce
  9. Bake until golden brown on top, 15 to 25 minutes
  10. We prefer using the grill

For the Mash

  1. Clean and dice the root parsley and the parsnip (ratio 1:1)
  2. Cook quickly in a limited amount of water
  3. When ready, drain and mash using a blender
  4. Add nutmeg and white pepper
  5. Just before serving add lots of finely chopped fresh parsley.

Antonio Carluccio’s Oysters with Bianchetto

Last Saturday we were extremely lucky. Not only did we buy the very first fresh morels of the season, we also bought a small bianchetto. This affordable white truffle is available from mid January to the end of April. It is also called March truffle (marzuolo).

In his book Complete Mushroom Book, Italian chef Antonio Carluccio combines fresh oysters with a white wine sabayon and white truffle: Ostriche con zabaglione e tartufo bianco. The result is spectacular. The combination of the distinct aroma of the white truffle with the oyster is intriguing. The sabayon brings everything together in terms of taste, consistency and structure. And just to show you how clever Carluccio’s combination is: the sabayon in itself is not pleasant. We prepared the dish with bianchetto. Maybe less subtle than when prepared with a white truffle, but the result is nevertheless wonderful.

Wine Pairing

With such a great dish you many want to drink a glass of Chablis or Champagne. We enjoyed a glass of Crémant de Bourgogne, produced by Vitteaut-Alberti. A refined wine, soft and with delicate fruit. The bubbles are small and pleasant.

Oysters a la Carluccio © cadwu
Oysters à la Carluccio © cadwu