Sharing our love for good food and excellent wine with you: mushrooms, sauces, forgotten vegetables, pies and tartelettes. Join us and Cook and Drink with us!
This year seems to be an exceptionally good year for Matsutake. Antonio Carluccio once described it is a much-overrated mushroom but we dare to disagree. Just smell it! Pine, pine, pine. A unique mushroom. We tried making this soup with shiitake, but the result is not as refined, delicate and well-balanced. The key elements are of course the (home-made) dashi, the matsutake and the shrimps. Kamaboko (made from processed seafood) and Mitsuba (Japanese parsley) add colour (and some extra flavour) to the dish.
What You Need
Dashi
0,5 l of Water
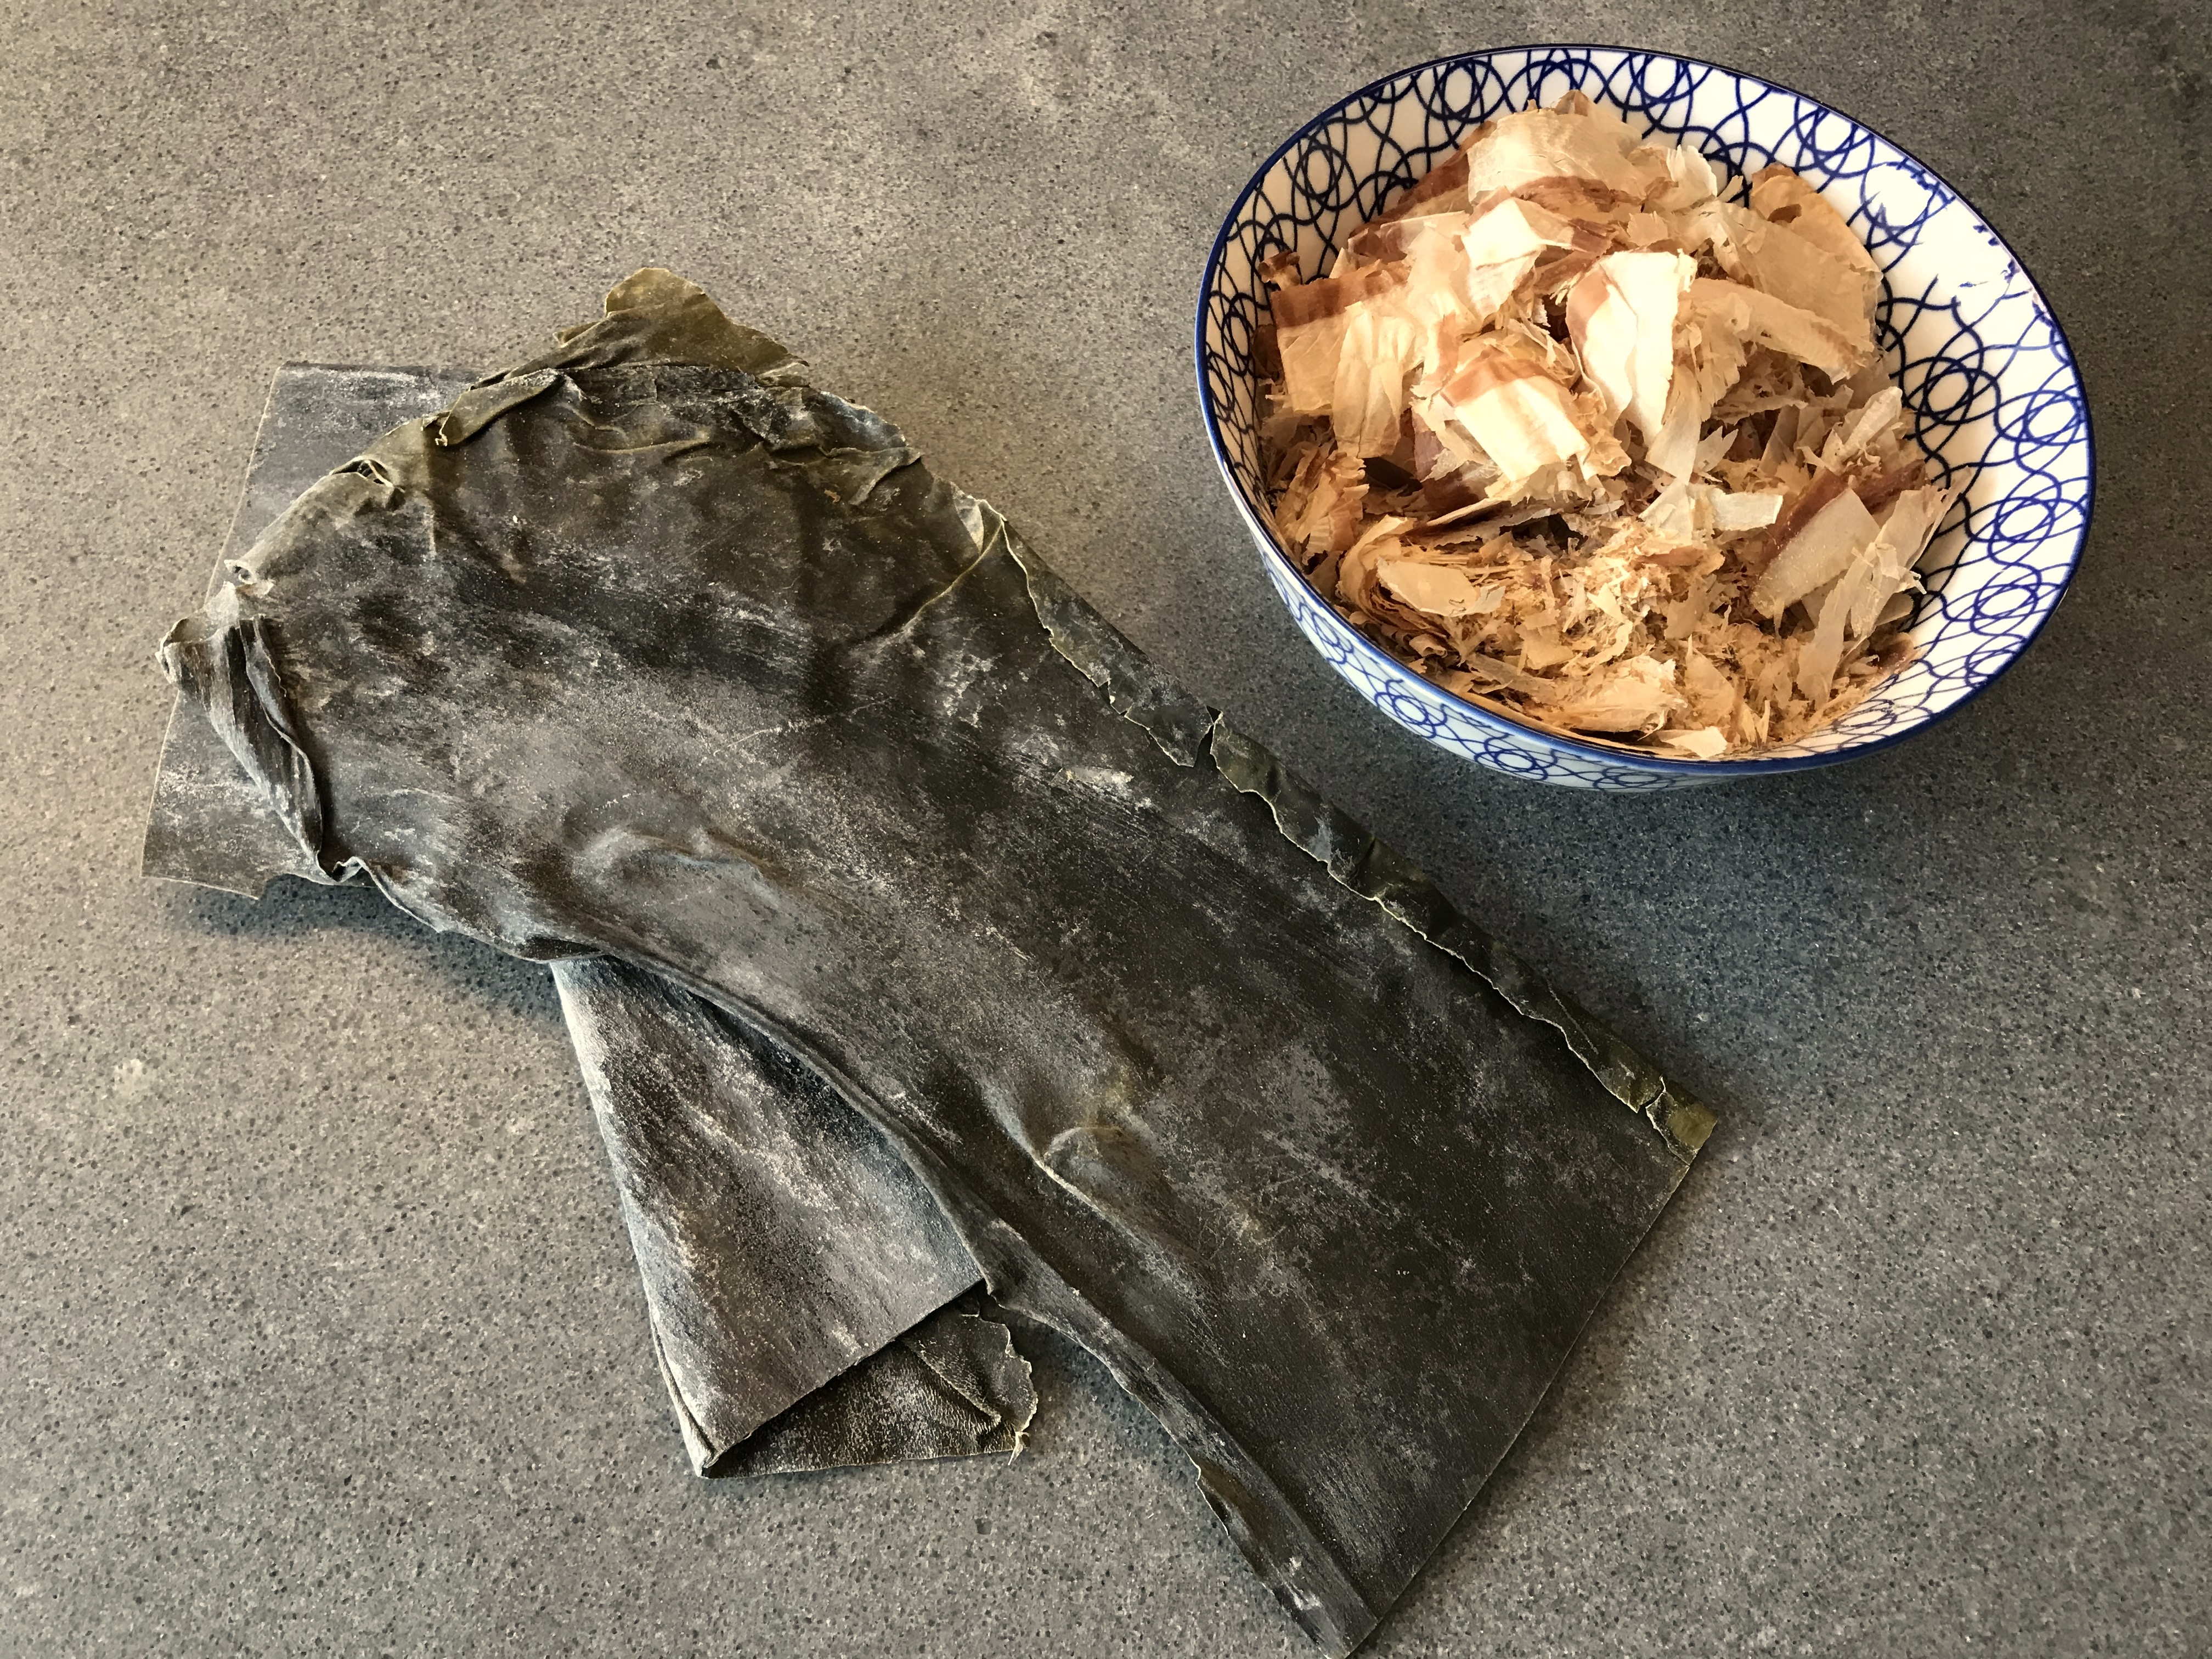
10 gram of Konbu
10 gram of Katsuobushi
75 gram of Matsutake
2 Shrimps
Taru Sake
Light Soy Sauce
Yuzu
Kamaboko
(Mitsuba)
Sake Pairing
If you want to serve a drink with the soup, then serve taru sake. This is a dry sake characterized by its refreshing taste and the wooden aroma of Yoshino cedar. A wonderful link to the matsutake. And if you bought a bottle of taru sake, then please use this sake for marinating the shrimps.
What You Do
With a damp cloth clean the matsutake. Be careful not to remove the skin. The root should be cut like a pencil. Clean the shrimps and cut lengthwise in two. Let marinade in two tablespoons of sake and transfer to the refrigerator for an hour. Gently warm the dashi, add a small tablespoon of sake and a similar quantity (or less) of soy sauce. Cut the matsutake in 8 similar slices and add to the soup. After a few minutes (depending on the size of the matsutake) add four slices of kamaboko and the shrimps. Taste and add some more soy sauce and or yuzu if needed. Serve immediately when the shrimps are ready. If available add some mitsuba.
Partridge is perhaps the most delicate of game birds. They come in two sorts: the red-legged and the grey-legged. The grey-legged ones are more expensive and in general they may be hunted for a few days per year only. In all cases it is best to buy them early in the year (September until mid November). The season is short, so don’t wait too long!
The meat of a partridge is lean and tends to become very dry when preparing it. So what to do? Of course! Put a strip of bacon on each breast and transfer the poor bird to a hot oven. Not really. The bacon will impact the characteristic taste of the partridge which is of course not something you want to do. And placing such a small, lean bird in a hot oven is a massive risk. Just a few minutes too long (simply because something else you are preparing takes a bit longer than expected) and the meat is bone dry. Stuffing the bird doesn’t help, the filling will be moist but the meat will be dry anyway.
The key to an excellent partridge is to be brave enough to use an oven on a really low temperature, meaning the temperature the meat should have when you serve it. Restaurant owner and celebrated Chef Peter Lute introduced this method in the Netherlands.
Another interesting aspect is that, different from many other birds, the legs of the partridge are not that special. They are fairly small and have lots of tendons. So, no bacon, no hot oven and focus on the breast.
Partridge combines very well with a range of vegetables and herbs. The classic combination is with choucroute (Alsace style). We wanted to link our partridge to late summer by combing it with a thyme-courgette cake. Easy to make and full of flavours.
Wine Pairing
A red wine is preferred, one that is not overpowering, with hints of red fruit, a touch of oak and soft tannins. Our choice was a 2016 Shiraz from Australia: the River Retreat Murray Darling Shiraz. Great value for the price.
What You Need
For the partridge
One Partridge
Two Garlic Gloves
Bay Leaf
Butter
Olive Oil
For the thyme-courgette cake
One Courgette
One Egg
Thyme
Parmesan Cheese
Olive Oil
Black pepper
What You Do
Start with preparing the partridge. This means carefully cutting of the two legs and removing the lower part of the back of the bird (the tail bone area, see picture). Warm a heavy iron pan and add butter. Add bay leaf and halved garlic gloves. Coat the bird with butter, making sure you get a very light brown colour. Put the legs on a plate and cover with foil. Now transfer the pan and the plate to a warm oven: 70° Celsius or 160° Fahrenheit. Leave in the oven for 50 – 60 minutes. Since the oven is on the ideal temperature for the meat, it doesn’t really mater if you leave them in the oven for 70 minutes. Remove the two breasts from the bird. Remove the bigger bone from the leg. Coat the meat with the fat from the pan. Transfer to a plate and cover with plastic foil.
Grate the courgette, transfer to a bowl, add a teaspoon of salt, mix and transfer to a sieve. Let rest for at least two hours. Discard the liquid. Wash the courgette with cold water and put the grated courgette in a clean cloth. Squeeze out as much liquid as you can. Beat the egg slightly; mix with the courgette, the grated Parmesan cheese and a generous amount of thyme. Add olive oil to a fairly hot non-sticky pan and start frying the courgette mixture. This takes longer than expected! In the mean time make sure your heavy iron skillet is heated through and through. Flip the courgette cake and fry the other side. In parallel add olive oil to the skillet, and quickly brown the meat. Separate the tenderloin from the breast and remove the fleece before serving the breasts. If all is well you will see a beautiful pink colour, indicating your cuisson is perfect and your partridge as tasty and delicate as possible. Before serving add some black pepper and extra thyme.
For most of us ‘stock’ begins with a combination of fish or meat with vegetables such as carrot, onion, leek and celery together with herbs like bay leaf, thyme and parsley. Dashi, the classic stock from the Japanese cuisine, is very different: it takes between one and four ingredients and takes only 30 minutes to prepare. The ingredients are kelp (kombu), dried small anchovies or sardines, dried shiitake and dried bonito flakes (katsuobushi). The simplest dashi is made from kombu only. Its taste is gentle with a touch of umami. Great vegetarian stock. The best known is awase dashi and it’s made from kombu and katsuobushi. This one is the basis for Oden, miso soup and many other dishes. It’s also the basis of our Dashi with Matsutake and Shrimps and for Dashi with Nameko and Shrimps. If you add a splash of dashi and some Japanese mustard (karashi) to your mayonnaise you can make your own Japanese mayonnaise.
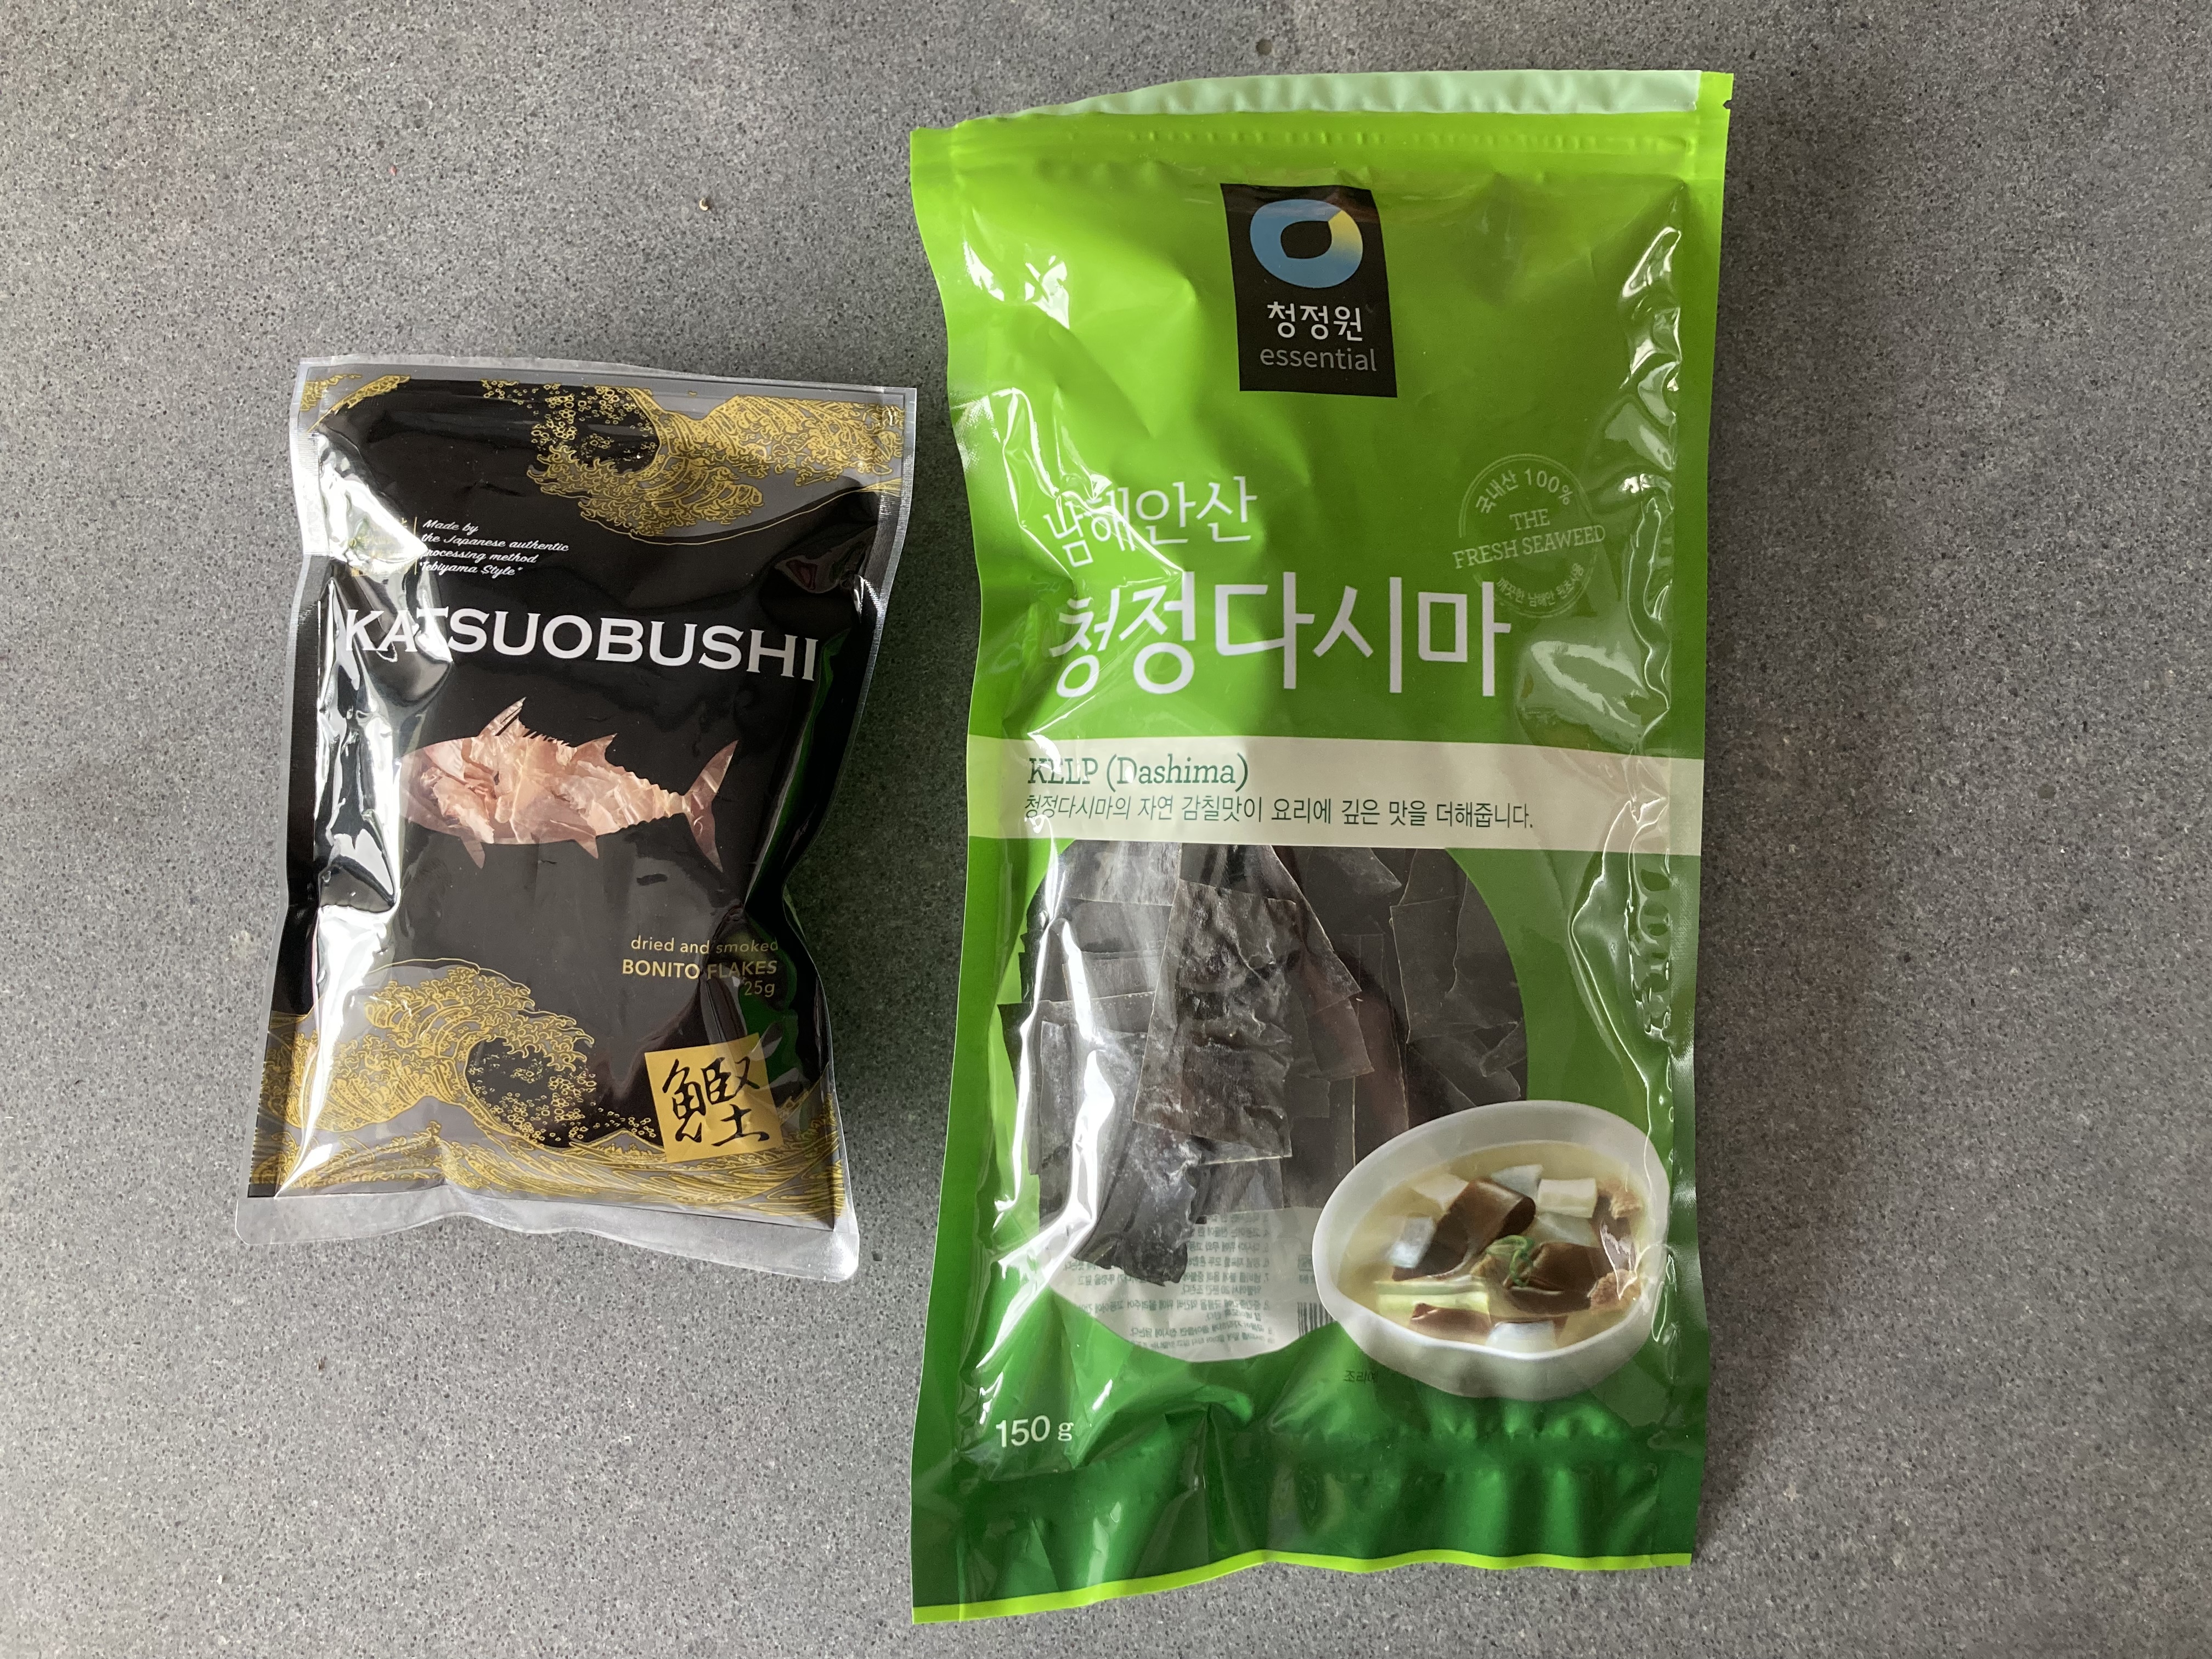
Katsuobushi is made from bonito or tuna. It’s a complex and time-consuming process, so don’t be surprised to pay between € 10,00 and € 15,00 per 100 gram. For one litre of dashi you only need 20 gram, so don’t worry too much about the costs. And you can make a ‘second’ dashi by repeating the process with the same kombu and katsuobushi.
A true Japanese chef will begin her or his day with shaving katsuobushi. We simply buy shaved katsuobushi. It comes in bags of 25 or 40 grams.
What You Need
1 liter of Water
20 gram of Kombu
20 gram of Katsuobushi
What You Do
With a wet cloth gently clean the kombu
Put the kombu in the cold water and heat slowly to 80° Celsius or 175° Fahrenheit
Take you time!
When the temperature has reached 80° Celsius or 175° Fahrenheit, remove the kombu (and store for using it for a second dashi)
Bring the liquid to the boil
Immediately reduce heat
Add the katsuobushi
Bring to a boil
Immediately remove from heat
Let sit for 10 minutes or so until the katsuobushi has sunk to the bottom
Pass the liquid through a sieve
You can also use a clean cloth, but don’t squeeze it. You want a clear broth
The dashi can be used immediately, stored in your refrigerator for a few days or kept in the freezer for a few weeks (not preferred)
This year the University of Amsterdam will award the prestigious Johannes van Dam price to Alain Passard, the French chef who showed that vegetables can be the centrepiece of your meal. In 1986 Alain Passard opened his restaurant Arpège in Paris and ten years later he obtained a third Michelin star. He published a number of great books, for instance In the Kitchen with Alain Passard (a graphic novel) and The Art of Cooking with Vegetables.
In this dish we simply combine a variety of seasonal vegetables into an inspiring side dish. Some of the vegetables are known as ‘forgotten’ vegetables. And although some are forgotten for a very good reason, you will find most forgotten vegetables very tasty and colourful. This dish will allow you to taste the individual and combined flavours. Don’t worry if you have some left over: it’s even better the next day.
Wine Pairing
A simple full-bodied red wine will work very well with the dish.
What You Need
Parsley Root
Turnip
Sweet potato
Truffle potato
Jerusalem Artichoke
Red and Yellow Beetroot
Black Carrot
Parsnip
Rosemary
Thyme
Olive Oil
Black Pepper
What You Do
You don’t need all of the above, but make sure you have a nice variety. Wash and clean the vegetables. Peel the vegetables if so required, but don’t peel the truffle potato. Slice it, this way you will be able to see the great pattern of the potato later on. Cut the other vegetables in chunks, making sure they are all of similar size. Sprinkle generously with olive oil, making sure everything is nicely covered. Add a bit more if in doubt. Add sprigs of thyme and rosemary. Heat the oven to 180° Celsius. Put in the oven (upper half) for 60 minutes or longer. Mix after 15, 30 and 45 minutes. You may want to increase the heat to add a nice golden color to the vegetables. Remove sprigs and serve with black pepper. Please note there is no need to add onions or garlic. The combination of vegetables, herbs and oil should do the trick.
This starter is easy to prepare and simply delicious, provided you have the best quality ingredients: fresh tuna, tasty sesame seeds, sesame oil and pickles. Japanese sesame oil is made from roasted sesame seeds. As with olive oil the best sesame oil is ‘extra vierge’ so the oil is extracted from the seeds using pressure only. We used oil produced by La Tourangelle, a company specialised in gourmet oils. Think Walnut oil, Hazelnut, Almond, Pistachio, but also Coconut and Avocado oil. As always, this sesame oil is more expensive than the usual sesame oil, but the difference in taste is impressive. A few drops of this wonderful sesame oil work perfectly with the tuna and the lightly toasted sesame seeds. Pickled cucumber is a great addition to this dish; it comes with a bit of ginger, sesame seeds (!) and a light acidity. Not difficult to make, but buying it is fine too.
Sake Pairing
The world of sake is a complex one. We decided to drink a glass of Yamato Shizuku, Junmai Gingo. The production of sake is labour intensive and it very much depends on the quality of its four main ingredients (rice, koji, yeast and water) and the skills of the brewers. Junmai means that only these four ingredients were used and Ginjo means that the sake was made with carefully selected products and that more or less traditional techniques were used. In most cases sake is produced in Kobe; this one however is from the northern part of Honshu. This sake is light, yet it still has a bit of umami. The taste is refreshing, floral and mineral with a clear but pleasant presence of alcohol (15,5%). It works wonderful, with the fish, the sesame and the pickles.
What You Need
Small piece of Tuna (125 gram)
White Sesame seeds
Olive Oil
Sesame Oil
Pickled Cucumber
What You Do
We want the tuna to be red on the inside and the sesame seeds gently roasted. Best is to buy a fairly thick slice of tuna and make sure it’s cold. Dry the tuna with some kitchen paper, coat both sides with the sesame seeds and fry in oil in a hot non-sticky pan. Keep it moving. Monitor the side of the slice. Turn the tuna when you see the beginning of a crust. Ideally the sesame seeds are now light golden brown. When ready, quickly transfer to a cutting board and slice. Put on a warm plate, drizzle some excellent sesame oil over the tuna and garnish with pickled cucumber.
Obviously Breast of Duck is great when combined with an orange sauce (or even better, with Mandarine Napoléon). Or combined with a Green Pepper Sauce, or with hoisin, soy sauce and five-spice powder (as used for Peking Duck). We combine the duck with fresh ginger (a bit spicy, but since the ginger is cooked in the sauce it will be very mild), yuzu (citrus fruit originaly from Japan, Korea and China) and sweet mirin and soy sauce. The cabbage comes with tamari and sesame oil, so this dish is full of wonderful flavours. Have we mentioned the pickled cucumber?
Wine Pairing
You could combine the duck with white wine, provided it has lots of character, for instance a Gewürztraminer. A red wine is the more obvious choice: a rich, warm Carignan will do nicely. The wine needs to combine with the richness of the dish and of course the sweetness of the soy sauce and the mirin. Duck is somewhat sweet in its own right and the sauce amplifies this. The wine should be fruity (plum), spicy and definitely not too woody.
What You Need
1 Breasts of Duck (250 grams)
Soy Sauce (we prefer the version with less salt)
Mirin
Yuzu
Ginger (fresh)
Water
What You Do
Check the breast of duck for remainders of feathers
Remove the vein on the meat side of the breast (and the odd membrane you don’t like)
Put on a dish, cover and transfer to the refrigerator
Leave in the refrigerator for a few hours, making sure it’s nice, firm and cold. We want crispy fat, so we need to fry the meat relatively long. In order to get the right cuisson, we start with cold meat (so not your normal room temperature).
Fry the duck in a hot, non-sticky skillet for 12 minutes on the skin side
Reduce the heat after a few minutes. You don’t need oil or butter, the duck fat will do the trick
Flip and fry for 2-3 minutes on the other side
Remove from the pan and cover the meat with aluminium foil in such a way that the crispy skin is not covered. The foil should only cover meat
You may want to remove some fat from the pan
Add water (2 tablespoons) and a generous amount of grated ginger (let’s say 3-4 centimeter), stir, add mirin (2 teaspoons) and soy sauce (1 tablespoon)
Keep warm
Add liquid from the duck to the sauce
After 10 minutes or so the ginger should be soft and the flavours integrated. If not, just give it a few more minutes
Remove the breast from the foil and slice
Make sure that any liquid left is added to the sauce
Quickly stir the sauce, add a bit of Yuzu (1 teaspoon) to bring acidity to the sauce, heat a bit more, dress on a plate and put the slices of duck on top of it.
PS quantities of soy sauce, yuzu and mirin may vary depending on the brand, sweetness, saltiness and the quality of the meat
Serve with…
Vegetables
Oxheart or Chinese Cabbage
Olive Oil
Tamari
Sesame Oil
Rice
Whole Grain Rice
Pickled cucumber
Grate the cabbage. Fry in a warm skillet in some olive oil. Add some tamari. Taste and adjust if necessary. Before serving add some excellent sesame oil. In parallel cook the rice and add some chopped pickled cucumbers to the rice.
A few months ago we shared a recipe of no-knead bread, based on the recipe courtesy of Jim Lahey, owner of Sullivan Street Bakery, New York. It was published in the New York Times in 2006 and can also be found in his book My Bread. It takes a bit of planning but preparing no-knead bread is simple and straightforward with a great result. We truly love it. The recipe is based on slow rise fermentation. With only one gram of yeast in combination with 18+2 hours of rest, the yeast will do a wonderful job. The dough will be perfect. And kneading, as you would expect, is not required.
UPDATE – Talmière
Recently when enjoying the luxury of having a classic French bakery around the corner of our holiday apartment, we explored a range of beautiful French bread. One of these was the Talmière. It is enriched with various seeds, such as poppy seed, linseed, sunflower seeds and sesame seeds. Sometimes honey is added. The Talmière came with a beautiful crust and a rich taste. The bread is a bit compact compared to the usual Baguette or Tradition, probably as a result of the seeds in the dough. We combined our ingredients with blue poppy seed and brown linseed. Our best bread ever?
What You Need
430 gram of Flour (we use 200 gram of Whole Grain Flour and 230 gram of Plain White Flour of French T65 Flour)
25 gram Blue Poppy Seed
30 gram Brown Linseed
1 gram Instant Yeast
4 gram Salt
355 grams Water
Additional All Purpose Flour
Bran
What You Do
The easiest way is to read and follow the recipe and video as provided by the New York Times. Or if you feel confident: mix flour, seeds, yeast and salt. Add water and create one mixture. Let rest in a bowl covered with foil for 18 hours. Dust your worktop with a generous amount of additional flour. Remove dough from bowl and fold 4 times. Let rest on a towel also generously dusted with flour and bran for 2 hours. Heat your oven to 230˚ Celsius or 450˚ Fahrenheit. Make sure the pot is also hot. We used a 20 cm Le CreusetCast Iron Round Casserole.Put the dough, seam side up, in the pot, close it and bake for 30 minutes. Remove the lid and bake for 15 minutes until it is nicely browned. Let cool on a wire rack for at least an hour before slicing you no-knead with blue poppy seeds and brown linseed.
Mai Take (Hen of the Woods) is originally a mushroom from Japan and China. The Mai Take is known as a medicinal mushroom (but we’re not sure what it is supposed to cure; we just love the texture and the taste!). It can be wild or cultivated. One of our favourites is a salad with Mai Take, Shrimp, Crab, Coquilles St Jacques, Coriander, Dill and Parsley, created byAntonio Carluccioand published in 2003 in the Complete Mushroom Book. Go to your local bookstore and buy it! The book has a wealth of wonderful, simple recipes.
Bavette is beef from the flank. Other names are Flap Meat, Sirloin Tip and maybe Hanger Meat. Bavette (and other meat from the flank) is often used for stewing and poaching. Not many know it is actually very tasty and great when eaten saignant. Plus it’s not expensive at all. It is however hard to find because most butchers will use it for stews and assume their customers are not interested in it. If your butcher is a real butcher (so one that buys a complete animal and not just vacuumed bits) it’s a matter of asking. Thyme is an essential element in the dish because it brings Bavette and Mai Take together. It’s not just a bridge between the two, it envelopes them.
Wine Pairing
We enjoyed our bavette with a glass of Verdarail, a rich wine from the south of France, with lots of red and black fruits. Spicy. A wine with a long finish and well-integrated tannins.
What You Need
Bavette
100 gram Mai Take
Olive Oil
Butter
Thyme
Black Pepper
What You Do
We’re not the world greatest carnivores. Bavette has an intense taste, so we would recommend 100 grams per person maximum. The bavette must be room temperature. So take it out of the refrigerator let’s say 2 hours in advance. Heat a heavy iron skillet, add olive oil. Fry as you would do a normal steak, but significantly longer. We fried our 214 gram of bavette for maybe 6 minutes. Agreed, you think your lovely bavette will be overcooked, but it will be fine. Ad some butter towards the end to coat the meat. Arroser and turn frequently. Check the firmness of the beef. As soon as you feel it becomes firmer, transfer to a plate and allow to rest for 15 minutes. The Mai Take need a few minutes only. Fry them gently in the same pan. You may want to add some of the juices of the bavette. Slice the bavette and serve with the Mai Take, a generous amount of fresh thyme and black pepper.
In October 2016 Jamie Oliver was criticised for making paella thewrong way. He dared adding chorizo to one of the most Spanish dishes ever. Paella should be made with rabbit, snails, chicken, beans, saffron and rice. How dare he insult all of Spain by adding chorizo to his Paella? Naked chef or not, ambassador of healthy food or not, no one touches Paella.
Rape a la Marinera is among our favourites because it’s all about monkfish, which is such a tasty fish. The monkfish is presented with a generous tomato sauce, large shrimps, vongole and bread. What better way to enjoy life!
In this recipe we will probably do a few things very wrong, but never mind, simply don’t tell your Spanish friends.
Wine Pairing
We very much enjoyed a glass of Spanish Verdejo. In our case a bottle of MonteabellonRueda. In general wines made from the Verdejo grape combine very well with fish. The wine comes with the right acidity, giving freshness to the wine. It has floral aromas typical for the Verdejo grape. You may recognize the aromas of banana and exotic fruit.
What You Need
Monkfish
Olive Oil
Optional
Bay Leaf
Saffron
4 Large Shrimps
Vongole (clams, Vongola Veraci)
White wine
Bouquet Garni
What You Do
The day before serving Rape a la Marinera make the tomato sauce.
Start by cleaning the monkfish and remove the skin where necessary. Clean the shrimps by removing the intestinal tract. Leave the head and the tail. Check the vongole and discard ones that are broken. In general vongole don’t need much cleaning. Vongola Verace are tasty, slightly sweet and juicy; great for Spaghetti Vongole and Rape a la Marinera. In a large skillet fry the monkfish. When coloured add the sauce. Gently heat the sauce and cover the fish with it. Baste (arroser) and continue to do so. In parallel add some wine to a pan with a bouquet garni and let gently cook for 5 minutes. Now it’s about timing! Add the raw shrimps to the pan with the monkfish, cover the shrimps with the sauce, continue basting both the fish and the shrimps. Add the vongole to the pan with the white wine. Cook quickly until open. Add some of the cooking juices of the vongole to the tomato sauce, mix, taste and add a touch of pepper. Serve the vongole on top of the monkfish and shrimps. Serve with crustedbread.
A glass of white wine, perhaps a glass of Crémant d’Alsace or maybe even a glass of Champagne; such a great way to start dinner (or lunch when you feel like treating yourself). You enjoy some bread with homemade Tapenade, or a few nice olives. All good. And then suddenly the chef presents you her or his Amuse-Bouche. Something very special and an indication of the chef’s talent. But in most cases it’s something on a spoon and not very special.
A bit of background: amuse-bouche is actually not a French term. Restaurateurs made it up because they think amuse-gueule (the correct term) is a bit harsh. ‘Gueule’ can refer to both humans and animals. And ‘ferme ta gueule’ is far from polite. So restaurateurs started using ‘bouche’, to eliminate the impression that they think their guests have a snout.
Some say the concept of the amuse was invented by the Nouvelle Cuisine in the 1960s. Not really. In 1946 Francis Ambrière, in his book Les Grandes vacances, writes “… Une côtelette à midi. Quelques amuse-gueule à l’heure du goûter. Et le soir, ô splendeur, un gigot bien saignant, le premier gigot depuis l’an 40!”
Today’s amuse-gueule is a dish in its own right that amuses the mouth, fools your appetite and makes you want to start on the first course. Small, tasty, full of flavours and maybe a bit out of the ordinary.
We use a traditional coddler for this amuse-gueule, but you could also use a small ramequin. No spoon, please.
Wine Pairing
Typically the amuse-gueule is combined with your aperitif. We combined this amuse gueule with a glass of German Sekt, to be more precise with a glass of Reichsrat von Buhl – Pfalz – Sekt – Spätburgunder Brut rosé 2016, which is a superb pale pink wine, made from 100% Pinot Noir and produced by one of the leading wineries in Germany. Think red berries, brioche, a delicate texture with a nice mousse, fresh acidity and a long-lasting aftertaste.
What You Need (for 4)
One Egg
Four Medium Sized Raw Prawns
75 grams Spinach
½ Shallot
A Generous Tablespoon of Crème Fraiche
Dill
Blue Cheese
Chives
4 Edible flowers
What You Do
Start by cleaning the prawns, removing the head, the shell and the vein. We used Argentine red shrimps. The meat is fairly soft and they become beautifully red when cooked. Fry the shrimps is some olive oil for 3 minutes. Remove the shrimps from the pan, set aside and let cool. Gently fry the shallot in the same pan for 10 minutes until glazed. Remove from the pan and let cool. In a different pan quickly cook the (dry and clean) spinach in some olive oil. Keep stirring! Drain if so required, set aside and let cool. Cut the prawns in smaller bits. Chop the spinach using a large knife. Whisk the egg until completely smooth. Now add the (cool) bits of prawn, the spinach and the shallot. Whisk with a spoon. Add the Crème Fraiche. Add some chopped dill (depending on your taste), a bit of blue cheese (not too much, just to add a dimension to the dish) and a generous amount of chives. Mix. Coat the coddlers or ramequins with butter. Add the mixture to the coddlers or ramequins. Heat your oven to 170° Celsius (or 340° Fahrenheit). Place the coddlers or ramequins in a shallow dish. Add boiling water up to 2/3 of the height of the coddler or ramequin. Close the oven and reduce the temperature to 120° Celsius (or 250° Fahrenheit). After 30 minutes au bain marie your amuse-gueule should be ready. Test with a needle. Let cool. If using a coddler, remove and dry the lid, add the flower and close.