Small-Spotted Catshark with Tomatoes

Once in a while your fishmonger will have small-spotted catshark, also known as lesser-spotted dogfish or rock salmon. Popular in Portugal (pata-roxa), less so in many other countries. It’s a very common shark, not endangered, it doesn’t have bones (sharks have a cartilaginous skeleton), it’s tasty and the texture of the meat is moist and pleasant. So why isn’t it more often on our menu?

We think the taste is very delicate so be careful withs herbs and spices. The structure of the meat made us think of monkfish. We know that some chefs compare catshark with sea eel, but that’s a big mistake as far as we are concerned. Catshark is much more refined.

Skinning a catshark requires special equipment, so the shark on sale is already skinned and cleaned, making it even more easy to prepare.  It looks a bit like a tube, long and round. Cut in chunks and start cooking!

Wine Pairing

The flavour and aroma of this dish are gentle. A not too complex, dry white wine with some acidity or a Provence rosé will be great with the cat shark stew.

What You Need

  • 200 grams of Small-Spotted Catshark
  • 2 ripe Tomatoes
  • 1 Red Bell Pepper
  • 1 Shallot
  • 1 Garlic Glove
  • Capers (in Brine)
  • A few Small Black Olives
  • Bouquet Garni (Thyme, Bay Leaf, Parsley)
  • Black Pepper
  • Olive Oil

What You Do

Clean the bell pepper, cut in large chunks and grill for 10 minutes until charred. Transfer to a small container, close it and leave for a few hours. Remove the skin of the bell pepper and dice. Clean the tomatoes, remove the seeds and dice. Chop the shallot and the garlic. Heat a pan, add olive oil and fry the catshark for a few minutes. Remove from the pan and keep warm in the oven at 50 °C or 120 °F. Add the shallot, fry gently on reduced heat, add the garlic, wait for one minute, add the tomatoes, half of the bell pepper and the bouquet. Allow to simmer for 5 minutes. Add the shark to the pan and allow to stew for 20-30 minutes, depending on the size of the fish. Five minutes before serving add the olives and the capers. Remove the bouquet.

Small-Spotted Catshark ©cadwu

Oyakodon

Hope you enjoyed Netflix’s The Makanai: Cooking for the Maiko House as much as we did. Two friends (Kiyo and Sumire) move from rural Japan to Kyoto, following their dream of becoming maiko’s. Once in Kyoto it turns out that their dreams are very different. Kiyo is passionate about food and becomes the person to prepare the makanai, the food for the people living in the Maiko house. Every episode shows Japanese food, from dumplings in red bean soup to baked sweet potato and onigiri (rice balls).

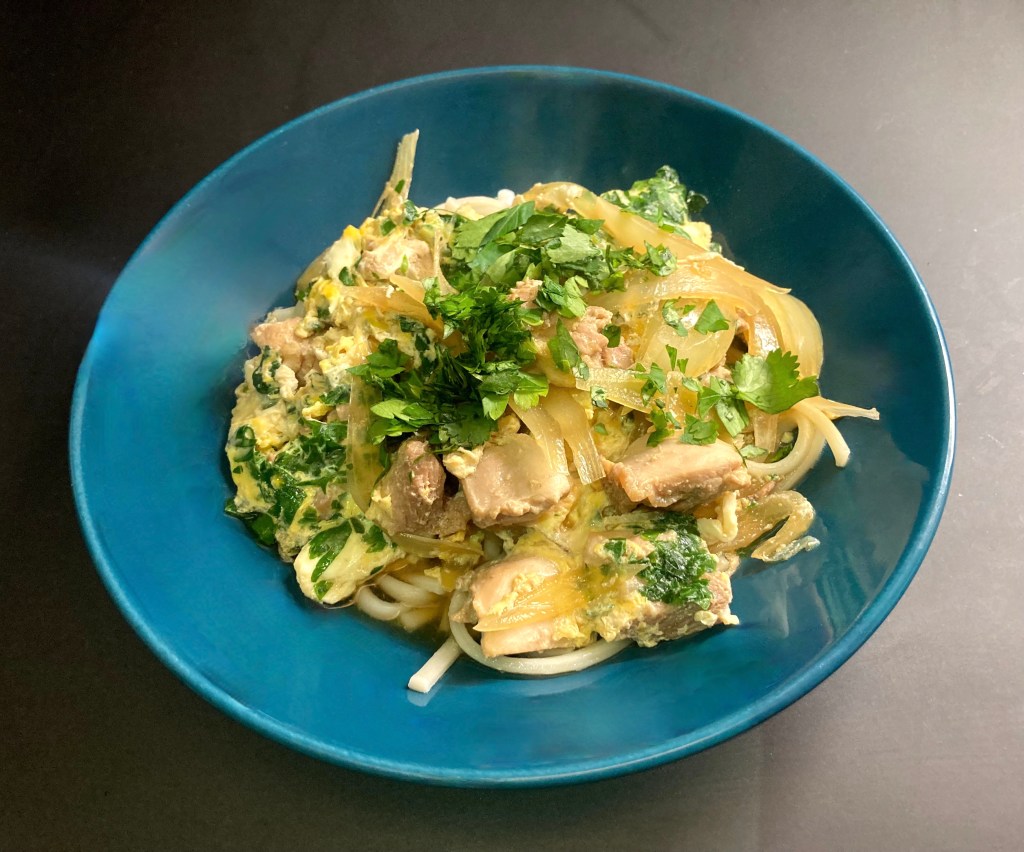
The first dish Kiyo prepares for the house is Oyakodon, a rice dish with egg and chicken, a popular dish in Japan. Easy to make, nutritious and the flavours and aromas are very satisfying. On Cooking With Dog you’ll find a helpful video showing you how to make Oyakodon. 

San Francisco based chef Namiko Hirasawa Chen (founder of Just One Cookbook, an award winning blog about food) was brave enough to cook all the food shown in the series. Obviously you’ll find all makanai recipes on their website.

What You Need
  • 100 grams of Chicken Breast (skin off)
  • 1 medium White Onion
  • 2 Eggs
  • 100 ml Dashi
  • 2 tablespoons Mirin
  • 2 tablespoons Soy Sauce
  • Mitsuba (or a mix of Parsley and Cilantro)
  • Rice
What You Do
  1. Make sure your dashi is full of flavours, perhaps a bit stronger than usual
  2. Make a broth with mirin and soy sauce
  3. Peel the onion and slice from top to bottom (banana shaped slices)
  4. Chop the chicken breast in comfortable slices
  5. Add the onion and the chicken to the broth, cover the pan with a lid and cook until nearly done
  6. Add half of the mitsuba (or the combination of parsley and cilantro)
  7. Add the eggs to a bowl and lightly beat the eggs but don’t mix. You should be able to distinguish the white and the yolk easily
  8. Add the first half to the broth and use chopsticks to distribute the combination in the pan
  9. Wait for a few moments and add the second half
  10. Serve over a bowl of warm rice
  11. Decorate with mitsuba.
PS

Perhaps you noticed that we used udon for our oyakodon, basically because we love udon, but it should be served with rice. Most (all?) recipes suggest adding sugar. We think the mirin brings sufficient sweetness to the dish, but feel free to add just a bit of sugar.

Artichokes Roasted In the Oven

We love artichokes, as a salad, stuffed, with pasta, always a treat. We saw young, small, purple artichokes on the market and decided to take a different approach. Let’s roast them in the oven with lots of fresh thyme, rosemary and bay leaf.
The bitter, nutty taste of the artichokes was clearly present, and it was delicious in combination with the mouthfeel (the olive oil) and the aromatic herbs. Compared to steamed artichokes the roasted ones come with stronger but not too strong flavours.

The artichokes were clearly young because there was no centre choke (the hairy part), which meant that we could eat most of the artichoke, including the stem.

Wine Pairing

Normally pairing artichokes and wine is a real challenge. According to various researchers this is due to cynarin, a chemical especially found in the leaves of the artichoke. When the wine and the cynarin meet in your mouth, the natural sweetness of the wine is enhanced, making it taste too sweet. Meaning you must pair artichokes with a bone-dry, crisp, unoaked white wine with clear, present acidity. Roasting the artichokes in the oven seems to reduce the impact of the cynarin. We suggest serving the artichokes with a medium bodied, dry red wine, not too complex. Could be Merlot, perhaps Malbec or Carménère.

What You Need

  • Young, Small Artichokes
  • One Garlic Clove
  • Fresh Thyme, Rosemary and Bay Leaf
  • One Lemon
  • Olive Oil

What You Do

Heat your oven to 150 °C or 300 °F. Press the lemon and add the juice to a bowl of cold water. Slice the artichokes lengthwise in two. Add them to the water. Check if they have a centre choke. If so, try to remove. Let the artichokes soak for a few minutes. In the meantime peel the garlic and chop, coarsely. Add a generous amount of olive oil to your baking dish, dry the artichokes somewhat, add them to the dish, add the garlic, the sprigs of thyme and rosemary, the bay leaf. Mix. Sprinkle with more olive oil. Cover with aluminium foil and transfer to the oven for 15 minutes. After 15 minutes increase the temperature to 180 °C or 355 °F. Leave for 30 minutes. Check if the artichokes are ready. The trick is simple. If you can remove a leave without too much trouble, they are ready, if not, give them 5 more minutes. You could also check the stem, it should be soft. Remove the foil and leave in the oven for another 5-10 minutes. In parallel fry some merguez sausages.

PS

Artichokes require eating with your hands. Given the olive oil you may need an extra napkin or two.

Cod Cheeks

Cod has been a popular fish for hundreds of years. Much appreciated for its taste and structure. Its popularity unfortunately also means it has been heavily overfished. During the nineties the population dropped significantly. Thanks to various restrictions, cod is slowly on its way back to recovery, especially in the Northeast Atlantic Ocean, although it is still on the red list in many countries. Sea Food Watch provides a very helpful buying guide.

When you buy cod, in most cases you buy cod fillets. But what happens to the remainder, what happens for instance to the head? You could roast it in the oven, you could use it to make stock (don’t forget to remove the skewers), in some countries dried cod heads are appreciated as a delicacy, but in reality, most fish heads seem to end up in animal food or biofuel.

Recently our fish monger surprised us by selling cod cheeks, an absolute delicacy. They are moist with a firm structure and have a delicate taste. Great to combine with parsley, capers and lemon. Or make a batter with beer, flower and egg, coat the cheeks and fry them in oil at 180 °C or 360 °F.

Wine Pairing

A medium bodied white wine will do very well in combination with the Cod Cheeks, for instance an unoaked Chardonnay or Chenin Blanc. We enjoyed a glass of Clin d’Oeil, Saumur Blanc from the Loire region in France produced by Les Vignobles Edonis. It’s a dry wine with clear acidity, fruit, green apples, some minerality and length.

What You Need

  • 200 grams of Cod Cheeks
  • All Purpose Flower
  • Egg
  • Bread Crumbs
  • Butter
  • Pepper
  • Tartar Sauce

What You Do

  1. Carefully remove the skin and white membranes of the cod cheeks
  2. Separate the egg, whisk the egg yolk
  3. Heat a pan and add butter
  4. Dry the cod cheeks with kitchen paper, dust with flower, then dip in the egg yolk and coat with bread crumbs
  5. Fry until golden
  6. Add some black pepper and serve on a warm plate
  7. A dish to share!
PS
  • Make your own bread-crumbs by using old, stale but originally very tasty bread. Obviously, we use our home-made bread.
    Toast the bread and let cool. Cut in smaller bits and then use a cutter or blender to make the crumbs. They keep very well in the freezer, so best to make in advance, when you have some left over bread.
  • Make your own tartar sauce by combining mayonnaise, pickles, lemon juice, capers, dill and Dijon mustard.
Cod Cheeks ©cadwu
Cod Cheeks ©cadwu

Dorade

The Gilt-Head (Sea) Bream, better known as Daurade, Dorade (Royale) or Orata is a popular fish in France, Greece, Italy, Spain and many other Mediterranean countries. Delicious when stuffed with herbs such as thyme, rosemary or marjoram, grilled and served with a slice of lemon. The firm, juicy meat is aromatic and a culinary treat.
Serving a whole fish can be a bit uncomfortable. You must remove the head, dissect the fish and look carefully for hidden bones. Serving a fillet makes enjoying fish much easier. The downside is that a fillet is less tasty and perhaps a touch dry. When you buy a fillet, make sure it’s fresh and enjoy it the same day.
We combine the Dorade with typical Mediterranean ingredients. A combination that is both light and tasty.

Wine Pairing

The dish is full of flavours, so we would suggest a glass of Spanish Verdejo or Italian Custoza. In general you’re looking for a full, fragrant dry white wine with a fruity aroma and a round, long, full and dry taste.

What You Need

  • 200 grams of Dorade Fillet
  • 2 ripe Tomatoes
  • 1 Garlic Clove
  • Capers (in brine)
  • Basil
  • Black Pepper
  • Olive Oil

What You Do

Remove the pits from the tomato and dice. Chop the garlic. Coarsely slice the capers. Add olive oil to the pan, heat the garlic for a few seconds, add tomatoes. Leave for a few minutes, add the capers. Taste and adjust. One minute before serving add half of the basil. Add black pepper.
In parallel fry the dorade until golden. Serve on a hot plate and add the remaining basil.
PS When you use salted capers, wash these thoroughly to remove the salt. You need lemon juice to get the right acidity.

Dorade ©cadwu
Dorade ©cadwu

Tomate aux Crevettes

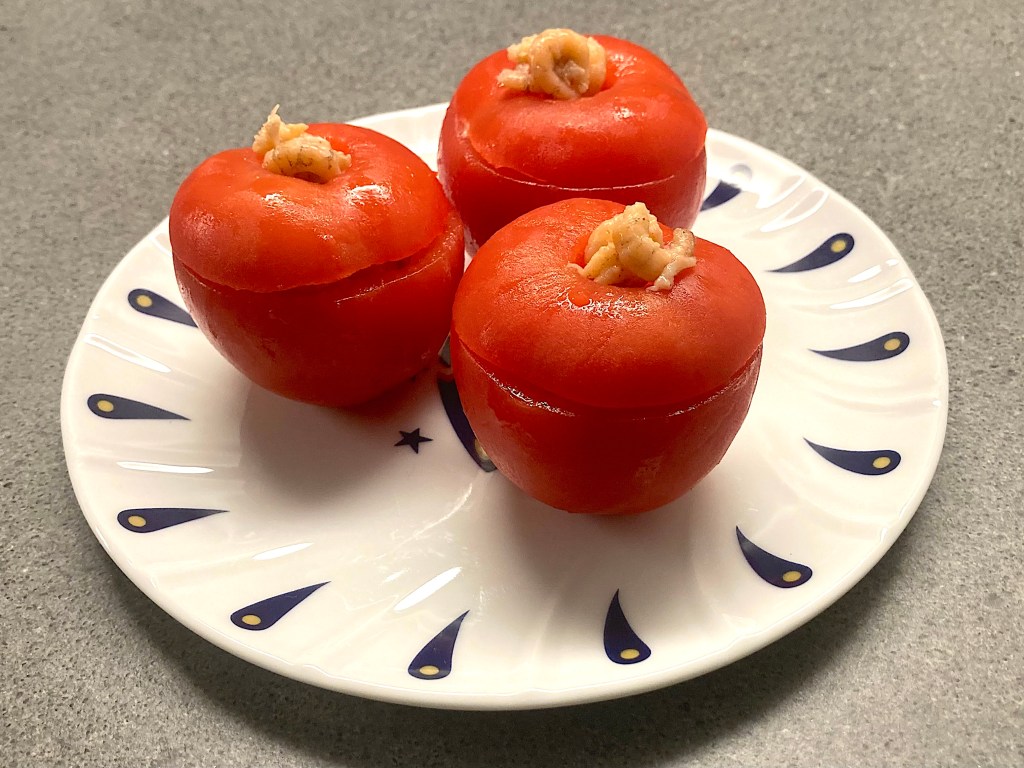
This simple and delicious starter is served in Belgium on special occasions. There are three key ingredients: tomatoes, small (grey) shrimps and mayonnaise. The tomato brings sweetness, umami and some acidity, the mayonnaise richness and a velvety mouthfeel and the shrimps saltiness and sweetness. Ideal combination.
We prefer to peel the tomatoes, because it makes it easier to enjoy the dish.
We thought it would be nice to tweak the recipe slightly. These ingredients are listed as optional.

Wine Pairing

We enjoyed our Tomate aux Crevettes with a glass of Muscadet Sevre et Maine sur Lie produced by Domaine Raphael Luneau. This is a very aromatic wine with a strong flavour and a long finish, which goes very well with the taste of the shrimps and the mayonnaise. The term ‘sur lie’ indicates that during a few months the wine stays in contact with the dead yeast cells left over after fermentation. This technique makes the wine more complex.
In general you’re looking for a fresh, light wine with a clear acidity. 

What You Need

  • 6 excellent ripe Tomatoes
  • 100 grams of (grey) small Shrimps
  • Mayonnaise
  • Black Pepper
  • Chervil
  • Optional
    • Ketchup
    • Worcestershire Sauce
    • Lemon Juice
    • Mustard

What You Do

  1. Peel the tomatoes
  2. Cut of the top and remove the green centre,
  3. Remove the inside of the tomato and discard
  4. Dry the inside of the tomatoes
  5. Dry the shrimps
  6. Add some black pepper to the shrimps and mix
  7. Chop the chervil
  8. Classic version: start with a layer of shrimps, then some mayonnaise and chervil, followed by a second layer of shrimps and finish with mayonnaise and chervil
  9. Alternative version: mix the mayonnaise with a squeeze of ketchup, Worcestershire sauce, lemon juice and mustard. Taste and adjust. Follow step 8
  10. Put the top back on the tomato and decorate with a few shrimps and chervil
Tomate aux Crevettes ©cadwu

Pasta with Tomatoes and Octopus

Happy New Year! Let’s start 2023 with a flavourful pasta dish, inspired by the Portuguese cuisine. A cuisine that is all about food with great flavours, such as bacalhau, Caldo Verde, octopus, cuttlefish, and the well known chicken piri-piri and pastel de nata. Octopus is very tasty and it comes with a great texture. The suction cups may be a bit unappealing, but don’t worry, the taste will make up for it.
In this case we use Orecchiette, small ear shaped pasta. The mixture of tomato and octopus is not like a sauce, so the paste should function as a carrier (a mini spoon) of the mixture. Enjoy quality pasta with slightly acidic tomatoes, rich octopus and refreshing parsley.

Wine Pairing

A Portuguese white wine will be a great idea, for instance a Vinho Verde. You could also go for a Spanish Verdejo from Rueda. Look for characteristics like fresh, fruity, clear acidity, subtle bitterness, minerality and full bodied. We enjoyed a glass of Pazo das Tapias Finca os Cobatos, from Monterrei in Spain made with Godello grapes.

What You Need

  • 2 Octopus Tentacles (cooked)
  • 2 Large Tomatoes
  • 2 Gloves of Fresh Garlic
  • Parsley
  • Jerez Vinegar
  • Black Pepper
  • Olive Oil
  • Pasta (Orecchiette)

What You do

Quarter the tomatoes, slice the garlic (not too small) and fry gently in a warm pan with olive oil. Set to low heat. In parallel heat a heavy iron skillet. Remove the gelatinous substance from the tentacles, dry them, coat with olive oil and fry. Cook the orecchiette according to the pack. With only 5 minutes to go for the pasta, slice the octopus in small chunks (depending on the size of the pasta), add the octopus to the tomato mixture and add half of the chopped parsley. Just before serving the dish, add some Jerez vinegar to the mixture. Add the remaining parsley and black pepper. Drain the pasta, keep some of the cooking liquid and add the pasta to the mixture. Combine, decide if you want to add some cooking liquid or perhaps some olive oil. Serve immediately on a hot plate.

Pasta with Tomatoes and Octopus ©cadwu

Salad of Small Artichokes

The season of artichokes varies depending on the variety and where you are based. In Italy it’s from mid-winter until early spring, in other countries from March to June, or September and October. And in other countries they peak in August. Best is to decide based on quality and price. An artichoke should feel heavy, look fresh and the leaves should be closed. If the leaves are wide open, the artichoke is older and it could be dry with lots of choke (the hairs) and dry inner leaves.

Don’t cook artichokes in boiling water. They must cook for 45+ minutes and during the long cooking process they will lose most of their flavour. Best is to steam artichokes.

Serve large artichokes as a relaxing starter or use them to make Artichoke Barigoule or a Pie. We use smaller ones to make a salad.  You can serve it to accompany an aperitif, or with some bread as a starter. Make sure you have plenty of dressing!

Wine Pairing

It’s not straightforward to pair artichokes with wine. According to various researchers this is due to cynarin, a chemical especially found in the leaves of the artichoke. When the wine and the cynarin meet in your mouth, the natural sweetness of the wine is enhanced, making it taste too sweet. So you have to pair freshly cooked or steamed artichokes with a bone-dry, crisp, unoaked white wine with clear, present acidity. For instance, Sauvignon Blanc, Grüner Veltliner or Albariño.
We enjoyed a glass of Château Pajzos Tokaj Furmint 2019. This dry, white wine made from the well-known Hungarian Furmint grape is fresh, clean and slightly floral. It supports the Salad of Artichokes beautifully.

What You Need

  • 6 small Artichokes
  • Olive Oil
  • Vinegar
  • Mayonnaise
  • Mustard
  • Garlic
  • Thyme
  • Black Pepper

What You Do

Remove the stem of the artichokes and steam the artichokes for 45 – 60 minutes, depending on the size. Remove and let cool. Peel of the first layers of the outer leaves. Make the dressing by turning the mustard and the crushed garlic into a smooth paste. Then gently add the other ingredients and whisk well to make it really smooth, thick dressing. Cut the artichokes in 6 or 8 parts. Add to the dressing, mix well, coating all artichokes. Sprinkle lots of thyme and mix again. Put in the refrigerator for at least 3 hours. Mix again, taste, add some more thyme and serve!

Bouchot Mussels

When you buy champagne, Cornish Clotted cream, Parmigiano-Reggiano or Kalamate Olives, you want to be sure it’s really champagne, clotted cream, Parmigiano or a Kalamata olive. There are various ways of protecting food (and wine) for instance by law, by creating and protecting a brand, or by systems such as the Appellation d’Origine Protégée (AOP) also known as Protected Designation of Origin (PDO). AOP/PDO is based on unique aspects of a region. For instance, the AOP for Comté cheese reflects the use of milk from specific cows from a region in the French Jura with a unique flora. This determines the cheese, its flavour and quality.

Another system focuses on the way food is produced. If this is done in a unique traditional way, the product can be labelled with Spécialité Traditionnelle Garantie (STG) or Traditional Speciality Guaranteed (TSG).

Bouchot Mussels carry both labels and they come with a special logo. Obviously, you wonder why.
The mussels grow in a unique way, benefitting from the large tide near Mont-Saint-Michel in Normandy. They grow on ropes strung from wooden poles (so called bouchots) in the sea. During a significant part of the day the mussels sit above sea level and therefore they grow slowly. The influence of the tide makes the bouchot mussels typical for the region and the use of poles makes the way the mussels grow unique.

Perhaps you also wonder if these aspects have an impact on the mussel and its taste. The answer is yes. They are small, clean, very tasty, flavourful, juicy and meaty plus they are free of sand and grit.

Preparing bouchot mussels is very simple, because adding flavours will only interfere with the already delicious taste.

Perhaps a bit more expensive than other mussels, but given they are so very tasty and rich, we think it’s perfectly fine to buy less than usual.

Wine Pairing

We enjoyed our Bouchot Mussels with a glass of Muscadet Sèvre et Maine, Domaine Raphaël Luneau. The wine originates from the Loire Valley and is made with 100% Melon de Bourgogne. The wine is stored on its ‘lees’ for several months before bottling. Lees are leftover yeast particles. They add flavour and structure to the wine.
In general, you’re looking for a white wine with minerality, fruit, structure and expression. It must be aromatic with a long taste.

What You Need (Starter)

  • 500 grams of Bouchot Mussels
  • White wine
  • One garlic Glove
  • Parsley
  • Crusted Bread

What You Do

Finely chop the garlic and the parsley. Add white wine to a pan and add the garlic. Bouchot mussels don’t release much liquid when you cook them, so use a little more wine than you would do with regular mussels. Leave for 10 minutes. Clean the mussels. Cook the mussels as quickly as you can, lid on the pan, until they are open. Add the parsley and combine. Serve immediately on a hot (soup) plate.

The Art of Sauces: Cameline

Welcome to the Middle Ages, welcome to the world of bread sauces and strong flavours. Already in the thirteenth century Sauce Cameline was very popular and in the fourteenth century it could be bought ready-made from vendors. It was used as accompaniment with fish, wild boar, chicken and it was served warm or cold.

Different from béchamel, velouté, Hollandaise or other modern sauces, a bread sauce has a very specific structure. In the United Kingdom a bread sauce with milk, onion, cloves, bay leaf and peppercorns is served with turkey as part of the traditional Christmas dinner.

Recipes for Sauce Cameline are included in several books, for instance in Two Fifteenth Century Cookery by Faulke Watling and Thomas Austin, 1888 and in The Viandier of Taillevent: An Edition of All Extant Manuscripts by Terrence Scully, 1988. Both books are available via the well-known channels.

The Viandier of Taillevent is very much a historical research into the origin of 5 manuscripts with recipes, all ranging from probably the same source, but all different. The oldest is from the second half on the thirteenth century. Taillevent, also known as Guillaume Tirel (ca. 1310 – 1395), was cook to the court of France (Charles V and many others). As the dates suggest it’s not very likely that he is the author of the oldest version of the recipes but on the other hand no other name is mentioned.

Terence Scully explains in wonderful detail the background of the manuscripts and the recipes. He also includes a modern version of 220 recipes, based on his historical and culinary interpretation of all manuscripts. A very impressive book.
The Viandier of Taillevent is also the inspiration for many other historical cookbooks.

There is no original recipe for Sauce Cameline. Our impression is that it must contain vinegar, bread, cinnamon, cloves, grains of paradise, mace and ginger. 

Food Pairing

We would suggest pairing it with chicken. Depending on your choice of ingredients you could combine it with pork or wild boar. We enjoyed Sauce Cameline with small chicken roulades, stuffed with chopped raisins and rosemary.

What You Need

  • Old White Bread
  • Red Wine Vinegar
  • Cinnamon Powder
  • Ginger Powder
  • Mace
  • Clove
  • Grains of Paradise
  • Optional
    • Nutmeg
    • Raisins
    • Almonds
    • Black Pepper
    • Salt 

What You Do

  1. Soak the bread in red wine vinegar (and water)
  2. In a mortar combine cinnamon, ginger and other spices
  3. When using raisins, make sure to soak them.
  4. The first option is to strain the bread and then combine it with the mixture. We didn’t think that worked very well!
  5. The second option is to drain the bread, add the mixture to the liquid and add some of the bread. We used a blender to create a sauce. We added a bit more bread and cinnamon to make it tastier and thicker.
  6. The third option is to cook and reduce the mixture
  7. According to the Viandier it should be a cold sauce, but others claim a warm sauce was served during winter.
  8. Regardless the way you prepare it, keep in mind it should be a fairly acidic sauce with a dominant cinnamon taste.

PS

Grains of Paradise? New to me!
The grains are common to the North and West African cuisine. They were brought to Europe in the thirteenth century.
The taste is supposed to be hot, peppery and fruity. Unfortunately, we couldn’t find them and we didn’t feel the need to order the grains online. We substituted them with freshly grounded black pepper. The other flavours were sufficiently intense!