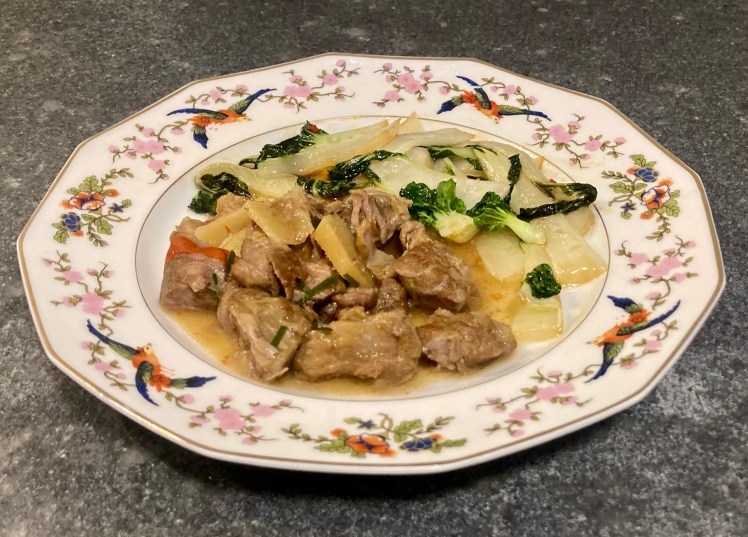
Easy Mushroom Pie

Thyme, oregano, nutty mushrooms and Parmesan cheese: a delicious combination at the heart of this easy mushroom pie. We used ready-made puff pastry, so making the filling is all you need to do.

Oregano (Origanum Vulgare) is typical for the Mediterranean cuisine. The leaves have an intense, earthy, slightly bitter taste. Use it when making tomato sauce, grilled vegetables or a lamb stew. Dried oregano is nearly as tasty as fresh oregano. When buying fresh oregano, make sure you’re not buying marjoram (Origanum Majorana) because its flavour is less intense and a bit sweet. To add to the confusion: oregano is also called wild marjoram whereas marjoram is called sweet marjoram.

Wine Pairing

We enjoyed our easy mushroom pie with a glass of Bardolino, made by Monte del Frà from Italy. The grapes used are Corvina, Rondinella and Molinara. It is a well-balanced, vibrant ruby red wine with lots of fruit and a hint of spices. Medium acidity. In general, you’re looking for a refreshing red wine with lots of fruit that should be served slightly chilled.

What You Need
  • 200 grams of firm Mushrooms, we used small Eryngii
  • 50 grams of Pancetta
  • 3 Eggs
  • 50 grams of Crème Fraîche
  • Parmesan Cheese
  • Thyme
  • Oregano
  • Shallot
  • 2 cloves of Garlic
  • Puff Pastry
  • Olive Oil
What You Do
  1. Warm a skillet
  2. Chop the shallot, the garlic and the oregano
  3. Clean the mushrooms and slice in two if so required
  4. Add some olive oil to the pan
  5. Add slices of pancetta
  6. Fry until crispy
  7. Transfer to a plate with kitchen paper
  8. Add the shallot to the pan and fry on low heat
  9. After a few minutes add the mushrooms and fry over medium heat
  10. After a few minutes add the garlic
  11. Reduce heat
  12. When all nicely done, add the thyme and the chopped oregano
  13. Set aside and let cool
  14. Preheat your oven to 180 °C or 355 °F
  15. Whisk the three eggs
  16. Add crème fraiche
  17. Add freshly grated Parmesan cheese and black pepper
  18. Cut or crumble the pancetta and add to the mushroom mixture
  19. Add the mushroom mixture to the egg mixture, combine
  20. Coat a 19 cm or 7.5-inch round baking tin with thin puff pastry
  21. Add the mixture and distribute evenly
  22. Transfer to the oven for 20-25 minutes or until nice and golden
  23. Allow to cool on a wire rack for a few minutes
  24. Remove from the tin as soon as possible
  25. If the bottom is not done, then transfer back to the oven (without the tin) for 10 minutes and set your oven to 160 °C or 320 °F, lower heat only
  26. Let cool and enjoy at 65 °C or 150 °F
PS

Skip the pancetta for a vegetarian version of this easy mushroom pie. Add extra thyme, oregano and Parmesan cheese.

Easy Mushroom Pie ©cadwu with thyme, oregano, nutty mushrooms and Parmesan cheese. The vegetarian version is as tasty as this one.
Easy Mushroom Pie ©cadwu

Bouchée a la Reine au Poisson

Crispy, fluffy, flaky puff pastry and a rich, warm ragoût, what better way to turn leftovers into a tasty starter. Bouchée a la Reine: a classic in Belgium and France. Not modern at all, but such fun to serve (and eat). The Bouchée a la Reine goes back to the days of Queen Marie Leszcynska, wife of King Louis XV. The story is that she tried to win back the attention of her husband (who was more interested in Madame de Pompadour) with these delicious small pastries. She assumed they would work as an aphrodisiac. One of her chefs (Nicolas Stohrer, also founder of the oldest patisserie in Paris) is probably the creator of Bouchée a la Reine (and Baba au Rhum by the way).
Enough history: you could fill the pastry with fish, poultry, mushrooms, sweetbread, just about anything will go, as long as you use a rich roux as basis.
Our ragoût combines fish with (common) shrimps. We bought halibut, a fish with compact, firm meat and a delicate taste, one that goes very well with butter, herbs and lemon. 

Wine Pairing

It all depends on the filling of your Bouchée a la Reine. Could be a light red wine if you have some left over veal, if it’s sweetbread then a lightly oaked chardonnay is fine et cetera. In all cases keep in mind that the filling comes with a generous amount of butter. In this case we enjoyed a glass of Mâcon, produced by Thierry Drouin. The wine has aromas of green apples and citrus, with a touch of toast and some minerality. Great in combination with the rich ragoût and its flavours. Good value for money too!

What You Need
  • One small Shallot
  • 100 grams of firm, delicate Fish
  • 50 grams of small Shrimps
  • 15 grams of Butter
  • 10 grams of All Purpose Flour
  • Fish Stock
  • Chervil
  • White Pepper
  • 2 Bouchées
What You Do
  1. Dice the raw fish (bite size)
  2. Finely chop the shallot
  3. Chop the chervil
  4. Warm the fish stock
  5. Preheat your oven to 180 °C or 355 °F
  6. Gently heat butter in a skillet
  7. Add the shallot and glaze for 5 minutes or so
  8. Add the flour
  9. Softly fry the flour until you begin smelling that typical cookie aroma
  10. Start adding the warm stock, slowly at first, constantly whisking.
  11. When the ragoût is ready, transfer the bouchées to the oven and leave for 10 minutes
  12. After 5 minutes, add the fish and combine
  13. After a few minutes the fish will be cooked
  14. Remove the pan from the heat
  15. Add white pepper, shrimps and chervil
  16. Combine
  17. Transfer the bouchées to the plates
  18. Add ragoût, decorate with chervil and serve immediately
PS

Normally we make our own stock. In this case we bought fish fond produced by Jürgen Langbein. We added water (1:1) to get the right stock for the ragout.

Bouchée a la Reine au Poisson ©cadwu made with a béchamel, halibut, shrimps and chervil
Bouchée a la Reine au Poisson ©cadwu

Your Favourites in 2025

In 2025 the most popular recipe was Scallops with Roe. We were inspired by the great quality of the scallops on the market in Nice and we were not disappointed. The combination of scallops, roe and mashed potatoes is simple and delicious.

This year’s runner up is an all time favorite: Kimizu. This classic, golden sauce from Japan, is made with egg yolks, rice vinegar, water and mirin. We also made a version with tarragon, let’s say the Béarnaise version of Kimizu. Although it is a classic sauce, we use a microwave to prepare Kimizu and Kimizu with Tarragon. An easy and very effective way of controlling temperature and consistency.

Number three was another classic sauce: Ravigote. We served it with Pâté de Tête Persillé and crusted bread. The recipe we posted goes back to the more or less original version. The Ravigote is light, uplifting and flavorful.

You’ve probably noticed we love mushrooms. Cultivated ones, like shiitake and oyster mushrooms and seasonal ones, such as morels and Caesar’s mushroom. This year we introduced a page with mushroom recipes in Dutch. It turned our to be a great success!

A few years ago we started exploring forgotten vegetables such as mashua and oca. We’re very pleased to see the popularity of this page. Clearly you’re as interested in these vegetables and their flavours as we are!

This year we will continue our series of sauces and of mushroom recipes, we will prepare dishes from illustrious Parisien restaurants and discuss wine pairing. We also plan to review cookbooks, with the help of our much loved tasting panel. In the meantime we look forward to your feedback, suggestions, likes and comments.

Let’s start cooking!

Oysters With Tarragon

Enjoying oyster begins by deciding which oysters to buy. Should they be small or large, should the taste be creamy and sweet or lean and juicy? If an oyster looks creamy (opaque) then it will taste creamy.

Next decision: raw or cooked? We think the best way to eat an oyster is to eat it raw. You will taste the saltiness, the texture and all of its flavours. The usual way to counter the saltiness is by adding a bit of lemon or mignonette but you could also go for something spicy like Tabasco, horseradish or perhaps wasabi. Don’t add something sweet because the oyster has its own sweetness.
In most cases cooked or steamed oysters are covered with lots of overwhelming ingredients, in an attempt to hide the taste of the oyster. Most likely the oyster will be overcooked and its structure rubbery and nasty. If you trust the chef, go for Steamed Oysters with Black Bean Sauce or for Oysters Rockefeller. Or even better: prepare our quick and easy Oysters with Tarragon, a delicious combination of warm (but not cooked) oyster and velvety anise flavours.

And finally: how to eat an oyster? Eating means chewing and tasting. Please don’t “drink” an oyster. If you do, you will only taste sea water.

Wine Pairing

When eating oysters, your wine must have some minerality. Think Chablis, Picpoul de Pinet, Sancerre or Sylvaner. We enjoyed a glass of Pommery Royal Brut champagne. The wine is elegant and uplifting, it comes with subtle notes of brioche and apple, a fine mousse and the perfect acidity with the oysters. Its freshness works very well after the intense taste of the oyster and the tarragon.

What You Need
  • 6 or 12 Oysters
  • Butter
  • Lots of Tarragon
  • White Pepper
  • Lemon Juice
What You Do
  1. Buy lean (not creamy) oysters, for instance the ones from the Île de Ré
  2. Combine butter and finely chopped tarragon with some white pepper
  3. Taste and add more tarragon
  4. Store in the refrigerator
  5. Scrub each oyster under cold, running water
  6. Open the oyster
  7. Use your knife or a spoon to detach the muscle underneath the oyster from the bottom shell
  8. Remove any small bits of broken shell or sediment
  9. Remove some of the liquid
  10. Add one or two drops of lemon juice to every oyster
  11. Top with a teaspoon of tarragon butter
  12. Make sure you have everything ready (plate, tongs, wine, guests)
  13. Transfer the oysters to the oven and place as close to the grill as possible
  14. Set your oven to grill or broil and leave the oysters for 3 or 4 minutes in the oven
  15. Transfer the oysters to a plate and serve immediately
  16. 🥂Happy New Year!🥂


Tortang Talong

Perhaps you wonder what kind of fish we prepared for this post. Well, actually, it’s Tortang Talong, a Philippine dish made with charred eggplant. Earlier this year we made banana ketchup and the idea was to serve it with Tortang Talong, but we couldn’t find the right eggplants. For Tortang Talong you need long, purple, slender eggplants, known as Chinese or Japanse eggplants. They not only look different from the oblong eggplant, their taste is slightly sweeter and softer. The shape is key to a moist and homogenous result.

Thanks Monch Weller for introducing us to the delectable sauce and the very tasty Tortang Talong!

Food Pairing

Serve Tortang Talong with banana ketchup as a starter. We could also imagine it as a side dish with fried vegetables, rice and perhaps chicken.

What You Need
  • 2 Chinese or Japanese Eggplants
  • 1 Egg
  • Black Pepper
  • (optional) Salt
  • Oil
What You Do
  1. Grill the eggplants for 5-10 minutes using the wire rack, following the instructions of your oven
  2. Flip and grill for another 5-10 minutes or until charred
  3. Let cool
  4. Peel of the skin
  5. Use a fork to flatten the eggplants
  6. Combine egg, salt (if using) and pepper
  7. Beat the mixture well
  8. Heat a heavy iron skillet
  9. Add oil to the skillet
  10. Dip the eggplant in the mixture
  11. Fry the eggplant
  12. Flip and use a brush to coat the top with the egg mixture
  13. Repeat step 12, two or three times

Duck with Garlic Thyme Sauce

Breast of Duck (Margret de Canard) is often paired with sweet ingredients, such as figs and oranges. We love the combination of duck with a green pepper sauce, because the sharpness emphasises the natural sweetness of the duck meat. In this recipe we do something similar. The sauce with thyme and mustard is aromatic and a touch sharp, which is very nice with the duck. The grated garlic adds spiciness to the sauce, making the dish more complex and bold. Delicious when combined with the sweet and sour caponata and crunchy fried polenta.

Wine Pairing

To balance the flavours of the dish, we suggest a fruity, dry red wine, one with subtle tannins and lots of freshness. We enjoyed a glass of Nero d’Avola, made in Sicily. The unoaked wine had a ruby red colour and aromas of cherries and plum. Serving the wine slightly chilled (meaning 15°C or 16°C (59°F or 61°F)) enhanced the freshness, acidity and fruitiness of the wine.

What You Need
  • 1 Breast of Duck
  • Thyme
  • Chicken Stock
  • Garlic
  • Mustard
  • Crème Fraîche
  • ½ grated clove Garlic
  • Black Pepper
  • To serve with the Duck
What You Do
  1. Check the breast for remainders of feathers
  2. Remove the vein on the meat side of the breast (and other bits you don’t like)
  3. Place on a dish, cover with foil and transfer to the refrigerator
  4. Leave in the refrigerator for one hour, making sure it’s nice, firm and cold
  5. Fry the duck in a hot, non-sticky skillet for 10-12 minutes on the skin side. Reduce the heat after a few minutes. You don’t need oil or butter, the ducks fat will do the trick
  6. Now fry for 2-3 minutes on the meat side and remove
  7. Cover with aluminum foil in such a way that the crispy skin is not covered. The foil should only cover the meat
  8. Remove most of the fat from the pan, but not all
  9. Add chicken stock and thyme
  10. Deglaze the pan
  11. Start building the sauce by adding juices from the duck
  12. Add mustard. This will not only add complexity and sharpness to the sauce, it will also make it thicker
  13. Add crème fraîche
  14. Add stock, mustard and crème fraîche to taste
  15. After 10 – 15 minutes add grated garlic, this will give a boost to the sauce
  16. Slice the duck (we like fairly big slices; you may prefer thinner ones)
  17. Add the last juices to the sauce and serve the duck with the sauce, caponata and fried polenta
Duck with Garlic Thyme Sauce ©cadwu served with caponata and polenta
Duck with Garlic Thyme Sauce ©cadwu

Black Pearl

Remember the Black Pearl, the ship captained by Jack Sparrow, portrayed by Jonny Depp? The ship had black sails and it was faster than the infamous Flying Dutchman. Films such as the Curse of the Black Pearl and At World’s End, characters such as Davy Jones and captain Barbossa, all good. We lost track when watching the third film and, in the end, we gave up on the series, despite the hilarious eccentricity of Jack Sparrow.

When shopping at our favourite mushroom stall, we noticed a cultivated mushroom, one we hadn’t seen before, called Black Pearl
The background of the Black Pearl mushroom (or Shimofuri) is as confusing as the story line of the Pirates-movies. According to some it’s a Japanese hybrid between King Trumpet and Black Oyster Mushrooms, others claim it’s a hybrid between a European and an Asian Oyster Mushroom and some say it’s a combination with Pearl Oyster mushrooms. Or perhaps a Marbled Oyster Mushroom? In all cases the Latin name seems to be Pleurotus Ostreatus, which is the name of the common oyster mushroom. 

Let’s forget about the background and enjoy its earthy, sweet, slightly peppery flavour and its firm texture. We combined the mushroom with an omelette, inspired by Tamagoyaki, the rolled Japanese omelette. We added Kashimiri pepper to the mushrooms, to emphasize their spiciness.

Drink Pairing

We enjoyed a glass of our favourite sake: Junmai Taru Sake as produced by Kiku-Masamune. The sake matured in barrels made of the finest Yoshino cedar, which is reflected in its aroma and flavour.
An aromatic, fresh and fruity white wine, with aromas of citrus and apple will also pair very well. The wine should be uplifting and juicy with a light character.

What You Need
  • 100 grams Black Pearl
  • 1 scallion, white only
  • 1/3 Kashmiri Pepper
  • 2 Eggs
  • ½ teaspoon Dashi Powder
  • teaspoon Mirin
  • teaspoon Soy Sauce
  • Olive Oil
What You Do
  1. Serve the omelette with the mushrooms on a warm plate
  2. Clean the mushrooms and cut in 2 or 4
  3. Thinly slice the white of the scallion
  4. Combine egg, dashi, mirin and soy sauce
  5. Warm a small heavy iron skillet
  6. Add some olive oil
  7. Add the egg mixture to the pan and bake a bavuese omelette
  8. In parallel: heat a small heavy iron skillet
  9. Crush pepper
  10. Add olive oil to the pan and fry the pepper, for a minute or so
  11. Reduce heat
  12. Add mushrooms to the pan
  13. Just before serving add the scallion
  14. Slice the omelette in two
Black Pearl Mushrooms served with an omelette. the omelette is flavored with dashi, soy suace and mirin. we also added crushed Kashmiri pepper ©cadwu
Black Pearl Mushrooms ©cadwu

Artichoke Pie

A few weeks ago, we were shopping at the Albert Cuyp market in Amsterdam. We saw excellent, very large artichokes. We simply had to buy them. They were far too big to be served as a starter. What to do? Let’s make an artichoke pie! Other ingredients? Egg? Crème Fraîche? Parmesan Cheese? Pancetta? Herbs, of course, parsley, thyme or perhaps fresh oregano?

Wine Pairing

It’s not straightforward to pair artichokes with wine, due to cynarin, a chemical especially found in the leaves of the artichoke. When the wine and the cynarin meet in your mouth, the natural sweetness of the wine is enhanced, making it taste too sweet. Pair freshly cooked or steamed artichokes with a bone-dry, crisp, unoaked white wine with clear, present acidity. For instance Sauvignon Blanc, Grüner Veltliner or Albariño. 
Cynarin and wine are not a match made in heaven but the good news is that cynarin seems to protect your liver and even helps it regenerate.
We enjoyed a glass of white Rioja made by Vivanco. This is a bright, intense white wine with aromas of citrus fruit and green apples. Fresh, tasty and a great match with the Artichoke Pie.

What You Need
  • For the Dough
    • 100 grams of Flour
    • 50 grams of Water
    • 10 grams of Olive Oil
    • 1 gram of Salt
  • For the Filling
    • 2 large Artichokes
    • 1 shallot
    • Olive Oil
    • 1 Egg
    • Crème Fraîche
    • Fresh Thyme
    • Freshly Grated Parmesan Cheese
    • Black Pepper
What You Do
  1. Combine flour, salt, water and olive oil
  2. Make the dough, kneed for a minute or so and store in the refrigerator for at least 30 minutes
  3. Clean the artichokes
  4. Steam the artichokes for 45+ minutes depending on the size and let cool
  5. Chop the shallot
  6. Warm a heavy skillet, add olive oil and gently fry the shallot
  7. Transfer to a plate and let cool
  8. Use a spoon remove the ‘meat’ from the leaves (bracts) of the artichokes
  9. Remove the centre choke (the hairs)
  10. Chop the hearts
  11. Strip a generous amount of thyme
  12. Whisk the egg and combine with the artichoke, the shallot, the crème fraîche, the thyme and some freshly grated Parmesan cheese
  13. Add black pepper
  14. Taste and adjust
  15. Coat a 15 cm or 6 inch round baking form with oil (or use a sheet of baking paper)
  16. Roll out the dough with a rolling pin on a lightly floured surface
  17. Place the dough in the baking form and add the filling
  18. Transfer to the oven for 40 minutes on 180˚ – 200˚ Celsius or 355˚ – 390˚ Fahrenheit
  19. Remove the pie from the oven
  20. Brush the outside with olive oil. This will intensify the colour of the pastry
  21. Let cool and enjoy luke warm
A delicious vegetarian Artichoke Pie ©cadwu with lots and lots of steamed artichoke, egg, creme fraiche and thyme.
Artichoke Pie ©cadwu

Mushroom Ketchup or Catsup

Recently we made Banana Ketchup, a popular condiment in the Philippines. Very tasty by the way! Sheryl (who runs a great blog with recipes and food-related information from a hundred years ago) commented that banana ketchup was new to her. She mentioned recipes for cucumber ketchup and mushroom ketchup in Lowney’s Cookbook, published in 1921.
It seems that mushroom ketchup originated in the UK and that it could be considered the original ketchup. It was used to flavour soups, marinades and meat dishes. The first reference we could find is from 1818 in a book called Apicius redivivus, the Cook’s Oracle by William Kitchiner (pages 475-477). The catsup is made by fermenting mushrooms with salt. Black pepper, allspice and brandy are the other ingredients.

Modern Version

One of the intriguing aspects of mushrooms is that you can use them to thicken a sauce. We used to do this when preparing Daube Provençale. Blender some of the cooked mushrooms until very smooth and transfer the paste back to the pan. The sauce will get a better consitency without becoming velvety or buttery, although the downside is that the mushroom paste reduces the flavour of the dish as a whole.
The recipe for modern mushroom ketchup is about cooking mushrooms and shallot with various spices (mace, clove, nutmeg) and herbs. After an hour sugar and vinegar are added. Blender the mixture until very smooth. The consistency of the ketchup is rather jelly (like wallpaper paste) and its flavour bland. We had to add more spices to make it tastier. Adding a teaspoon of mustard improved the ketchup, somewhat. We combined it with red meat, chicken and potatoes. We were not impressed.

Classic Version

This version focuses on the liquid and that turned out to be a good idea. The result is a tasty condiment, with lots of umami, but not specifically mushroom. It will strengthen the taste of a sauce or a stir fry with various vegetables. We made a beef burger patty with thinly sliced scallion, two teaspoons of mushroom catsup and black pepper. Delicious! We also used the catsup to season meatballs. The catsup emphasized the flavour of the meat and added complexity and length.
You need quite a lot of mushrooms to make it, meaning it’s both intense and expensive! If you’re in the UK, you can buy a bottle of Mushroom Ketchup produced by Geo Watkins.

Etymology

The term ketchup (also spelled catsup) is interesting. It could be related to a sauce with fruits and spices called catchup, or a fish sauce called kichap. It made us think of ketjap, or kecap in Malaysia and Indonesia. This term is related to a Chinese sauce called kê chiap, meaning fermented fish sauce!

Love-Apples

Perhaps you now wonder what the origin is of today’s Tomato Ketchup. The first known recipe for Tomatoe, or Love-Apple Catsup was published in 1812 by James Mease (1771-1846). The love-apples (tomatoes) are thinly sliced. Layers are added to a tin or pot and over every layer a little salt is sprinkled. Leave for 24 hours. Beat the love-apples well, simmer for 30 minutes with mace and allspice. When cold, add chopped raw shallot and brandy. The brandy supports the preservation.

What You Need (classic version)
  • 300 grams of Mushrooms (200 Button Mushrooms, 50 Shiitake, 50 Oyster Mushrooms or another combination of juicy mushrooms)
  • teaspoon of Mace
  • 2 teaspoons of Salt
  • 1/8 cup Rice Vinegar
  • 1/8 cup Water
  • Nutmeg
  • Clove
  • Black Pepper
What You Do
  1. Clean and slice the mushrooms
  2. Add mushrooms and salt to a skillet
  3. Mix very well
  4. Cover and leave on very low heat for 60 minutes
  5. Perhaps add some water to speed up the process
  6. After 15 minutes add mace
  7. After 60 minutes, transfer to a pan
  8. Add vinegar and water
  9. Mix
  10. Leave on medium heat for 20 minutes
  11. Add black pepper, nutmeg and grated clove to taste
  12. Leave on low heat for 5 minutes
  13. Taste and adjust
  14. Pass gently through a sieve
  15. Use cheesecloth to capture all the juices from the mushrooms
  16. Reduce if necessary
  17. Let cool and transfer to the refrigerator

Kimizu (with a Twist)

A few years ago we enjoyed an excellent Kaiseki dinner at Yamazato in Amsterdam. One of the dishes on the menu was Kimizu-Ae: a combination of white asparagus and Kimizu. A few days later we prepared Kimizu, a rich and light sauce. It comes with a velvety mouthfeel, a natural note of sweetness, a bright yellow colour and perfect acidity. Over the years we used it as a base for Béarnaise and Sauce Perigord.

Kimizu combines rice vinegar, mirin and egg. Compared to Hollandaise, Kimizu is lighter, easier to digest and fresher, because it does not contain butter (the egg yolk being the only source of fat).
The vinegar used to prepare Hollandaise or Béarnaise is often a flavoured vinegar, for instance with tarragon, shallot and black pepper. An idea we simply had to try when making Kimizu, with a twist!

Using a microwave oven to make Kimizu is a great idea (see our recipe for Hollandaise), although it does require more whipping and more attention compared to making Hollandaise.

What You Need
  • For the Castric (35 ml)
    • 5 ml Vinegar
    • 50 ml dry White Wine
    • 20 ml Noilly Prat
    • One corn of Black Pepper
    • One small Shallot
  • For the Kimizu
    • 35 ml Castric
    • 25 ml Water
    • 1 teaspoon Mirin
    • 2 Egg Yolks
What You Do
  1. Start by making the Castric
    • Chop the shallot
    • Combine all ingredients and leave to reduce by 1/2 on low heat
    • Pass through a sieve; try to capture the juices of the shallot
    • Set aside
  2. Make the Kimizu
    • The castric should be at room temperature
    • Whisk the egg yolks
    • Add the castric, the mirin, the water and whisk some more
    • Now transfer to the microwave and give it let’s say 10 seconds of 30%. Power and duration very much depend on your microwave
    • Remove from oven and whisk
    • Repeat
    • You will now feel the consistency changing. If not, don’t worry, just keep repeating the step
    • You may want to reduce the power or the duration
    • Whisk, whisk again and feel free to find your own way
    • When the Kimizu is ready, take it out of the oven and serve immediately
  3. We served the Kimizu with excellent beef and pommes dauphinois
Kimizu, the Japanese golden sauce
Kimizu with a Twist ©cadwu