Tomate aux Crevettes

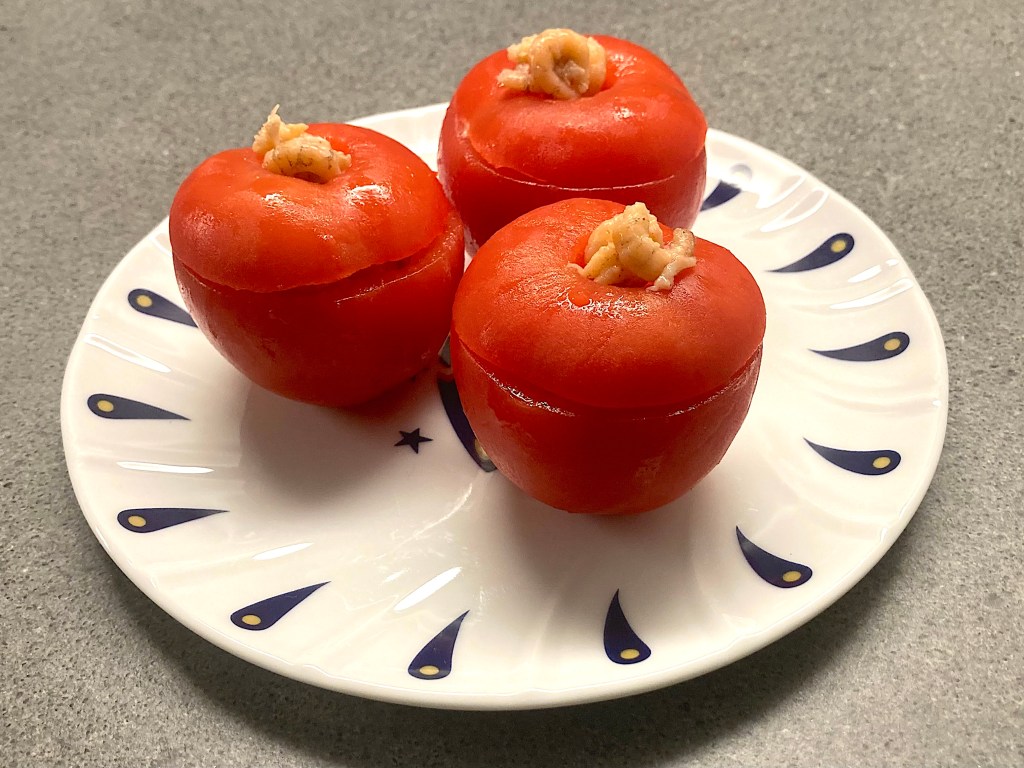
This simple and delicious starter is served in Belgium on special occasions. There are three key ingredients: tomatoes, small (grey) shrimps and mayonnaise. The tomato brings sweetness, umami and some acidity, the mayonnaise richness and a velvety mouthfeel and the shrimps saltiness and sweetness. Ideal combination.
We prefer to peel the tomatoes, because it makes it easier to enjoy the dish.
We thought it would be nice to tweak the recipe slightly. These ingredients are listed as optional.

Wine Pairing

We enjoyed our Tomate aux Crevettes with a glass of Muscadet Sevre et Maine sur Lie produced by Domaine Raphael Luneau. This is a very aromatic wine with a strong flavour and a long finish, which goes very well with the taste of the shrimps and the mayonnaise. The term ‘sur lie’ indicates that during a few months the wine stays in contact with the dead yeast cells left over after fermentation. This technique makes the wine more complex.
In general you’re looking for a fresh, light wine with a clear acidity. 

What You Need

  • 6 excellent ripe Tomatoes
  • 100 grams of (grey) small Shrimps
  • Mayonnaise
  • Black Pepper
  • Chervil
  • Optional
    • Ketchup
    • Worcestershire Sauce
    • Lemon Juice
    • Mustard

What You Do

  1. Peel the tomatoes
  2. Cut of the top and remove the green centre,
  3. Remove the inside of the tomato and discard
  4. Dry the inside of the tomatoes
  5. Dry the shrimps
  6. Add some black pepper to the shrimps and mix
  7. Chop the chervil
  8. Classic version: start with a layer of shrimps, then some mayonnaise and chervil, followed by a second layer of shrimps and finish with mayonnaise and chervil
  9. Alternative version: mix the mayonnaise with a squeeze of ketchup, Worcestershire sauce, lemon juice and mustard. Taste and adjust. Follow step 8
  10. Put the top back on the tomato and decorate with a few shrimps and chervil
Tomate aux Crevettes ©cadwu

Mousse au Chocolat

Crème Brulée, Ile Flottante, Crêpes Suzette and Mousse au Chocolat: four classic French desserts. It’s tempting to buy them ready-made, especially Mousse au Chocolat is popular in supermarkets, but why not make your own?

From 1992 until 2002 Belgian cook Herwig van Hove and host Dré Steemans (better known as Felice Damiano) had a weekly program on television called ‘1000 seconds’. In these 1000 seconds (just under 17 minutes) Herwig van Hove would prepare a three-course meal. Sometimes he took a short cut by serving cheese as dessert, but very often he would prepare three courses. His recipe for Mousse au Chocolat is quick and easy. The result is a delicious Mousse au Chocolat, one that will keep well for at least 24 hours.

What You Need (for 4)

  • 2 fresh organic Eggs
  • 35 grams of fine Sugar
  • 100 grams of Dark (Cooking) Chocolate
  • 165 grams of Cream
  • Raspberry (to decorate, optional)

What You Do

  1. You will need 2 bowls plus one larger bowl
  2. Start by separating the eggs
  3. In a smaller bowl beat the egg white until firm
  4. In the larger bowl beat the egg yolks and the sugar until ‘ruban’ (meaning thick and pale)
  5. In a smaller bowl whip the cream until firm
  6. This order allows you to use one wire whisk for all three steps in the process!
  7. Melt the chocolate with 65 grams of cream in your microwave on very low power. No rush, the result should be lukewarm. This will take 3 minutes or longer
  8. Use a spoon to mix the cream and chocolate until smooth
  9. For the next steps you need a spatula
  10. Add the chocolate mixture to the egg yolks and combine
  11. Now fold in the cream using a spatula and then fold in the egg whites. Don’t stir or mix, just fold
  12. Fill four nice glasses with the mousse, cover with cling foil and transfer to the refrigerator
  13. Just before serving decorate with raspberries and perhaps some freshly whipped cream.
  • Mousse au Chocolat ©cadwu
  • Mousse au Chocolat not decorated ©cadwu

Deviled Eggs with a Twist

Easy to make, tasty, and most people love them. You only need a few simple ingredients such as hard boiled (organic) eggs, mayonnaise, Dijon mustard, vinegar (or lemon juice) and black pepper. Sprinkle some paprika on top and they’re ready.

Alas, we’re not huge fans of paprika. Why would you ruin lovely ingredients like egg, mayonnaise and mustard by adding a spice that is at best a touch sweet and in most cases bland?

Paprika (powder) is made from dried red peppers and probably originates from Mexico. When it was brought to Europe, local versions were created, for instance a hot Hungarian version (essential when making goulash) and a smoked Spanish version (pimentón, key ingredient of chorizo and paella). Local peppers were used, including red bell pepper, and the flavours ranged from mild and sweet to hot. By the way, the term ‘deviled’ refers to the spiciness of the dish.
Unfortunately, nowadays factory produced paprika seems to be used for its red colour only.

We combine a bit of everything by adding roasted bell pepper. It adds depths, smokiness, complexity and flavour.

What You Need

  • 6 organic Eggs
  • Mayonnaise
  • Dijon Mustard
  • Lemon Juice
  • Red Bell Pepper
  • Black Pepper
  • Parsley (optional)

What You Do

Grill the bell pepper in your oven until nicely burned, perhaps 10 minutes. Transfer to a plastic container and close the lid. Wait a few hours before peeling the bell pepper. Use a sharp knife to mash the bell pepper. It’s fine if the mash has a bit of structure.
Boil the eggs and let cool. Slice the eggs lengthwise, remove the yolk. Use a fork to crumble the yolks (mimosa) and then combine with mayonnaise, mustard and mashed bell pepper. Add lemon juice and black pepper to taste. Remember the stuffing should be ‘devilish’. Add mixture to the egg whites. Decorating with parsley gives an extra twist to the deviled eggs.

Deviled Eggs ©cadwu
Deviled Eggs ©cadwu

Pasta with Tomatoes and Octopus

Happy New Year! Let’s start 2023 with a flavourful pasta dish, inspired by the Portuguese cuisine. A cuisine that is all about food with great flavours, such as bacalhau, Caldo Verde, octopus, cuttlefish, and the well known chicken piri-piri and pastel de nata. Octopus is very tasty and it comes with a great texture. The suction cups may be a bit unappealing, but don’t worry, the taste will make up for it.
In this case we use Orecchiette, small ear shaped pasta. The mixture of tomato and octopus is not like a sauce, so the paste should function as a carrier (a mini spoon) of the mixture. Enjoy quality pasta with slightly acidic tomatoes, rich octopus and refreshing parsley.

Wine Pairing

A Portuguese white wine will be a great idea, for instance a Vinho Verde. You could also go for a Spanish Verdejo from Rueda. Look for characteristics like fresh, fruity, clear acidity, subtle bitterness, minerality and full bodied. We enjoyed a glass of Pazo das Tapias Finca os Cobatos, from Monterrei in Spain made with Godello grapes.

What You Need

  • 2 Octopus Tentacles (cooked)
  • 2 Large Tomatoes
  • 2 Gloves of Fresh Garlic
  • Parsley
  • Jerez Vinegar
  • Black Pepper
  • Olive Oil
  • Pasta (Orecchiette)

What You do

Quarter the tomatoes, slice the garlic (not too small) and fry gently in a warm pan with olive oil. Set to low heat. In parallel heat a heavy iron skillet. Remove the gelatinous substance from the tentacles, dry them, coat with olive oil and fry. Cook the orecchiette according to the pack. With only 5 minutes to go for the pasta, slice the octopus in small chunks (depending on the size of the pasta), add the octopus to the tomato mixture and add half of the chopped parsley. Just before serving the dish, add some Jerez vinegar to the mixture. Add the remaining parsley and black pepper. Drain the pasta, keep some of the cooking liquid and add the pasta to the mixture. Combine, decide if you want to add some cooking liquid or perhaps some olive oil. Serve immediately on a hot plate.

Pasta with Tomatoes and Octopus ©cadwu

Your Favourites in 2022

We have been baking our own bread for several years, based on the method of no-knead bread (see Jim Lahey’s book My Bread for more detail) and using the ingredients of the French Talmière. The technique is a bit challenging, so we were very pleased to test the simplified method described by Le Creuset. You were also pleased to learn about this easier method for No-Knead Bread, because it’s our number one post this year!

Kimizu is the classic, golden sauce from Japan, made from Egg Yolks, Rice Vinegar, Water and Mirin. The recipes for Kimizu and Kimizu with Tarragon continue to be very popular. Although this is a classic sauce, we use a microwave to prepare it. A great tool to be in control of temperature and consistency.

If you’ve been following this blog for a few months, perhaps years, then you’ll know we love mushrooms. We are especially interested in the seasonal ones, such as Morels, St. George’s mushroom, and Caesar’s Mushroom. We combine these with Japanese Udon, creating a very tasty starter, full of flavours and texture. Also one of our personal favourites.
Another favorite is the Bay Bolete. Actually a fairly common mushroom, as tasty as Cèpes, but much more affordable.
During the season we saw lots of interests in Bay Boletes and Caeser’s Mushroom, so next season we will publish new recipes with these two delicious mushrooms.

The classic Cèpes à la Bordelaise was also amongst your favourites. You can also use more available mushrooms for this great combination. Always a pleasure to serve, with eggs, with meat, with more present fish.

Ajerkoniak was a dish we looked into when we were exploring dishes/drinks based on egg yolks, such as caudle, eggnog and advocaat. Perhaps not our personal favourite, but why nog give it a try?

We wish you a happy and inspiring 2023!

Your Favourites in 2022 ©cadwu

Madeira Cake

A delicious cake that doesn’t contain Madeira, nor does it originate from the island. The idea is perhaps to serve the cake with a glass of Madeira. We tried it and yes, it works, but you could also serve the cake with a cup of tea or coffee. Let’s forget about the name and enjoy a relatively easy to make traditional British cake. It has a light structure, it is a touch moist and the flavours and aromas are citrusy.
We think it looks best when made in a round tin.

What You Need

  • 140 grams of Butter
  • 130 grams of fine Sugar
  • 3 Eggs
  • 170 grams of Self-Raising Flour
  • 25 grams of Almond Flour
  • Zest of 1 Lemon
  • 1 slice of Candied Orange

What You Do

Melt the butter in the microwave until very soft but not warm. Line the bottom of a 16 cm (6 inch) round baking tin with parchment baking paper. Butter the inside. Sieve the self-raising flour into a bowl. Set your oven to Traditional (upper and lower heat, no fan), temperature 180 °C or 355 °F.
Mix the butter with the sugar until yellow and light. Add one egg, mix and add ⅓ of the flour. Mix until you have a smooth batter. Repeat this step twice. Now add the almond flour and the fine lemon zest. Mix. Add the batter to the tin, smooth the top and transfer to the oven.
It will probably take 45 minutes. Check with a metal pin if the cake is ready. Leave the cake in the tin for 10-15 minutes, then remove from the tin and let cool on a wire rack.
When cool, decorate with candied orange.

Madeira Cake ©cadwu
Madeira Cake ©cadwu

Rose Fish

One of our favourite starters! It’s light, full of flavours and it comes with various textures. The homemade pickled radishes are refreshing in combination with the fish and the mushrooms.

There are many names for the fish we use: rose fish, Norway haddock (perhaps because of its Latin name Sebastes norvegicus), ocean perch, roodbaars, Rotbarsch, vanlig uer and sébaste orangé. The meat is firm and flaky, the taste is fairly neutral with a touch of sweetness. Ideal to combine with shiitake and a light soy sauce.
The fillets are difficult to fry because the skin is rather thin and ideally you want it to become crispy and keep some of its beautiful colour.

Wine Pairing

A Chardonnay or Chenin Blanc with a touch of oak will be a perfect match with the mushrooms and the fish. Full bodied, elegant, balanced and with the aromas of ripe yellow fruit.
We enjoyed a glass of Révélation Pays d’Oc Chardonnay 2021, produced by
 Badet Clément with our Rose Fish and Shiitake.

What You Need

  • For the Rose Fish
    • two small Fillets of Rose Fish 
    • Olive Oil
  • For the Mushroom Mix
    • 100 grams Shiitake
    • 1 scallion
    • Light Soy Sauce
    • Olive Oil
    • Sesame Oil
  • For the Pickled Radishes
    • Red Radishes
    • Shallot
    • White Wine Vinegar
    • Sugar

What You Do – Pickled Radishes

Take a cup of white wine vinegar, add it to a bowl, add sugar, perhaps some water (depending on the acidity of the vinegar), mix very well and taste. The mixture should be both sweet and sour. Slice the radishes and chop the shallot. Add to the mixture, stir and leave in the refrigerator for a few hours. Over time the colours will blend. The vegetables will keep well for a few days.
Feel free to use the same approach with other (firm) small vegetables.

What You Do – Mushrooms

Clean the shiitake, remove the stems and chop. Fry in olive oil until juicy and soft. Add the chopped scallion. After a few minutes add some light soy sauce and one or two teaspoons of sesame oil. Tate and adjust.

What You Do – Rose Fish

Heat a non-stick pan and fry the fish in olive oil. Best is to start with the meat side, push the meat towards the pan and fry until nearly done. Turn the fish, fry for a few seconds and serve immediately on a hot plate with the mushrooms and pickles.

Rose Fish ©cadwu
Rose Fish ©cadwu

Classic Beef Stew

Wintery weather, sunny and cold, the best time of year to enjoy a beef stew. We decided to cook an old-fashioned version, with red wine, bay leaf, mustard and black pepper. And patience of course, because it will take hours.

Regardless if you want to cook a Flemish Stew, Bœuf Bourguignon, Daube à la Provençale or this beef stew, you must use fatty, structured meat. The idea to use lean meat because fat is unhealthy or altogether wrong is one to forget quickly. Fat, structured meat is the key to a delicious stew. In general you’re looking for meat from the neck or the shoulder (beef chuck roast, sucade, paleron). When in doubt, ask your butcher.

Most recipes suggest dicing the meat. We didn’t want to do that. When cutting the meat before serving, we followed the structure of the meat, which gives the plate a rustic feel.

We served the beef stew with a beet root salad and cranberry compote.

Drink Pairing

A rich beer or a full-bodied red wine will be a great accompaniment with the stew. The dish comes with some sweetness (the stew, the salad and the compote, obviously) so the wine should have some acidity and tannins. A robust wine with aromas of dark fruit (plums, blackberries, cherries), a touch of oak and a long taste will be perfect. 

What You Need

  • 400 grams of excellent Fat, Structured Beef
  • 50 grams of organic Bacon
  • Butter
  • Shallot
  • Mustard
  • Red Wine
  • 2 Bay Leaves
  • Bouquet Garni (Thyme, Parsley, Sage)
  • Black Pepper
  • Water

What You Do

Heat a heavy iron skillet, pat the meat dry with kitchen paper, add butter to the pan and fry until golden-brown. Reduce the heat and remove the meat from the pan. Add the sliced bacon and fry until golden. Add the shallot and glaze. Return the meat to the pan, add red wine, some water, mustard, bay leaves, bouquet garni and crushed black pepper. Allow to simmer for 6+ hours. You could close the pan with a lid. We prefer to cook it without a lid. The meat will take longer to become tender and soft. Our impression is that a stew prepared in a skillet without a lid is more moist. In all cases check the pan every 30 minutes, turn the meat and add water if required.
You could reduce the jus or turn it into a sauce, but you could also keep it as is.

What You Need – Beet Root Salad

  • One Beet Root
  • Excellent Olive Oil
  • White Wine Vinegar
  • Shallot
  • Black Pepper

What You Do – Beet Root Salad

The day before wash the beetroot and wrap in aluminium foil. Leave in the oven on 180° Celsius or 355° Fahrenheit for 45 – 60 minutes depending on the size. Cool and store in the refrigerator.
The next day peel the beet root and use a vegetable slicer (or mandoline) to make ridges. This will not only make the dish look more inviting, it will also enhance the taste given there is more coated surface and more air when chewing it. Make a simply, relatively acidic dressing with olive oil and vinegar. Finely chop the shallot and add to the dressing. Test a small slice of beet with the dressing and adjust when necessary. Perhaps some fresh black pepper? If you’re happy with the combination, toss the slices with the dressing making sure everything is nicely coated.

No-Knead Bread – Easier Method

Recently Le Creuset introduced a Cast Iron Bread Oven. A great way to make bread at home. The oven is well designed, making it easy to transfer the dough to the pan. It has a domed lid, ergonomic handles and looks amazing. Typical Le Creuset quality.

On their website you’ll find several recipes, including one for sesame bread. It is made with 600 grams of wheat flour, 14 grams of salt (wow!) and 400 grams of water. The recipe is based on slow-rise fermentation. With only 1 gram of yeast in combination with 19+3 hours of rest, the yeast does a wonderful job. And kneading, as you would expect, is not required.

Le Creuset’s approach is slightly different from Jim Lahey’s, owner of Sullivan Street Bakery, New York, promotor of no-knead bread since 2006 and author of the excellent book My Bread.
After the first rise, Jim Lahey folds the dough four times, dusts it with flour and bran, transfers it to a cloth for 3 hours before transferring it to a hot pan, a step that requires some practice and skills.
Le Creuset folds the dough twice and then transfers it to a cold pan. Wait for 3 hours and then transfer the cold pan to the oven. This approach is clearly quicker and easier.
And the result? A beautiful, tasty bread with a crispy crust.

What You Need

  • 430 gram of Flour (we use 200 gram of Whole Grain Flour and 230 gram of All Purpose Flour)
  • 25 grams Blue Poppy Seed
  • 30 grams Brown Linseed
  • 1 gram of Instant Yeast
  • 4 grams of Salt
  • 355 grams of Water
  • Additional Flour
  • Bran

What You Do

We use a 20cm Le Creuset Casserole with a heat resistant knob. Make sure the pan is well coated. If not, coat with oil and kitchen paper before using.
Mix flour, yeast, seeds and salt. Add water and create one mixture. Let rest in a covered bowl for 19 hours. Dust your kitchen worktop with flour, remove the dough from the bowl, fold 4 times, dust the pan with a touch of flour and bran, transfer the dough to the pan, sprinkle some bran on the top of the dough and close the lid. Let rest in the pan for 3 hours. Heat your oven to 235˚ Celsius or 450˚ Fahrenheit. Transfer the pan to the oven and bake for 35 minutes. Remove the lid and bake for 10 to 15 minutes until it is nicely browned. Remove the bread from the pan and let cool on a wire rack for at least an hour before slicing it.

Date with Foie Gras and Bacon

It’s such a pleasure to serve a warm snack (appetizer, finger food, quick nibble). In an earlier post we described how to make crostini with mushrooms and taleggio. A delicious vegetarian appetizer. This one is also simple and quick, but requires some shopping.

Let’s start with the bacon. Ideally you would use bacon made of pork belly, cooked in water with spices such as cloves, bay leaf and mustard seed, then rubbed with sugar, smoked and dried. The result is a moist, slightly sweet, cured bacon. The Dutch call it Katenspek.

Foie gras is always a bit of a debate. We are flexible and enjoy eating it, provided it comes with an authenticity label, perhaps with an award of an agricultural show and of course with positive reviews from connaisseurs. Ethical foie gras, made without force feeding the geese, is of course the preferred option. One that is nearly impossible to find. The Guardian published an interesting article about making Foie Gras without gavage.

The combination of these three ingredients is savoury and sweet, with a texture that is soft, crispy and a touch chewy. We love it.

What You Need

  • Excellent Dates
  • Excellent Terrine de Foie Gras (Goose preferred)
  • Sweet Cured Bacon

What You Do

Make sure all ingredients are at room temperature. Stuff the dates with foie gras and wrap it in one rasher of bacon. Fry quickly in a non-stick pan. The bacon should be crispy, the foie gras soft, the date warm. Serve immediately on a warm plate.

Date with Foie Gras and Bacon ©cadwu