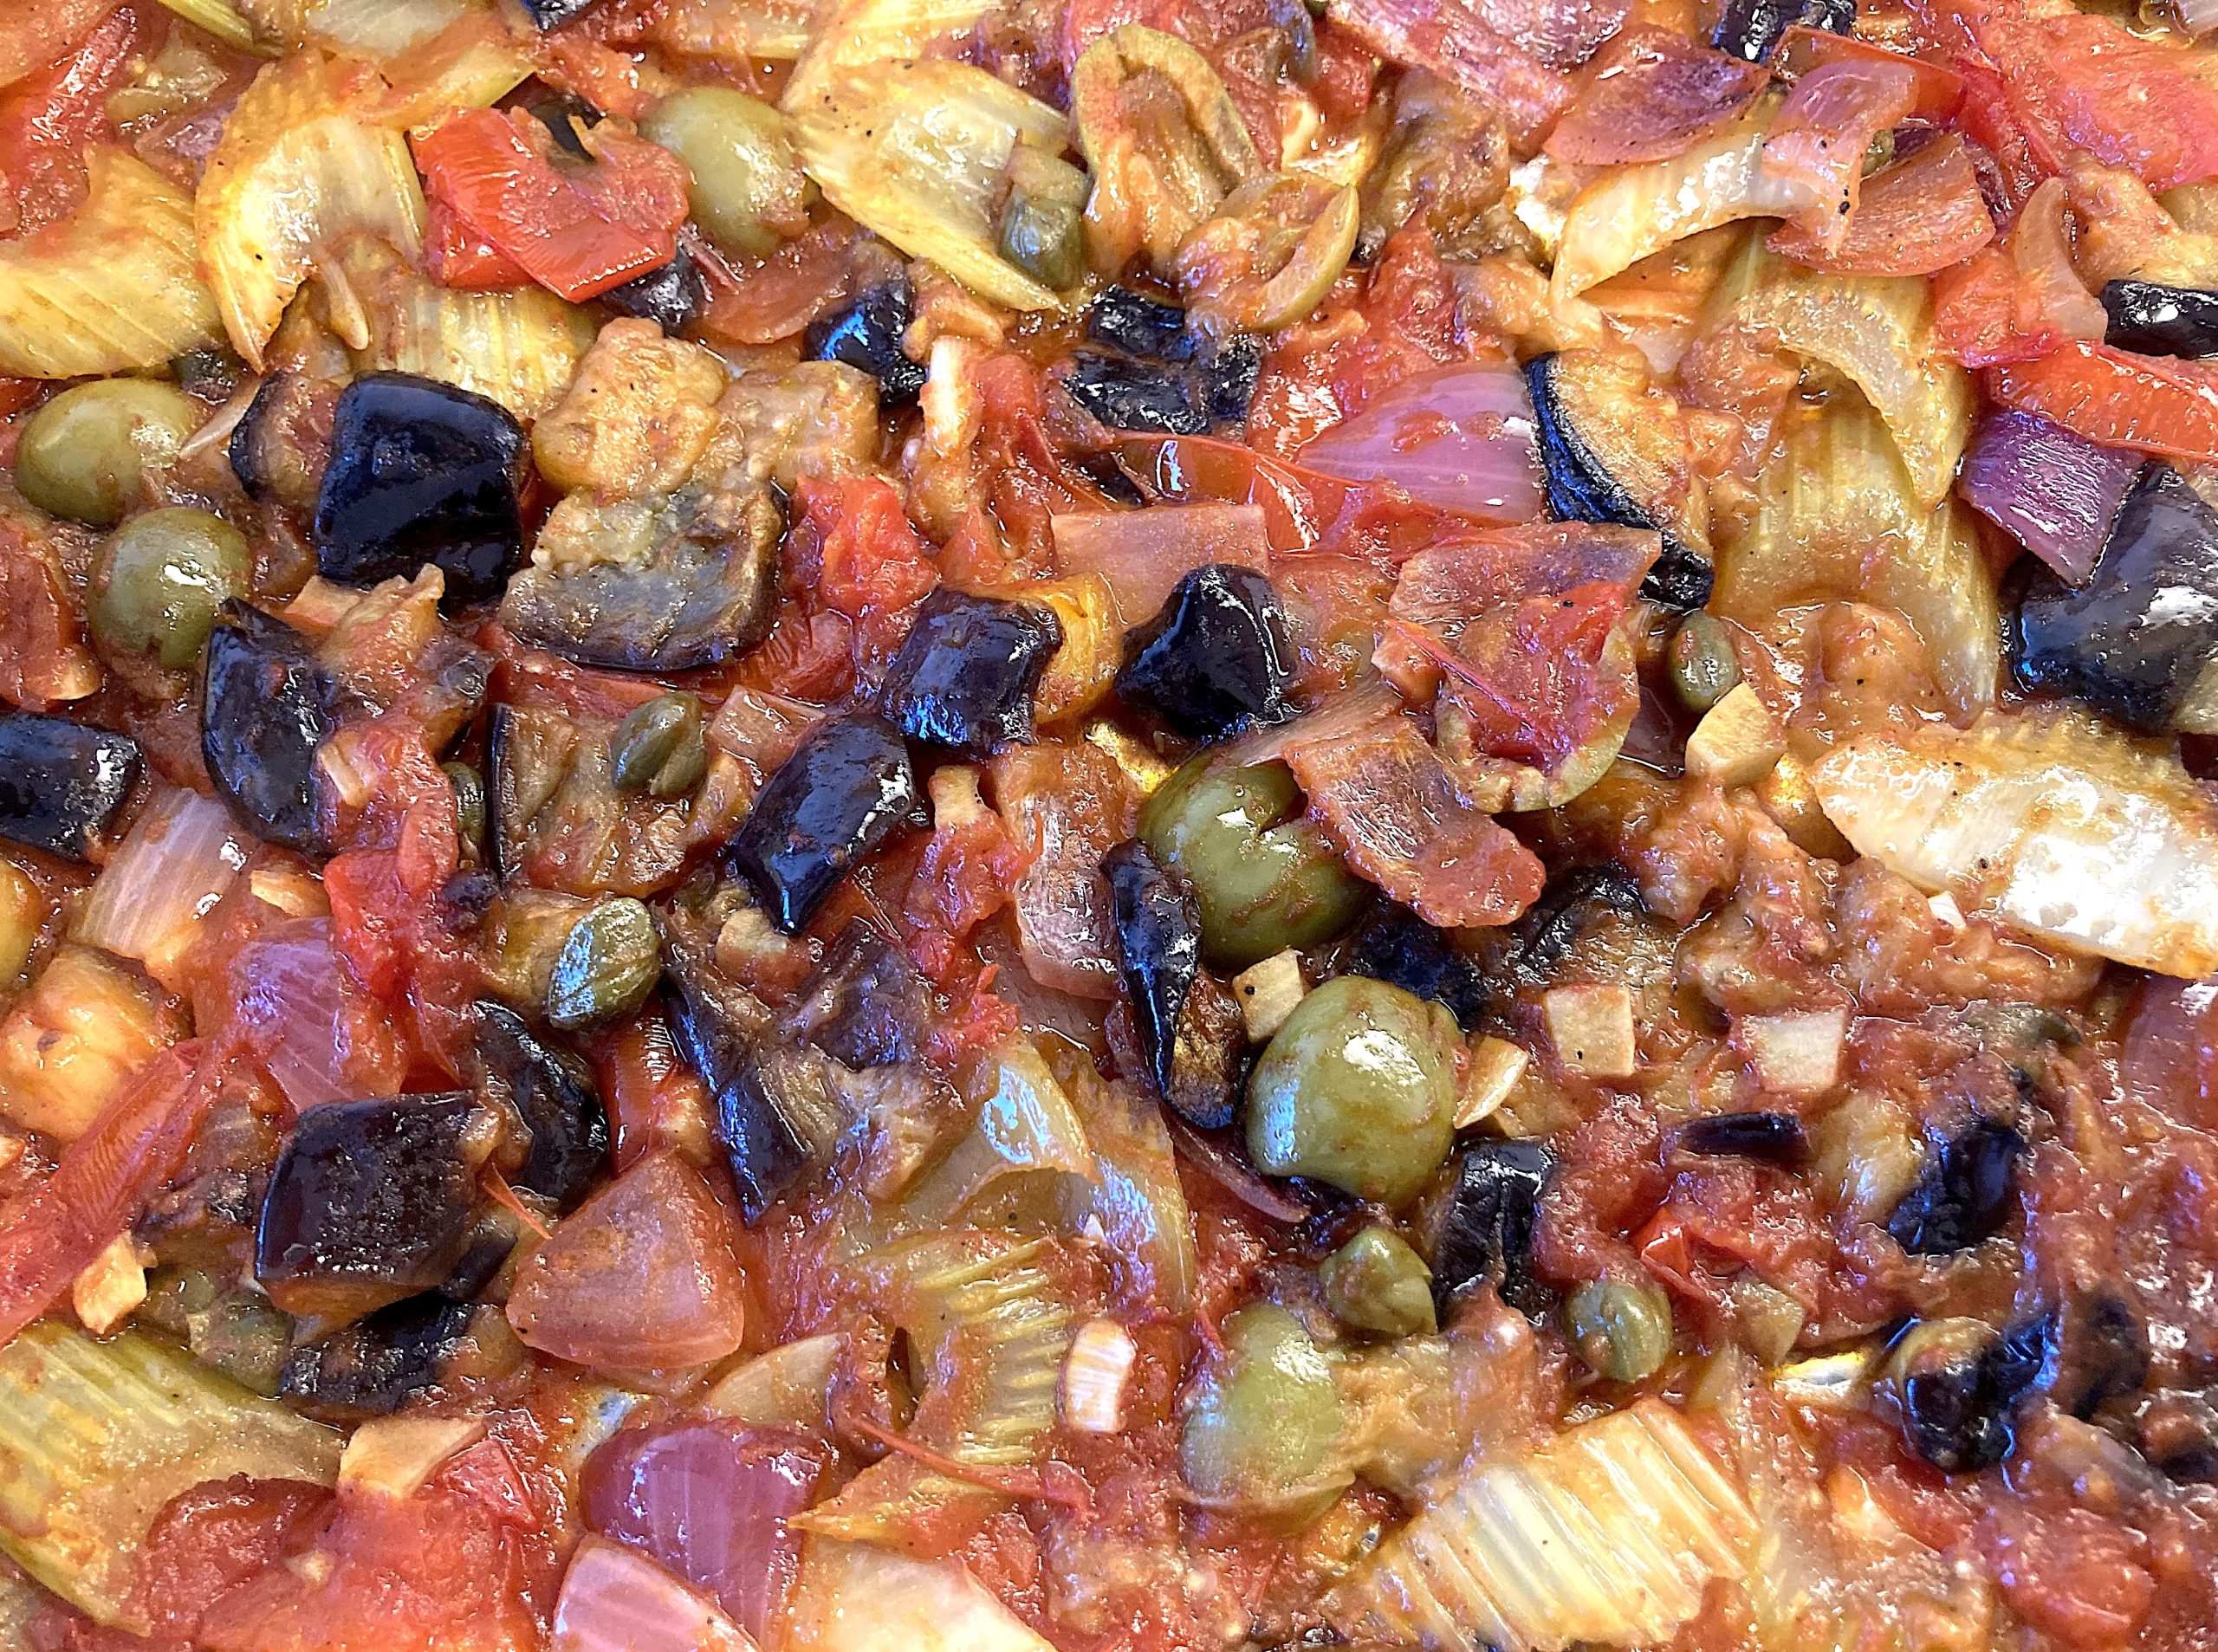
Caponata

This very tasty dish originates from Sicily and is a mixture of chopped and fried vegetables. Eggplant (Aubergine), Tomatoes, Celery, rRed Onion and Green Olives are the main ingredients. The vegetables are prepared and served in an agrodolce sauce, so sweet and sour. Although we’re not keen on using sugar in a salad, in this case the combination of sugar and vinegar is perfect.
Perhaps the ingredients make you think of Ratatouille. Caponata and Ratatouille are very different dishes. Capanota is about fried vegetables, about crunchy celery, about sweet and sour.

Food and Wine Pairing

We served our Caponata with a roulade of pork with sage, rosemary, pancetta, black olives and black garlic. A dish we enjoyed with a glass of Barbera del Monferrato 2022, produced by Livio Pavese. In general, we suggest a full-bodied red wine with perhaps a touch of oak. Some acidity to balance the caponata and dark fruit (plums, blueberries).

The next day we served the Caponata with a roulade of chicken with pancetta, Parmesan Cheese and sage. A dish we enjoyed with a glass of Spätburgunder from the Pfalz area in Germany. In general, we suggest a medium bodied red wine with aromas of red fruit. Medium tannins and balanced acidity. Its taste dry, aromatic, fruity, juicy with a touch of strawberry.

You could also add some canned tuna (in olive oil) and serve the Caponata with crusted bread as a starter, perhaps accompanied with charcuterie and a glass of Crémant or Prosecco.

What you Need (recipe for 4)
  • 2 Aubergines
  • 400 grams excellent ripe Tomatoes
  • 10 Green Olives
  • Capers
  • 30 grams Tomato Puree
  • 4 cloves of Garlic
  • 4 small Red Onions
  • 3 stalks Celery
  • Tablespoon of Caster Sugar
  • Tablespoon of White Wine Vinegar
  • Black Pepper.
What You Do

Best to prepare Caponata one day ahead.

  1. Wash the vegetables.
  2. Slice the eggplant lengthwise in 8 and then in chunks. Drizzle with salt and mix. Put the chunks in a sieve and let rest above a bowl for one or two hours.
  3. Coarsely chop the onion.
  4. Quarter the tomatoes. Remove the internal hard bits and the pits and put these aside. Slice the outer part of the tomato lengthwise in three.
  5. Roughly cut the remainder of the tomatoes, add to a sieve and use the back of a spoon to capture the juices.
  6. Coarsely chop the garlic.
  7. Halve the olives.
  8. Use a knife to peel the back of the celery stalks, or ribs. Slice.
  9. Combine the tomato puree, black pepper, the caster sugar, the vinegar and the tomato juice.
  10. Set your oven to 140 °C or 285 °F.
  11. Discard the liquid of the eggplants, wash of the salt, dry with kitchen paper and fry the chunks in a generous amount of olive oil until golden.
  12. Transfer to a baking tray in your oven.
  13. Fry the onions and the celery until somewhat translucent. Add these to the baking tray.
  14. Now add the olives, the capers, the garlic, the tomato mixture and the tomatoes. Mix. Perhaps add a splash of water.
  15. Cover the baking tray with aluminium foil.
  16. After 20 minutes it’s time to mix the vegetables. Check if you need to add extra water.
  17. After another 20 minutes, remove and discard the foil, mix and increase the temperature to 160 °C or320 °F.
  18. Now you need to keep an eye on the mixture. It may take 10 to 20 minutes for the liquid to somewhat evaporate, but you don’t want the dish to become dry.
  19. When ready, let cool and transfer to the refrigerator.

Ottolenghi’s SIMPLE

In 2017 during the Amsterdam Symposium on the History of Food, Yotam Ottolenghi was awarded the prestigious Johannes Van Dam prize, in recognition of his contribution to the culinary tradition. The prize is named after Dutch culinary author and critic Johannes van Dam who was not only known for his reviews of restaurants but also for his massive collection of books on food and drinks. The jury, chaired by Professor Louise O. Fresco, mentioned his passion for vegetables and his talent to bring colour and flavours to his food. She also mentioned his influence on what we eat in general and how he made bold, tasty Mediterranean ingredients and food popular and accessible through his books.
Yotam Ottolenghi is a well-known and very successful chef, patron, restaurateur and cookbook author. If someone says, “This is a recipe from Yotam Ottolenghi”, the suggestion is that the food will be exciting, colourful, vegetable focused, delicious and absolutely modern.
During one of the breaks, we leaved through his books. Great pictures, nice design, well written recipes and the food delectable. Perhaps we should buy one of his books?
For some reason we didn’t.

When Bernadette suggested to review SIMPLE, as part of her excellent series of cookbook reviews, we borrowed a copy and decided to make two recipes: Tofu and French beans with chraimeh sauce and Quick okra with sweet and sour dressing. The Tofu-dish is labelled with S, meaning it’s Short on Time. The Okra one is labelled with S and I, meaning it has 10 or less Ingredients and is Short on Time.

Tofu

The tofu dish is a combination of French beans, flour, tofu, sunflower oil, dill, black pepper, salt and coriander. The chraimeh sauce is made with garlic cloves, sweet paprika, caraway seeds, ground cumin, ground cinnamon, green chilli, sunflower oil, tomato paste, caster sugar and lime juice. The result is tasty and flavourful, although, honestly, we think it would be better to leave out the tofu. Then you would have a very nice side dish. The chraimeh sauce will probably combine very well with fish. The recipe for this dish was published in the Guardian.

Okra

We love okra, so we were keen to make the salad. It’s a combination of okra, olive oil, garlic cloves, red chilli, sweet chilli sauce, maple syrup, lime juice, sesame oil, coriander leaf and salted roasted peanuts. We didn’t add peanuts. The salad was very nice and balanced with lots of flavours. One to remember. This recipe was also published in the Guardian.

The Book

We enjoyed both dishes, but we haven’t bought SIMPLE for a number of practical reasons. For instance, the vast majority of the recipes requires you to preheat your oven to 180 °C or 200 °C. Not something you’d like to do on a regular basis if you cook for 2 persons as we do most days. Another practical point is the size of his books: they simply don’t fit in our bookcase. Fortunately he has published many recipes on his website and there are 60 videos available via his YouTube channel.

Should SIMPLE be on your shelf? Probably yes if you’re looking for very tasty dishes, clear instructions, inspirational combinations and beautiful pictures. But we could also imagine that you’re happy reading his weekly recipes in the Guardian! SIMPLE is available via your local bookstore or via the well known channels for 20 US$ or 26 Euro.

Wild Garlic

From February to June, you can find Wild Garlic (Ramson(s) Daslook, Bear Leek, Ail des Ours, Bärlauch). It’s a shade-loving plant with beautiful white flowers that you can forage for in the woods or grow in your garden or on your balcony. If you decide to pick wild garlic, be careful not to pick its lookalike: the poisonous Lily of the Valley. Check if it’s wild garlic by grinding your fingers on the leaf. If you smell garlic and onion, you should be fine. If in doubt, don’t use it.
Wild garlic is much loved in Germany, Austria, France and other parts of Europe. The leaves and the flowers are edible (and so are the bulbs, but we haven’t tried these yet). Some sources mention that you should only eat the leaves before the plant starts flowering. But then you can’t combine the leaves and the tasty flowers in your dish, so we suggest ignoring that idea. The flowers are a touch sweet because of the honey. We suggest tasting the leaves and the flowers well before using. Adjust the quantities accordingly.
The taste is a bit like a combination of onion and garlic, but much greener, longer lasting and with a touch of bitterness at the end.  Works very well as a pesto, but equally nice with potatoes or gnocchi. You can also add the leaves and the flowers to a salad, but we feel the taste benefits from some warmth. Be very careful when cooking wild garlic because the flavour deteriorates quickly and at its best becomes unpleasant and onion-like. However, it’s possible to prepare a very tasty wild garlic soup.

We use wild garlic in four dishes. One is Farfalle with a wild garlic-based pesto, the second is a soup and the third is with white asparagus with morels and is published in the excellent book Mushrooms by Johnny Acton and Nick Sandler.

The cheese we use on our potato-wild-garlic-mash is Vacherin Fribourgeois. It originates from the region around the Swiss city Fribourg. It’s a semi-hard, creamy cheese made with raw cow milk. It matures for some 10 weeks in a damp cellar. Its taste is aromatic, floral, full-bodied and lasting, with a touch of sweetness, bitterness and umami. Ideal to combine with gnocchi or an omelette. Unfortunately, it’s not a widely available cheese. We bought it at one of our favourite cheese shops. You could replace it with Gruyère or perhaps Emmenthaler.

We combined out potato-wild-garlic-mash with a nice steak, but you could also serve it with an excellent organic sausage, perhaps one with sage?

Wine Pairing

The combination of the rich and flavourful mash and the red meat suggests a red wine with sufficient acidity, structure and tannins. We decided to enjoy a glass of Le Jardin de Queyron Pindefleurs 2018, Saint-Emilion, made from 78% merlot, 20% cabernet franc and 2% Cabernet Sauvignon grapes. It’s an elegant wine with aromas of dark fruit, liquorice and toast. The wine was a perfect balance with the various flavours in the dish.

What You Need
  • Floury (Starchy) Potatoes
  • Milk or Cream
  • Butter
  • Pinch of Salt
  • Cheese
  • Wild Garlic
What You Do
  1. Bring a pan of water with a pinch of salt to the boil
  2. Add the potatoes and cook until tender
  3. Transfer to a colander and drain
  4. Return to the pan (on low heat) and allow to dry
  5. Mash the potatoes using a fork or a potato masher
  6. Add hot milk, or cream and (melted) butter
  7. A few minutes before you serve the mash, coarsely chop the leaves and grate the cheese
  8. Quickly add the cheese, mix, taste, adjust, perhaps some more, perhaps some black pepper and then add the chopped leaves
  9. A few seconds later the mash is ready
PS

Watch this video (in English) about a communal garden in a park in Amsterdam, featuring Lynn and her beloved daslook.

Small Artichokes (Carciofo Violetto)

The season of artichokes depends on the variety and where you are based. In Italy it’s from mid-winter until early spring, in other countries from March to June, or September and October.
An artichoke should feel heavy, look fresh and the leaves should be closed. If the leaves are wide open, the artichoke is older and it could be dry with lots of choke (the hairs) and dry inner leaves.
The artichokes we use in this recipe are special. Not only are they vibrant purple, they are also small with hardly any choke. In Italy they are called Carciofo Violetto. Tasty as you would expect from an artichoke and easy to eat because the texture of the leaves is not stringy.

Wine Pairing

It’s not straightforward to pair artichokes with wine. According to various researchers this is due to cynarin, a chemical especially found in the leaves of the artichoke. When the wine and the cynarin meet in your mouth, the natural sweetness of the wine is enhanced, making it taste too sweet. Pair artichokes with a bone-dry, crisp, unoaked white wine with clear, present acidity. For instance, Sauvignon Blanc, Grüner Veltliner or Albariño.
The Carciofo Violetto artichoke in combination with the olive oil, Parmesan cheese and browned garlic (bitter, nutty) is less demanding when it comes to wine. We enjoyed it with a nice glass of Côtes de Provence rosé.

What You Need
  • Small purple Artichokes
  • Olive Oil
  • 2 Cloves of Garlic
  • Parmesan Cheese
What You Do
  1. Preheat your oven to 180 °C or 355 °F
  2. Cook the artichokes for 5 minutes in boiling water.
  3. Allow to cool and remove the outer leaves. Be generous, it’s better to remove too many!
  4. Halve the artichokes and place them in a shallow oven dish
  5. Drizzle with olive oil
  6. Transfer to the oven for 5 minutes
  7. In the meantime, grate Parmesan cheese, chop the garlic and mix
  8. Spread the mixture on top of the artichokes
  9. Wait for the cheese and the garlic to colour, perhaps 5 minutes
  10. Serve immediately.
PS

Other recipes with artichokes you may like:

Marmalade

We love a cup of (Russian) Earl Grey or Lady Grey. Black teas flavoured with oil of bergamot (Citrus Bergamia), which gives the tea a lovely citrusy flavour.
You could imagine how happy we were when we saw fresh bergamots on the market. Yellow, the size of an orange and very fragrant. Great to use for a tarte au citron, for a curd or for marmalade.
The juice of the bergamot is fairly similar to lemon juice. Bitter, pungent, perhaps a bit more tart. The rind is fragrant, has a powerful aroma and a (bitter) taste. Bergamot oil is made of the rind and often added to perfumes and cosmetics.

We also used the bergamot juice to make a kimizu-like sauce, served with fried fish. The result was okayish but certainly not our best idea!

What You Need
  • (organic) Citrus Fruit (Oranges, Mandarins, Lemons, Bergamots or a mix of these)
  • Sugar
  • Water
What You Do

Weigh and wash the fruit. Cut into quarters and slice the quarters into thin slices. Transfer to a pan. Add some water, bring to a boil and cook on low heat for 15-30 minutes until the peel is translucent. Now add sugar (we use a ratio fruit to sugar of 2:1, but feel free to add more sugar). Cook on medium heat until the marmalade starts to thicken. This may take 15-30 minutes depending on the fruit. Transfer to clean jars, let cool and enjoy a few days later!

Chicken with Morels

A few weeks ago we bought the first fresh morels of the season. They looked beautiful but unfortunately, they were very bland. Not the typical pancake, buttery taste, not the intriguing aroma. Pity, but worth a try.
This week we bought some great looking dried morels at our favourite epicerie. Dried morels are as tasty as fresh morels, which makes them very different from all other mushrooms. Dried cèpes are such a disappointment. We bought 15 grams and talked about preparing veal with morels and madeira. Monsieur Max, who runs the epicerie, mentioned he preferred to combine them with chicken. Great idea, we said, let’s do that.

The dish relies on the quality of the chicken, the morels and the white wine. Ideally this is Vin Jaune, a wine produced in the Jura in the far east of France and made from Savagnin grapes. This wine is often compared to Fino Sherry, but we think it has more character and length. It also not fortified, so no alcohol was added.
We served the chicken and morels with fried oca. A combination that worked very well, because the oca brought freshness to the dish. Perhaps its oxalic acid?

Wine Pairing

We opened a bottle of Arbois Savagnin 2018. This complex, white wine is made from the same Savagnin grape and is also produced in the Jura. It comes with aromas that will make you think of nuts, curry and even umami. When tasting it, you may think the wine is off, given it is slightly oxidized. In this case it’s a good thing. Enjoy the savoury, nutty taste of the wine in combination with the various flavours in the dish.

What You Need
  • 3 organic Chicken Thighs
  • Butter 
  • 1 Shallot 
  • 15 grams dried Morels
  • 50 ml Arbois Wine
  • 50 ml Double Cream
  • 1 Egg Yolk
What You Do

Check if the morels are clean. If not, use a brush to clean them or rinse with water. Soak the morels in fairly warm water for at least 30 minutes, depending on the quality. In the meantime, finely slice the shallot lengthways. Pat the chicken thighs dry and halve. Fry the thighs in butter until golden brown, perhaps 4 minutes. Set aside and cover with aluminium foil. Fry the shallot in the remaining butter on low heat for a few minutes. Drain the morels, pat dry with kitchen paper and halve lengthways. Keep the soaking water. Add the morels and combine. Leave on low heat for a few minutes. Add the wine and leave to reduce by half. Add some morel juice and reduce. Add cream and allow to warm through and through. Allow to simmer for a few minutes, add the chicken. Leave on low heat until the chicken is done, perhaps 15 minutes. Now it’s time to taste the sauce and see if you have enough. Happy? Beat one egg yolk. Slowly add the mixture from the pan to the egg yolk (this is called ‘marrying the sauce’). Then transfer the mixture to the pan. Warm carefully, otherwise it will split. To serve, place the chicken pieces on a warm plate with some morels on top. Cover with the rich, aromatic sauce.

Oca

There are so many interesting vegetables and fruits. We’re always keen to try something new, so last year when we found mashua we simply had to try it. And how about sand carrots?
This week we spotted oca at our bio-supermarket. Small red tubers originally from Peru. Hopefully not imported, but we bought them anyway.
Oca (Oxalis tuberosa, known as yams in New Zealand) originate from the Andes. It is grown in the highlands of several countries (Ecuador, Peru, Chile, Argentina). Oca’s are also cultivated in various other countries, including the UK, Mexico, New Zealand and France.
Oca is a member of the family of wood sorrels and the plant has clover-like leaves. The leaves and the stems are also edible. Nutrient wise oca tubers and potatoes are very similar. The oca tubers contain a high amount of vitamin C, calcium and iron. Oca tubers can be acidic, thanks to the presence of oxalic acid. The tubers have a lovely soft, red colour. 

Oca tubers can be eaten raw, boiled and baked. We tasted a few slices of raw oca, only to find the texture not great and the taste a bit tangy, radish like. We decided to bake them in olive oil. The result was a pleasant surprise and some of the colour is still visible. The tubers tasted like a really, really good potatoes: soft and nutty.

What You Need
  • 250 grams of Oca
  • Olive Oil
  • Black Pepper
What You Do
  1. Preheat your oven to 180 °C or 355 °F
  2. Wash the oca’s
  3. Don’t be tempted to peel them because the peel is very tasty
  4. Remove small bits of dirt with a sharp knife
  5. Wash again and dry
  6. Add olive oil to a baking dish
  7. Add the tubers and make sure they are nicely coated
  8. Transfer to the oven and fry for 15-25 minutes, depending on the size
  9. Allow to cool for a few minutes before adding black pepper.

Flammkuchen

We continue our series of very simple, tasty dishes by preparing Flammkuchen (Tarte Flambée in France, Feuerfleck in Austria). The dish originates from the Alsace. The first part of the name refers to fire and flames. The story is that bakers baked bread in wood fired ovens. The oven would initially become too hot, and the bakers had to wait for the oven to cool and reach the right temperature. The Flammkuchen would be the indicator. If it was ready within two minutes or so, then the temperature was right. If it would burn, the oven was too hot, but nothing was wasted. 

The dough of Flammkuchen is extremely simple, but also a bit puzzling. In all cases it’s flour, salt, olive oil and water. Some suggest adding egg yolks, others yeast. Adding yeast makes it into a bread dough. Doesn’t it seem obvious that the bakers would use the already prepared dough? Adding egg yolks seems odd too us. Why make a more expensive dough for a product that was to be used as an indicator only?

Back to yeast or no yeast. Which brings us to the question: isn’t Flammkuchen a kind of pizza? They do look very similar, and both are baked in a hot oven, but there are differences. Traditionally Flammkuchen are covered with crème fraîche, lardons and thinly sliced onions. The Flammkuchen should be very thin and very crispy. We think the bakers didn’t use their bread dough but made a quick, simple dough with the sole aim to test the temperature of the oven. Perhaps only water and flour?

Another difference is that Flammkuchen were not on the menu of restaurants until the 1960’s. Probably you would buy them at the local bakery or make them at home. Thanks to the global popularity of pizza, Flammkuchen have gained some visibility.

Drink Pairing

Flammkuchen are tasty, crispy, flavourful and not complex. Enjoy with a glass of white wine, with a beer, or your favourite drink.

What You Need
  • For the Dough
    • 250 grams of Flour
    • 2 tablespoons of Olive Oil
    • 125 ml Water
    • Pinch of Salt
  • Crème Fraîche
  • Black Pepper
  • Mushrooms (we used Trompettes de la Mort)
  • Red Onion
What You Do
  1. Pass the flour through a sieve
  2. Add a pinch of salt and mix
  3. Add water and olive oil and quickly turn the mixture into a dough using your hands
  4. Don’t kneed too long
  5. Leave on room temperature for an hour
  6. Pre-heat your oven to 220 °C or 430 °F
  7. Roll out until very thin, 2 millimetre is perfect.
  8. Add black pepper to the crème fraîche and mix
  9. Place the dough on baking or parchment paper in a baking tray, cover with a layer of crème fraîche, add mushrooms and sliced onion
  10. Bake for 10-12 minutes or so and serve immediately.

Baking Flammkuchen on a higher temperature is preferred, but then you can’t use baking or parchment paper. Best is to use a pizza stone. The baking time will be 3 to 5 minutes on 300 °C or 570 °F.

Flammkuchen ©cadwu
Flammkuchen ©cadwu

Claudia Roden – The Book of Jewish Food, part 2

As contributor to the cookbook review project by Bernadette we reviewed The book of Jewish Food, An Odyssey from Samarkand and Vilna to the Present Day. The book combines more than 800 recipes with the stories and histories that have shaped Jewish cooking over the centuries. The book showcases the diversity of Jewish food. It’s about (Jewish) culture, about how food is part of our shared culture, how we are all connected and how food can help us understand history.

We prepared Joodse Boterkoek and Aliyah, a dish that combines chicken, tomato, tamarind, basil and cilantro. We served it with polenta. Both are delicious!

We also very much liked Fish Balls in Tomato Sauce as prepared by John Rieber. The fish balls are a combination of white fish with ginger and nutmeg. The dish originates from Egypt and Morocco. It will perhaps make you think of Gefilte Fish, a traditional appetizer. The recipe is not complex and the result as prepared by John looks great. One we will be making soon!

Jo Tracey prepared a Goulash Soup with beef, sweet paprika and a touch of chilli. She writes: “I first bought the digital version of this book a few years ago but I never got around to reading it or cooking from it until now. And what a treat it’s been.” The soup is rich and one we would cook on a wintery day.

Robbie Cheadle baked a Honey Cake, made with honey, brandy, coffee, cinnamon, cloves, orange zest, almonds and sultanas. Sounds wonderful! According to Robbie: “This cake is delicious, and we all enjoyed it. The orange zest, coffee, and honey create a lovely symphony of flavors.

Bernadette herself chose a recipe from the Ashkenazi section of the book – Holishes or Stuffed Cabbage Leaves; a dish that appeared frequently in her childhood home. The leaves are stuffed with a combination of beef, rice and onion. The sauce is made with tomatoes, lemon, ginger, apple, raisins and honey. Not the most obvious combination! The result looked absolutely yummy.

The book of Jewish Food by Claudia Roden is available via your local bookstore or the usual channels for approximately 50 US$ or 40 euro. Highly recommended!

Claudia Roden – The Book of Jewish Food, part 1

The cookbook review project by Bernadette is a great way to explore cookbooks. The book of Jewish Food by Claudia Roden was not yet on our bookshelf, so we bought a copy of the 25th edition for 40 euro.  Its subtitle is An Odyssey from Samarkand and Vilna to the present day. The book combines more than 800 recipes with the stories and histories that have shaped Jewish cooking over the centuries. The book showcases the diversity of Jewish food. 

The first time we saw Claudia Roden was during the 2016 Amsterdam Symposium on the History of Food. In 1999 she received the Prince Claus Award in recognition of her exceptional initiatives and achievements in the field of culture. She is author of the classic comprehensive book Food of Italy and member of the jury of the prestigious Johannes van Dam prize, awarded in 2016 to Yotam Ottolenghi. We were far too impressed to actually talk to her. A bit silly, agreed, and we will make up for it in April 2025 during the next Symposium.

The Netherlands

The Dutch Jewish community plays an important role in the Netherlands, and more specifically in Amsterdam. The community was formed in the seventeenth century by people who came from Portugal (Sephardi Jews) and from Germany and Eastern Europe (Ashkenazi Jews). In general the first group was worldly, cultured and well connected to the Dutch upper classes. The second group was poor and unskilled. They worked as market traders, food sellers (for instance pickled vegetables and salted herring with chopped onions, which is still a Dutch treat) and pedlars.

Over the years both groups influenced Dutch cuisine. According to food author and publisher Jonah Freud dishes such as Haringsalade met Bietjes (see here for our version) and Broodje Halfom (a bun with beef liver and salted beef (somewhat similar to pastrami) with white pepper) are typical examples of the Jewish influence on Dutch cuisine. Gemberbolussen (a sweet cake with ginger) and Kugel (a cake with almonds and pears) are still widely available in Amsterdam.

Two Recipes

We decided to make two recipes from the book. Boterkoek is very typical for the Netherlands. A rich combination of lots of butter, sugar, flour and a pinch of salt. Classic and easy to make. We slightly adjusted Claudia Roden’s recipe, inspired by Dutch Pâtissier Cees Holtkamp. Early on during his career he learned how to bake Boterkoek when he worked for a Jewish Bakery. 

The second recipe is for Aliyah, stewed chicken with tomatoes, tamarind, cilantro and basil. An intriguing combination and one we simply had to try. The recipe originates from the Georgian town of Kulashi. This small town was once the home of one of the largest Georgian Jewish communities.

Obviously we decided to enjoy a kosher wine with the Aliyah. We bought a bottle of Barkan Classic Merlot-Argaman 2021. The Argaman grape (an Israeli creation) is combined with Merlot. The result is an intensely coloured red wine with dark fruit, supple tannins and depth. In general, we would suggest a medium to full-bodied red wine with sufficient depth and length.

Your Bookshelf

We think this book should be on your bookshelf. It’s about (Jewish) culture, about how food is part of our shared culture, how we are all connected and how food can help us understand history. It took Claudia Roden 16 years to write it. We can only thank her for this impressive and relevant achievement.

The book of Jewish Food by Claudia Roden is available via your local bookstore or the usual channels for approximately 50 US$ or 40 euro.

Recipes for Joodse Boterkoek and Aliyah on Bernadette’s website.