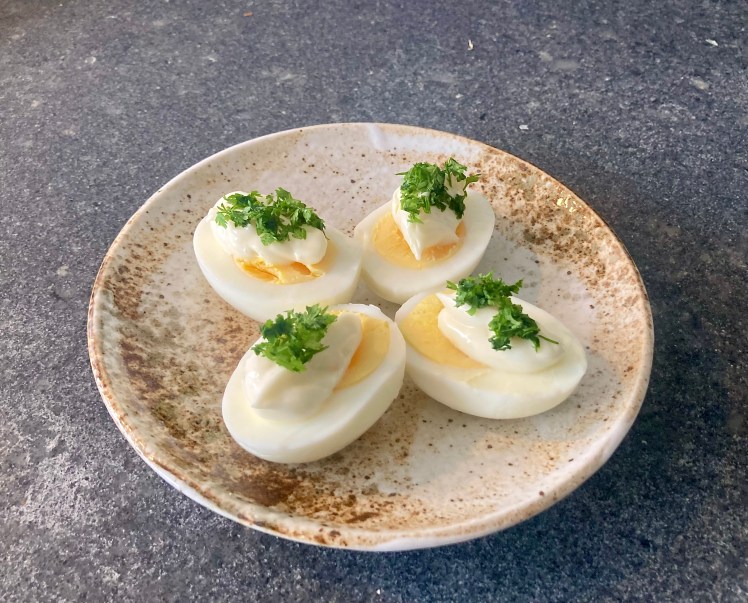
Clafoutis

Cherries, cherries, cherries! We love their rich, sweet taste, the touch of tartness and their firm, succulent texture! They just want to be eaten, one after the other. So what better summer dessert than Clafoutis?

Should you use whole cherries or pitted ones? Not removing the pits is less work for you (obviously) and it reduces the risk of a soggy Clafoutis. Unpitted cherries will give a subtle almond flavour to the clafoutis. On the other hand, you don’t want to bite into a pit while enjoying your dessert. Also important: the pits contain amygdalin, a toxic compound that can also be found in almonds, apple seeds and apricot stones.
We decided to pit the cherries and compensate for the lack of almond taste by adding some almond flour to the batter.
If you decide to remove the pits, make sure you remove all of them!

Finally, yes, you can replace the cherries with fresh apricots, berries, peaches or prunes. The result is called a Flaugnarde. But nothing as tasty as Clafoutis made with fresh cherries!

What You Need
  • 2,5 dl of regular Milk
  • 2 Eggs
  • 30 grams of plain Flour
  • 10 grams of Almond Flour
  • 20 grams of Sugar
  • 500 grams of Cherries, pitted
  • 10 grams of Butter
What You Do
  1. Pre heat the oven to 180° Celsius or 350° Fahrenheit
  2. Whisk together the eggs, plain flour, almond flour and sugar
  3. Bring the milk almost to a boil
  4. Stir the milk into the mixture
  5. Butter a large, shallow baking dish, add cherries to the dish
  6. Make sure the bottom is nicely covered with cherries; no need to have two layers of cherries
  7. Pour the mixture over the cherries
  8. Bake (lower third of the oven) for 20 minutes
  9. Add a few dots of butter
  10. Continue baking for another 20 minutes or until the Clafoutis is golden
  11. Leave to cool for 60 minutes or so, this will enhance the taste
  12. Clafoutis should be served luke-warm
  13. You could decorate the clafoutis with icing sugar
Clafoutis ©cadwu made with fresh cherries, milk, sugar, all purpose flour, butter and almond flour
Clafoutis ©cadwu

Garlic Soup

A few weeks ago John Rieber wrote about the miracle of garlic. He also explains the 10-minute rule and the way it creates additional benefits when using garlic. His post includes a recipe for a garlicky soup, a variation of Avgolemono.

The post made us think of ‘knofsoep’ (in English it would be ‘garsoup’) as described by author, poet and performer Johnny Van Doorn in 1988. He was known for his ecstatic performances, enabled by the use of various substances. His knofsoep, based on a recipe from Roman times, helped him through the day. The soup is uplifting, supports overall health and more specifically the liver. It is to be served with crusted bread and a glass of wine.
We adjusted the recipe slightly by using vegetable stock and adding some chives. The soup has a very mild, sweet garlic flavour (thanks to not roasting or frying the garlic) and complexity thanks to the herbs and the clove.

The original recipe (in Dutch) is available in his diary Door de Weken Heen, available for 5 euros, second hand only.

What You Need
  • 500 ml Vegetable Stock
  • 8 cloves of Garlic
  • 1 starchy Potato
  • Olive Oil
  • Bouquet Garni (Thyme, Sage, Rosemary, Parsley, Bay Leaf)
  • 1 Clove
  • 2 crushed Black Peppers
  • Parmesan Cheese
  • Chives
  • (optional) Black Pepper
  • (optional) Salt
What You Do
  1. Bring the stock to a boil
  2. Add garlic and potato
  3. Reduce the heat
  4. Add a small tablespoon of olive oil
  5. Add bouquet garni, clove and crushed black peppers
  6. After 40 minutes pass the soup through a sieve
  7. Use a spoon to capture all the flavours of the ingredients
  8. Reheat the soup
  9. Taste and adjust (salt, pepper)
  10. Garnish with Parmesan cheese and chives
Garlic Soup ©cadwu made with garlic, potatoes, clove, bouquet garni, vegetable stock and decorated with parmesan cheese and chives
Garlic Soup ©cadwu

Mapo Tofu with Mushrooms

The aromas and flavours of Mapo Tofu are powerful, also thanks to the use of Sichuan pepper. It gives the dish a floral, citrusy touch. The combination of silky, soft tofu with ground pork, Chili Bean sauce and scallions is very rich. It’s a delicious, heart-warming dish.
In this version we replace the meat with mushrooms (Wood Ear turned out to be the best choice, but Shiitake will also be fine). We think it’s a lighter, equally tasty but different, version of Mapo Tofu.

Sichuan pepper is not related to black pepper or chili. It’s actually not spicy. It causes a pleasant numbing sensation on your tongue and lips, for a few minutes only, which is surprisingly nice when eating spicy food. We recommend lightly toasting the peppers before grinding or crushing them.

Serving Mapo Tofu with rice is a great idea. Or enjoy it with some Bok Choy (Pak Choi) simmered in a combination of oyster and soy sauce.

Drink Pairing

Jasmine tea is an obvious choice. It has a nice aroma and floral taste. The combination with the spices and the Sichuan pepper works really well.

What You Need
  • 100 grams of fresh Wood Ear (or 25 grams dried Wood Ear)
  • 300 grams of Silken Tofu
  • 100 ml Vegetarian Stock
  • 2 tablespoons light Soy Sauce
  • 1 tablespoon Mirin
  • 3 teaspoons Sesame Oil
  • 2 Garlic Cloves
  • 1 small Onion
  • 1 Scallions
  • 3 teaspoons of chopped Fresh Ginger
  • ½ -1 tablespoon Chili Bean Sauce (Douban, Toban-Djan)
  • 1-2 teaspoons Black Bean Sauce (Douchi)
  • 1 teaspoon of Red Sichuan Pepper
  • Oil
  • Cornstarch
  • Rice
  • Pickled Spicy Cucumber
What You Do
  1. Toast the Sichuan peppers lightly in a non-stick pan
  2. Remove the peppers from the pan and let cool
  3. Pre-heat your oven to 65 °C or 150 °F
  4. Cook the rice according to the instruction on the package
  5. Chop the onion, the garlic and the fresh ginger
  6. Slice the scallions and separate the white from the green
  7. Clean and slice the mushrooms
  8. Slice the tofu and make cubes (2 cm, 1 inch)
  9. Warm the stock
  10. Add oil to the pan and fry the mushrooms
  11. After a few minutes, add soy sauce, mirin and sesame oil
  12. Combine and leave to simmer for a few minutes
  13. Remove from the pan and keep warm in the oven
  14. Grind the Sichuan peppers coarsely
  15. Add oil to the pan
  16. Fry the white part of the scallions, the onion, the garlic and the ginger
  17. Add the chili bean sauce and fry. Enjoy the aromas!
  18. Add half of the grounded Sichuan pepper
  19. Add the stock, the tofu, the mushrooms and the black bean sauce
  20. Use a spatula to mix
  21. Allow to simmer for 15 minutes or so until the sauce is nicely reduced and the flavours mixed
  22. In the meantime, finely crush the remaining Sichuan pepper
  23. Use cornstarch to create the right consistency
  24. Just before serving sprinkle with Sichuan pepper and the green of the scallions.
  25. Add spicy pickled cucumber to the rice
  26. Assemble and serve
Mapo Tofu with Mushrooms ©cadwu made with wood ear and Sichuan pepper
Mapo Tofu with Mushrooms ©cadwu

Lion’s Mane

If you search for Lion’s Mane mushrooms, you will find lots of references to supplements with wonderful health benefits, ranging from supporting longevity to improved cognitive functions. It’s also supposed to have antibiotic, anti-fatigue and anti-ageing properties. Sounds great, but how do the fresh mushrooms taste?

Lion’s Mane (also known as Yamabushitake and Hou Tou Gu) is a mushroom native to North America, Asia and Europe. Their flavour and texture sets them apart from many other mushrooms. A bit sweet, mild, some umami, subtle, a hint of seafood (crab, lobster). The texture meaty and elastic with a unique structure thanks to the spines.

Alan Bergo (the Forager Chef) uses them to make crab cakes. He writes: This is one of my all-time favorites. I guarantee this is so good, some people may not be able to tell it’s a crabcake made from mushrooms instead of crab.

We thought it would be nice to make a dish with various flavours, allowing us to taste the mushroom on its own, but also with the Tomato Confit and Polenta. Combining it with tomato enhanced the flavour of the mushroom and made it more complex (sweet, sour, umami, aromatic). The combination with Polenta was nice, perhaps because of the various textures.

Wine Pairing

Grüner Veltliner is a wine typical for Austria, with flavours such as lime, grapefruit and white pepper. We enjoyed a glass of Grüner Veltliner, made by Eisacktal Valle Isarco, from the Alto Adige region in Italy. It is fruity, fresh and slightly spicy with clear acidity. Very nice with the flavours in the dish. In general we suggest a fresh, dry white wine with hints of green apple and/or citrus. 

What You Need
  • Mushrooms
    • 100 grams of Lion’s Mane
    • Olive Oil
  • Polenta
    • Polenta
    • Vegetable Stock (optional)
    • Parmesan Cheese
    • Thyme
  • Tomatoes
    • Tomatoes
    • Thyme
    • Rosemary
    • Garlic
    • Olive Oil
What You Do
  1. Day before
    1. Cook (in vegetable stock) the polenta according to the package until ready
    2. Add some Parmesan cheese and thyme
    3. Pour the polenta on a plate and smooth it into an even layer (1,5 centimetres) with a spatula
    4. Cool to room temperature
    5. Cover with foil
    6. Transfer to the refrigerator for use the next day.
  2. A few hours before
    1. Wash and dry the tomatoes and add these to a baking dish
    2. Chop the garlic
    3. Add herbs, garlic and a generous amount of olive oil to the dish
    4. Put in the oven for something like 2 hours on 90 °C or 200 °F
    5. Baste the tomatoes once or twice
    6. Don’t forget to use the cooking liquid as well, it’s another pack of flavours!
  3. Preheat your oven to 65 °C or 150 °F
  4. Turn out the polenta onto a cutting board
  5. Cut it into a shape you like (strips, triangles, circles)
  6. Fry in relatively hot olive oil in a non-stick pan until golden, probably 2*5 minutes. 
  7. In parallel clean the mushroom and slice (not too thin)
  8. Fry in olive oil until golden brown, probably 2*2 minutes
  9. Transfer to the oven
  10. Leave for 5 minutes in the oven
  11. Add just a hint of black pepper to the mushrooms before serving.
  12. Assemble and serve on a warm plate.
PS

Best to buy young mushrooms, the size of a tennis ball.

Rhubarb and Apricot Jam

Jam must contain a certain percentage of fruit and sugar in order to be called jam. In Canada for instance fruit jam must have at least 45% fruit. In the EU it’s 35% for jam and 45% for extra jam. So what’s the remaining 55% if it’s not fruit? In most cases it’s a gelling agent (pectin), an acidifying agent (citric acid), a preservative (potassium sorbate) and sugar. Lot’s of sugar! For instance Waitrose’s Essential Strawberry Jam contains (per 100 grams) 63 grams of sugar and it’s made with 45 grams of strawberries. See picture.

If the combination contains less sugar, then it’s no longer jam. Fior di Frutta (as produced by Rigoni di Asiago) uses organic fruit, apple juice and natural pectin to make a fruit spread. Their strawberry not-jam is made with 60% strawberries and contains 36 grams of sugar per 100 grams. The sugar is not added, it’s natural sugar (strawberries and apples). A very tasty and huge improvement, but we can do better by making our own. The trick is not to make too much, store it in the refrigerator and enjoy within a few days.

What You Need
  • 4 Apricots
  • 1 small Orange
  • 2 Rhubarb Stalks
  • 1 tablespoon of Sugar (or less)
What You Do
  1. Wash and dry the apricots and the rhubarb
  2. Slice the rhubarb (0,5 cm or 0.2 in)
  3. Remove the stone of the apricots and cut the apricot in small pieces
  4. Add orange juice to the pan
  5. Add apricot and rhubarb
  6. Heat until boiling, reduce heat
  7. Close the lid and leave for 5-10 minutes
  8. Check if the rhubarb is soft
  9. Pulse once or twice with a blender to smoothen some of the mixture
  10. Add sugar
  11. Mix well
  12. Taste and adjust if necessary
  13. Transfer to 2 very clean jars (2*250 grams)
  14. Close the jars and transfer to a bassin with cold water
  15. Will keep well for a limited time in the refrigerator
PS

Combining rhubarb with strawberries is also a great idea!

Oven Roasted Tuberous Chervil

Tuberous chervil, also known as turnip chervil and bulbous chervil, is a forgotten vegetable. It was popular throughout continental Europe in the 19th century, but today it’s hard to find. Tuberous chervil is very tasty and easy to prepare. Its flavour will make you think of chestnuts, without a hint of bitterness. The ‘chervil’ in the name does not mean it’s the tuber of the chervil plant (like parsley and parsley root are related). It’s included because the leaves of tuberous chervil look like the leaves of chervil. The two are not related.
As more often, the tubers were replaced by potatoes: cheaper, easier to handle and easier to grow.

Earlier we made a purée with tubers, cream, butter and nutmeg. Combine it with lamb chops and you have a very tasty meal.

This colourful, flavourful and aromatic oven dish goes very well with pork and chicken.

What You Need
  • 5 Tuberous Chervil
  • 1 Parsnip
  • 1 Shallot
  • 1 Carrot
  • 1 Garlic Clove
  • 1/2 teaspoon of Cumin
  • 3 Pruneaux d’Agen
  • Handful of Chick Peas, drained and washed
  • Chicken Stock
What You Do
  1. Preheat your oven to 180 °C or 355 °F
  2. Chop the shallot
  3. Chop the garlic
  4. Chop the pruneaux
  5. Wash and peel the parsnip and the carrot
  6. If the tuberous chervils are young and fresh, you don’t need to peel them. The ones we bought were a bit older, so we peeled them
  7. Quartered tuberous chervils
  8. Slice the carrot
  9. Dice the parsnip
  10. Gently fry the shallot
  11. Add garlic
  12. Add cumin
  13. Transfer to a shallow dish
  14. Add tuberous chervils, parsnip, pruneaux, carrot and chickpeas
  15. Mix
  16. Add stock
  17. Cover the oven dish with aluminium foil
  18. Transfer to the oven for 30 minutes
  19. Flip the vegetables after 15 minutes
  20. Remove foil
  21. Leave in the oven for another 15 minutes
  22. Serve warm
Oven Roasted Tuberous Chervil ©cadwu with parsnip, pruneaux, carrots, shallot, cumin and garlic
Oven Roasted Tuberous Chervil ©cadwu

Rhubarb and Strawberry Crumble

The combination of rhubarb and strawberry is delicious. It’s sweet, sour, tangy and tart with a touch of bitterness. The seasons of rhubarb and strawberries overlap for only a few weeks (late spring, early summer) so don’t wait too long if you want to make jam or this dessert.
The crumble brings warmth and depth to the dessert, thanks to the use of allspice, cinnamon and nutmeg. Filling and crumble are complementary with regard to texture, flavour and aroma.

What You Need
  • Filling
    • 4 stalks of Rhubarb
    • 400 grams of Strawberries
    • 1 tablespoon of Lemon Juice
    • 2 teaspoons of White Sugar
  • Crumble
    • 40 grams of Unsalted Butter
    • 40 grams of Light Brown Sugar
    • 30 grams of All Purpose Flour
    • 70 grams of Almond Flour
    • 1/2 teaspoon of Cinnamon
    • dash of Nutmeg
    • 3 finely ground Allspice berries
What You Do
  1. Pre-heat your oven to 180 °C or 355 °F (traditional)
  2. Wash and dry the rhubarb and the strawberries
  3. Slice the rhubarb in 1 cm (0,4 in) slices
  4. Slice smaller strawberries lengthwise in 4, bigger ones in 6
  5. Combine sugar, flour, almond flour, cinnamon, nutmeg and allspice
  6. Cut the butter in small cubes
  7. Use your hands to combine butter and the mixture until you have a crumbly dough
  8. Combine rhubarb, strawberries, lemon juice and sugar
  9. Add the fruit mixture to a ceramic oval oven dish
  10. Top with the crumble
  11. Transfer to the oven for 25 minutes
  12. The crumble is ready when the colour is golden brown and the fruit is bubbly around the edges
  13. If the fruit needs more time, reduce the heat to 150 °C or 300 °F
  14. Serve at room temperature with a scoop of vanilla ice cream
PS

As many other we thought allspice should be spelled ‘all spice’ and that it is a mixture of various spices. It isn’t. Allspice is the lightly fermented and dried unripe berry of a tree called Pimenta Dioica. Best to buy berries and ground these in a mortar.
A few days later we added ground allspice to a beetroot salad. A winner!

Rhubarb and Strawberry Crumble ©cadwu with allspice, nutmeg and cinnamon
Rhubarb and Strawberry Crumble ©cadwu

Royal Carrot Cake

Today, April 27th, we celebrate the birthday ol King Willem-Alexander of the Netherlands. Hip hip hurray!
The Dutch royal family is also known as ‘de Oranjes’, which is reflected in the use of the colour orange when referring to Dutch royalty. There is no link between the royal family and the colour. The ‘orange’ in their name refers to the French city of Orange, a Principality one of his ancestors inherited in 1544.
Over the years we prepared Orange SabayonQueen’s SoupOrange and Almond CakeBouchée à la Reine, Orange FlanCanard à l’OrangeBaba au Mandarine Napoléon and Orange Parfait on this day.

This year we prepare a Carrot Cake. Given its English origin we thought it would be best to use an English recipe as a starting point. What better cookbook to use than Harrods Book of Traditional English Cookery by Hilaire Walden! It includes recipes for dishes such Jugged Kippers, Rabbit in the Dairy and Dorset Apple Cake. Buy this wonderful book via the usual channels for a few euros or dollars.

Bake the cake 2 days before serving. Add the topping, transfer to the refrigerator and serve cold.

The recipe is for a 19 cm (7,5 inch) baking tin and the cake will serve 8 people.

What You Need
  • Cake
    • 125 grams of Butter
    • 150 grams of light Brown Sugar
    • 3 Organic Eggs
    • 3 teaspoons of Orange Rind
    • 15 ml of Lemon Juice
    • 175 grams of Flour
    • 8 grams of Baking Powder
    • 35 grams of ground White Almonds
    • 75 grams of chopped Walnuts
    • 50 grams of White Raisins
    • 250 grams of grated Carrot
  • Topping
    • 200 grams of Soft Cheese
    • 1 teaspoon of Honey
    • 1 tablespoon of Lemon Juice
    • 25 grams of chopped Walnuts
    • 45 grams of white Marzipan for the carrots
    • 10 grams of white Marzipan for the green part
    • Food colouring: Red, Yellow and Green
What You Do (Cake)
  1. Preheat your oven to 180 °C or 350 °F, traditional
  2. Coat a round cake tin with butter
  3. Coarsely grind the almonds
  4. Coarsely grind the walnuts
  5. Sift flour and baking powder and combine
  6. Soak the raisins for 10 minutes; discard the water
  7. Grate the carrot
  8. Grate the orange rind
  9. Melt the butter until soft 
  10. Combine butter and sugar until relatively fluffy
  11. Combine flour, baking powder, chopped walnuts and almonds
  12. Separate the eggs
  13. Whisk the egg whites until stiff
  14. Add the egg yolks to the butter and sugar mixture, combine
  15. Add orange rind, raisins and lemon juice to the mixture, combine using a spoon
  16. Add the combination of flour, baking powder and nuts to the mixture
  17. Add carrots to the mixture and combine
  18. Fold in the egg white
  19. Transfer to the oven for 50 minutes
  20. Leave to cool on a wire rack
  21. Keeps well on room temperature for at least 2 days
What You Do (Topping)
  1. Make 3 small orange balls
  2. Press these into the shape of a carrot
  3. Use a knife to make a few superficial slices
  4. Roll out the green marzipan, cut out 3 circles and create the green part
  5. Beat cheese, honey and lemon juice
  6. Taste and adjust; we added extra lemon juice
  7. Spread evenly over the cake
  8. Sprinkle with walnuts
  9. Decorate with three carrots
  10. Once you’ve added the topping, store in the refrigerator

Asparagus à la Carbonara

We love white asparagus and traditionally we make classic white asparagus at the start of the season. We have prepared a range of dishes with asparagus and are always keen to try something new. Recently we saw a recipe for Spaghetti Carbonara with Asparagus. Wrong idea. Spaghetti Carbonara is an iconic Italian dish, made with spaghetti, guanciale, eggs, Parmesan cheese and/or Pecorino and black pepper. No reason to change or add anything. The picture showed penne, asparagus, basil and a creamy, rich sauce. Well, we must admit, it did look tempting. What if we would skip the penne and basil? That combination is not too dissimilar to the classic one. Knowing how tasty the combination of grilled asparagus and Parmesan cheese is, what’s stopping us? Let’s give it a try!

Before you dash of to your kitchen: the recipe comes with a challenge. The starch of the spaghetti helps thicken the sauce of Spaghetti Carbonara. There is no starch in this combination. Even more challenging, the asparagus are moist which will make the sauce thinner. When you’ve added the egg mixture to the pan, you will have to increase the heat to thicken the sauce. Too quickly or not enough stirring and your sauce will become an omelette. Be careful!

Wine Pairing

A Pinot Gris form Northern Italy will go very well with this dish. In general, a white wine with aromas of for instance lemon, green apple or pear. Some refreshing acidity is perfect with the rich sauce. The wine should be light to medium bodied.

What You Need
  • 500 grams of (white) Asparagus
  • 100 grams of Pancetta
  • 2 Organic Eggs
  • Parmesan Cheese or Pecorino
  • Black Pepper
What You Do
  1. Peel the asparagus
  2. Steam the asparagus for 10 minutes, depending on the size. The asparagus should remain crunchy 
  3. Cut the asparagus in 4 or 5 pieces
  4. Cut of the rind of the pancetta (if any)
  5. Dice the meat. Small cubes are best, the salty meat should become a condiment
  6. Warm a pan to medium heat
  7. Fry the pancetta
  8. Whisk the eggs, add some freshly grated Parmesan cheese, add some black pepper and whisk again
  9. Reduce the heat to minimum
  10. Add the asparagus to the pan
  11. Combine and make sure the asparagus are nicely coated with the fat and juices from the meat.
  12. Now it’s time to create the creamy sauce!
  13. Check if the pan is not too hot. If so, better wait a minute
  14. Add the egg mixture and combine
  15. Now for the difficult part: carefully increase (!) the heat while moving the asparagus, the pancetta and the sauce, keep moving, add more grated cheese, it helps thicken the sauce, taste, keep moving, and do so until the sauce has the right consistency. This may take a few minutes.
  16. Serve immediately on a warm plate
PS
  • We decided to use pancetta instead of guanciale because pancetta has a milder taste, which combines better with the bitterness of the asparagus.
  • We haven’t prepared the dish with Green Asparagus. Anyone willing to give it a try?
Asparagus à la Carbonara ©cadwu with pancetta and a very cream sauce, made with eggs and parmesan cheese.
Asparagus à la Carbonara ©cadwu

Tian

A delicious combination of tomatoes, zucchini, eggplant and onion. Add flavoured olive oil (garlic and Herbes de Provence), assemble and transfer to the oven. That’s all! The result is a Tian, a vibrant and very tasty dish. Thanks to the preperation in the oven, without additional liquid or sauce, the taste and aromas of the vegetables are pleasant and intense.

A few weeks ago, we prepared Ratatouille Niçoise. We read about variations such as Confit Bayaldi and saw beautiful presentations by Remy (Ratatouille) and other chefs. We also came across a recipe for Tian. Then it all made sense: the nouvelle cuisine version of ratatouille combines the ingredients and preparation of a classic ratatouille with the presentation of Tian.

Tian is the name of a ceramic casserole dish used in the Provence and other parts of France. The dish prepared in it is also called Tian. We found lots of versions, including a Tian d’Anchois, in Hélène Barale’s book La Cuisine Niçoise. A combination of a rich tomato sauce, fresh anchovies and bread.

When shopping for our Tian we wondered if we should add onion. Our greengrocer on the Cours Saleya in Nice was clear: white onions are mandatory.

What You Need
  • 1 Courgette or Zucchini
  • 1 Eggplant or Aubergine
  • Tomatoes
  • White Onion
  • 2 teaspoons (or more) Herbes de Provence
  • 2 cloves of Garlic
  • Black Pepper
  • Olive oil
What You Do
  1. Wash the zucchini, the tomatoes and the eggplant
  2. Heat your oven to 200 °C or 390 °F
  3. Slice the zucchini, the tomatoes and the eggplant into thin, evenly sized pieces.
  4. Cut the eggplant and/or zucchini slices in half to make layering easier.
  5. Slice the onion, but thinner
  6. Crush the garlic
  7. Combine garlic, olive oil and herbes de Provence 
  8. Coat the dish with half of the oil
  9. Assemble the dish
  10. Drizzle with the remaining oil-mixture
  11. Add some black pepper
  12. Sprinkle with some extra herbes de Provence
  13. Cover the dish with aluminium foil
  14. Bake for 20 minutes
  15. Remove the cover and continue baking for another 20–25 minutes
  16. Allow to cool for 10 minutes
  17. Serve in the dish