Oysters With Tarragon

Enjoying oyster begins by deciding which oysters to buy. Should they be small or large, should the taste be creamy and sweet or lean and juicy? If an oyster looks creamy (opaque) then it will taste creamy.

Next decision: raw or cooked? We think the best way to eat an oyster is to eat it raw. You will taste the saltiness, the texture and all of its flavours. The usual way to counter the saltiness is by adding a bit of lemon or mignonette but you could also go for something spicy like Tabasco, horseradish or perhaps wasabi. Don’t add something sweet because the oyster has its own sweetness.
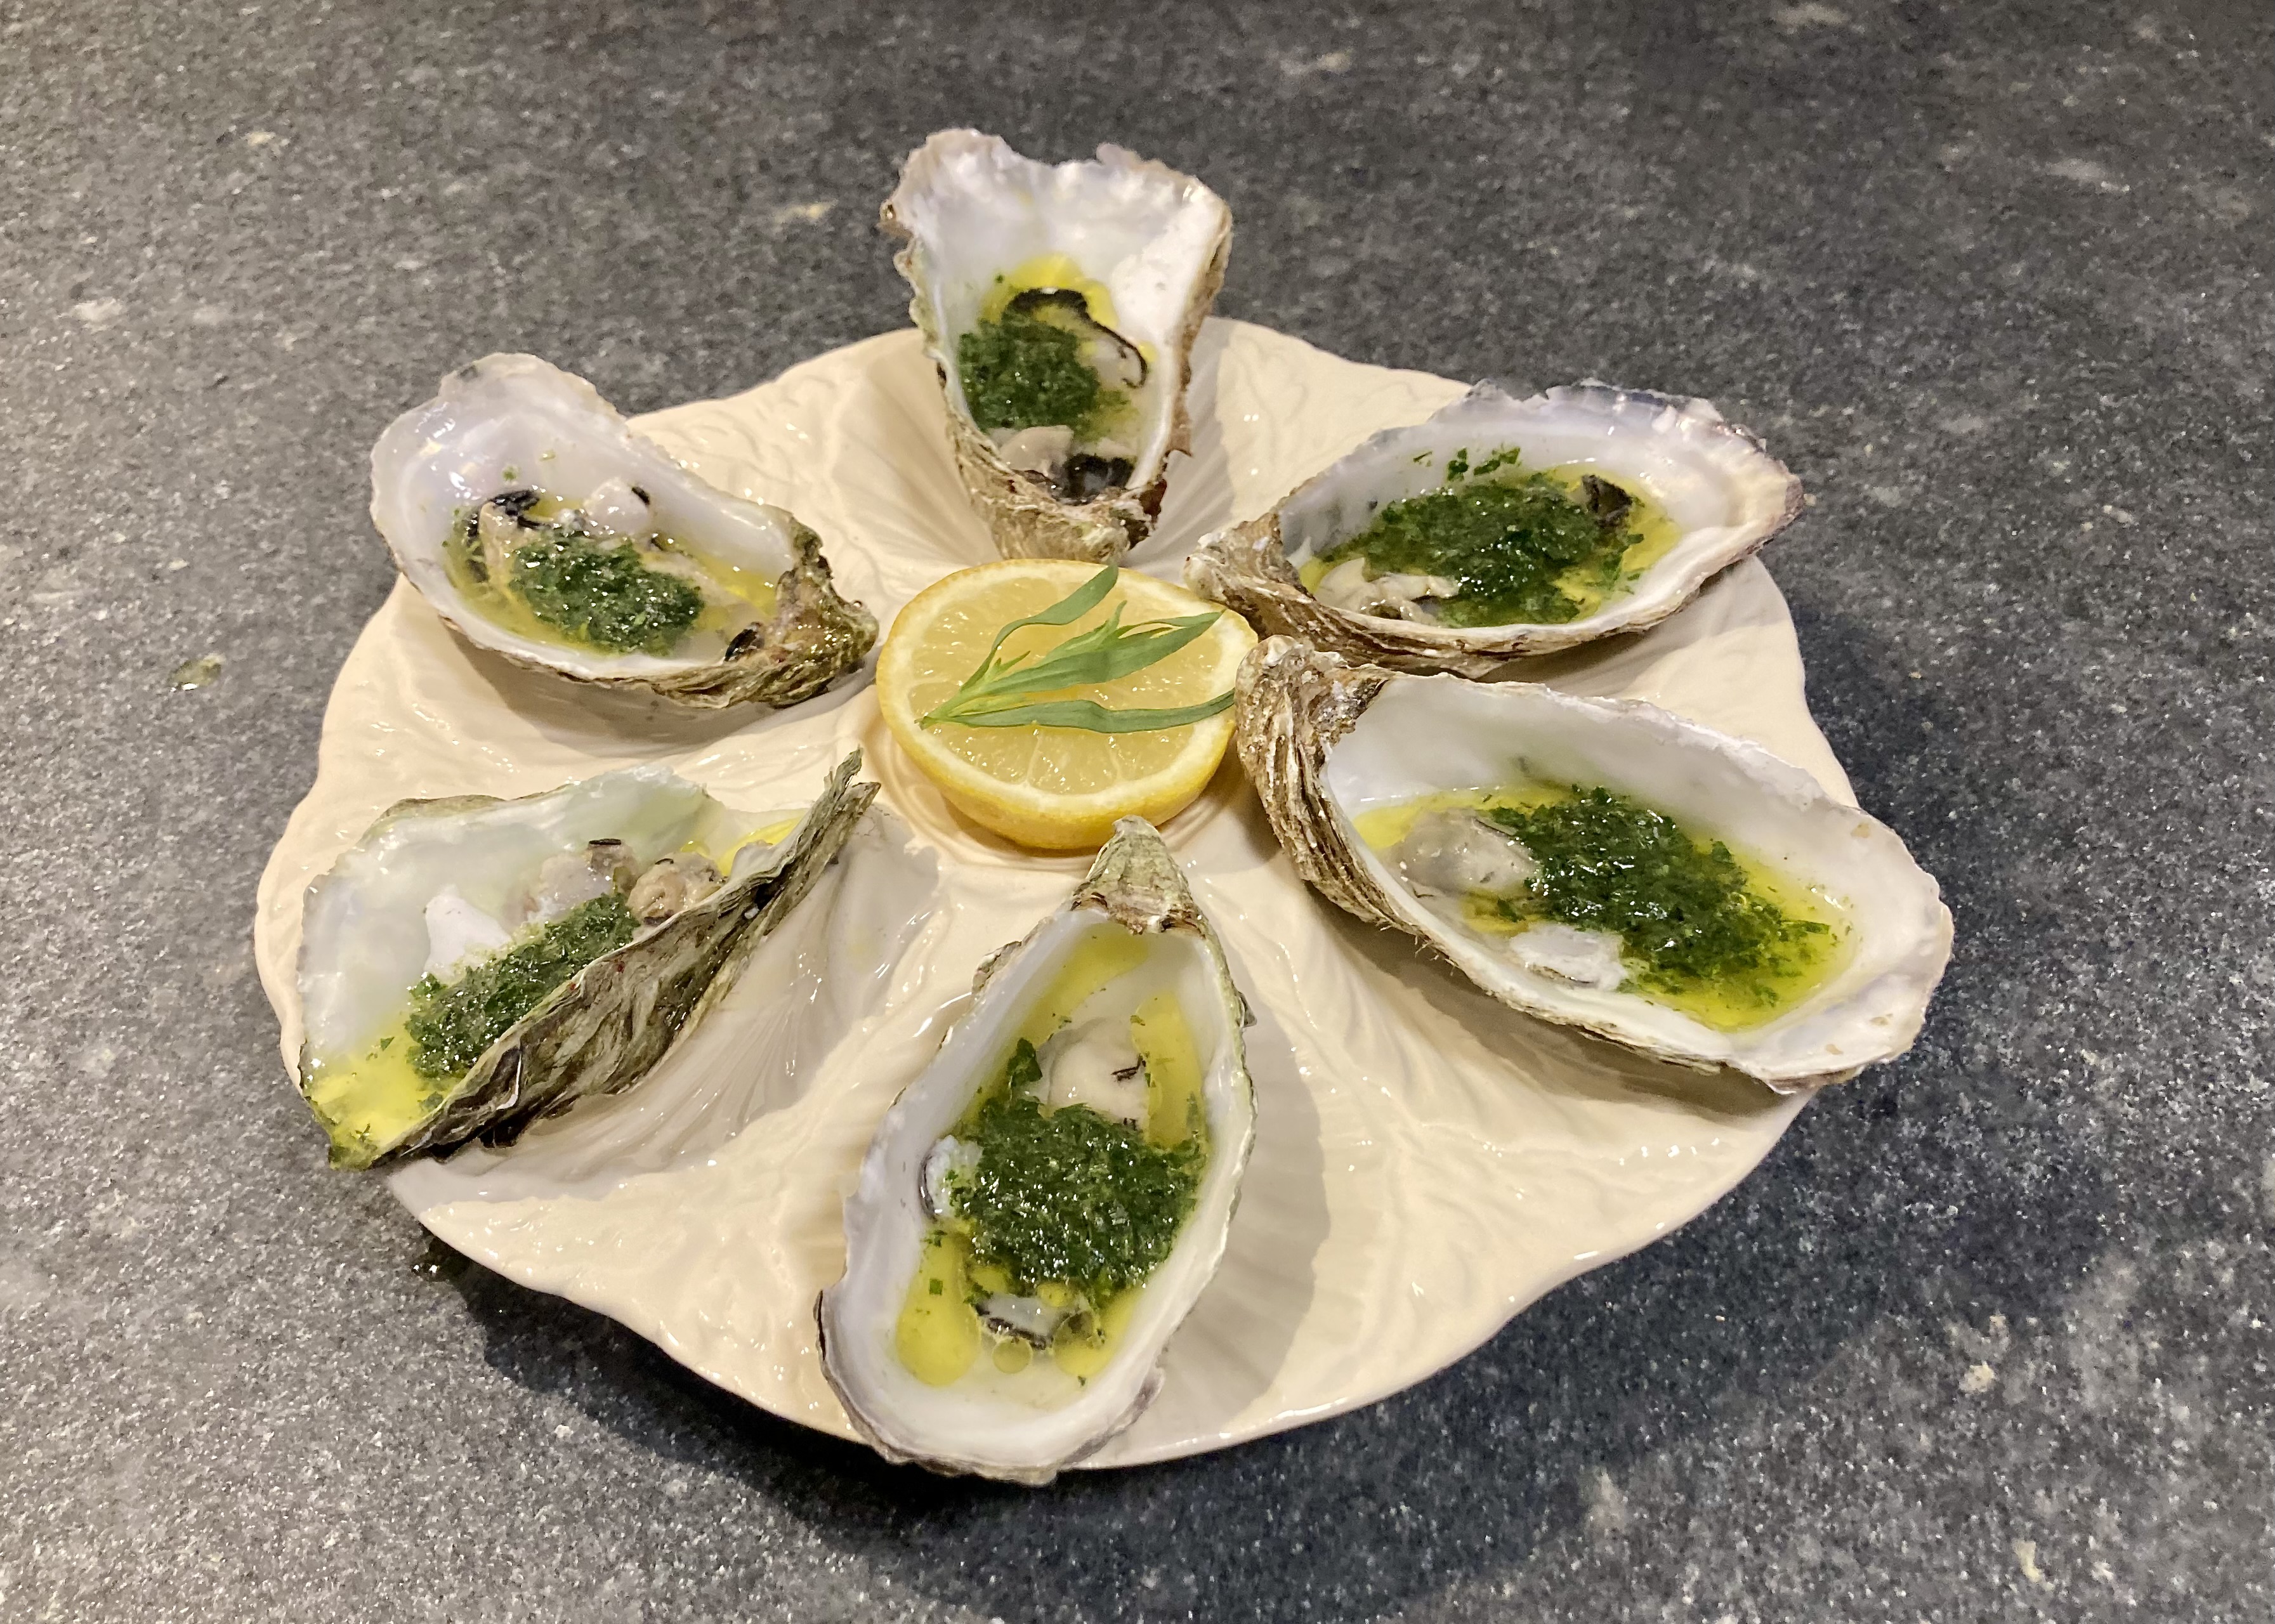
In most cases cooked or steamed oysters are covered with lots of overwhelming ingredients, in an attempt to hide the taste of the oyster. Most likely the oyster will be overcooked and its structure rubbery and nasty. If you trust the chef, go for Steamed Oysters with Black Bean Sauce or for Oysters Rockefeller. Or even better: prepare our quick and easy Oysters with Tarragon, a delicious combination of warm (but not cooked) oyster and velvety anise flavours.

And finally: how to eat an oyster? Eating means chewing and tasting. Please don’t “drink” an oyster. If you do, you will only taste sea water.

Wine Pairing

When eating oysters, your wine must have some minerality. Think Chablis, Picpoul de Pinet, Sancerre or Sylvaner. We enjoyed a glass of Pommery Royal Brut champagne. The wine is elegant and uplifting, it comes with subtle notes of brioche and apple, a fine mousse and the perfect acidity with the oysters. Its freshness works very well after the intense taste of the oyster and the tarragon.

What You Need
  • 6 or 12 Oysters
  • Butter
  • Lots of Tarragon
  • White Pepper
  • Lemon Juice
What You Do
  1. Buy lean (not creamy) oysters, for instance the ones from the Île de Ré
  2. Combine butter and finely chopped tarragon with some white pepper
  3. Taste and add more tarragon
  4. Store in the refrigerator
  5. Scrub each oyster under cold, running water
  6. Open the oyster
  7. Use your knife or a spoon to detach the muscle underneath the oyster from the bottom shell
  8. Remove any small bits of broken shell or sediment
  9. Remove some of the liquid
  10. Add one or two drops of lemon juice to every oyster
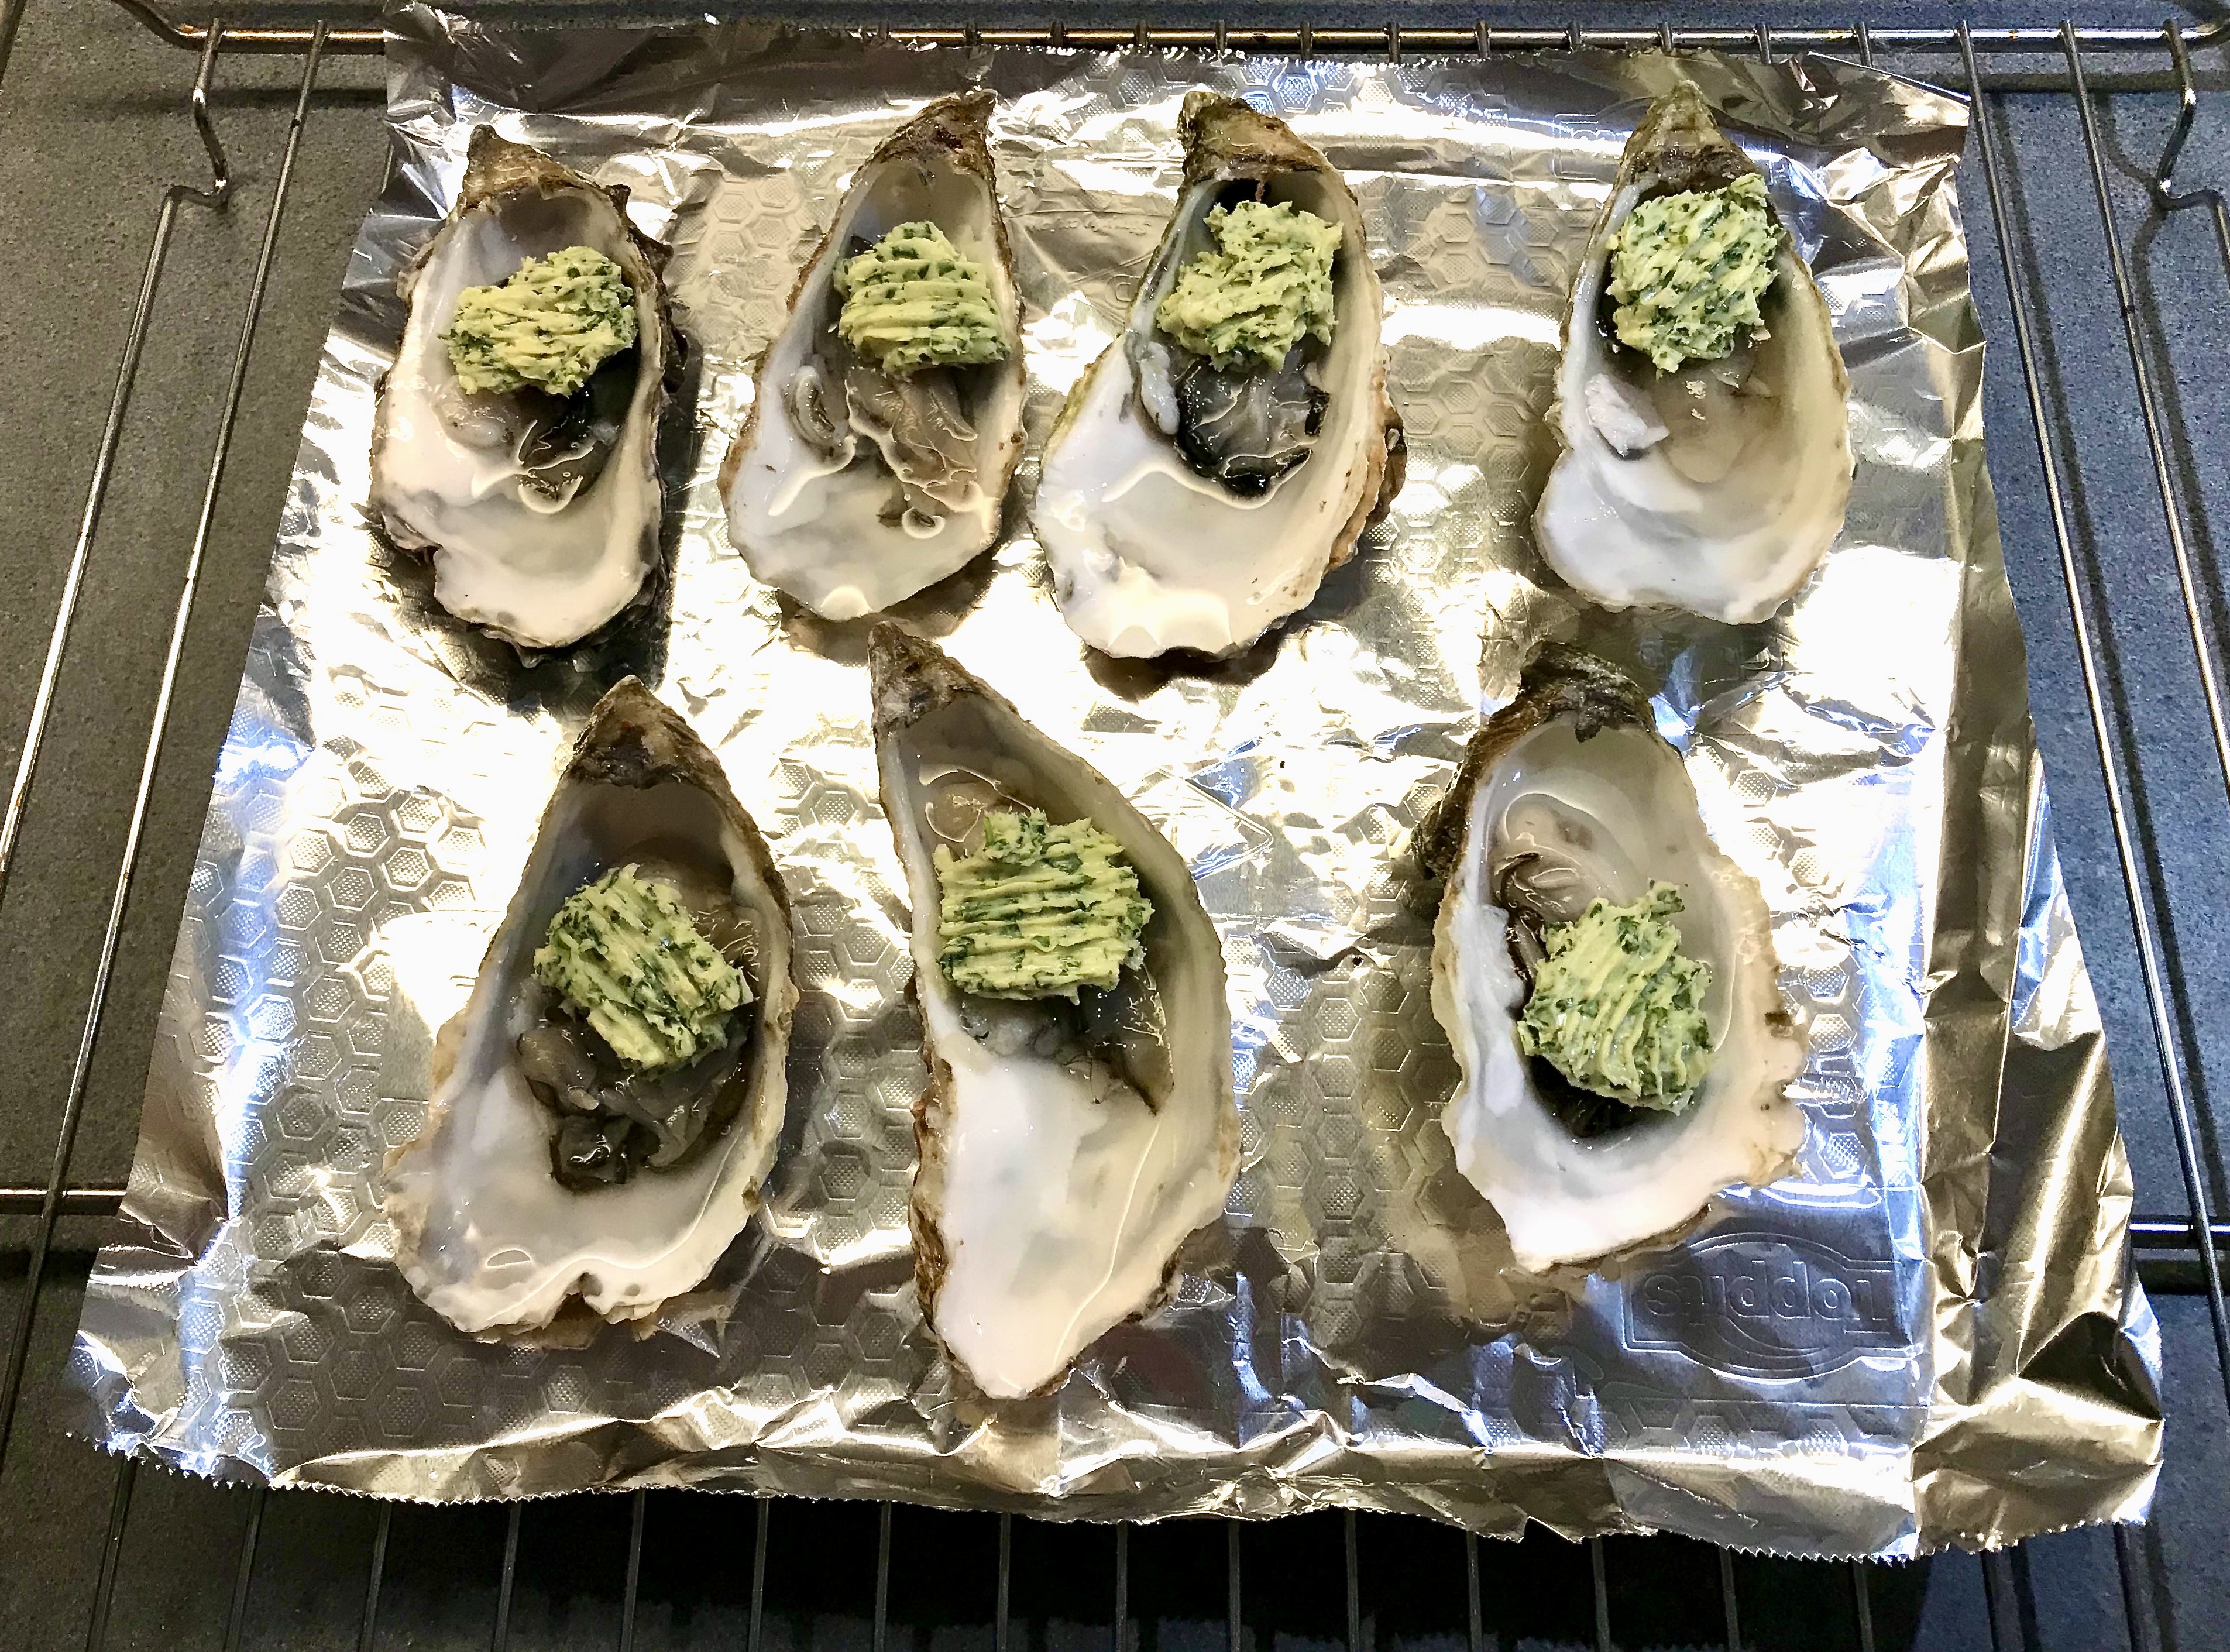
  11. Top with a teaspoon of tarragon butter
  12. Make sure you have everything ready (plate, tongs, wine, guests)
  13. Transfer the oysters to the oven and place as close to the grill as possible
  14. Set your oven to grill or broil and leave the oysters for 3 or 4 minutes in the oven
  15. Transfer the oysters to a plate and serve immediately
  16. 🥂Happy New Year!🥂


Coronation Quiche

The coronation of King Charles is a wonderful combination of tradition, religion and mystery, a ceremony loved by many, for its pageantry, the celebrations, the concerts and of course the coronation food. Just think about a lovely Victorian Sponge Cake with raspberry jam and buttercream or a Coronation Chicken (Poulet Reine Elizabeth) with carrots, green peas, rice and a creamy curry sauce.

King Charles’s coronation quiche is supposed to somehow reflect his vision regarding the monarchy and its role in modern society. The quiche is tasty, healthy, nutritious, not expensive and relatively easy to make. Plus, when you replace the lard in the original recipe with butter (as we do), then it’s a nice vegetarian dish. Great to share with friends.

The quiche combines spinach with broad beans, tarragon and cheddar cheese. We suggest baking it one day ahead and serving it at room temperature.

We read the recipe, watched a few videos (this one is good fun, it also shows how to make a Victorian Sponge cake) and decided to prepare a Coronation Quiche, topped with a Crown!

What You Need (for a 15 cm tin)

  • For the Pastry
    • 125 grams All Purpose Flour
    • Pinch of Salt
    • 50 grams Cold Butter
    • 2 tablespoons Water
  • For the Filling
    • 200 ml Double Cream
    • 2 Eggs
    • 1 tablespoon chopped Fresh Tarragon
    • 100 grams grated Cheddar Cheese
    • 400 grams fresh Spinach
    • 450 grams fresh Broad Beans (or Fava Beans)

What You Do

Start by making the shortcrust pastry. Dice the butter. Sieve the flour, add a pinch of salt and combine. Add the butter and mix using your fingertips until is has a crumble-like texture. Add the water and turn the mixture into a dough. Cover and allow to rest in the refrigerator for one hour.

Now it’s time to prepare the vegetables. Wash and cook the spinach. Let cool. Drain and squeeze to remove as much liquid as possible. Chop finely. Remove the beans from the shell. Cook for 2 minutes. Let cool and double pod.
Flour your work surface and roll out the pastry to a circle a little larger than the top of the form. The dough should be approximately 4 mm thick. Coat the form with butter. Line the form with the pastry. Use a knife to remove the excess dough. Cover and let rest for 30 minutes in the refrigerator.

Preheat the oven to 190 °C or 375 °F. Use a fork to make small holes in the pastry. Line the pastry with greaseproof paper, add baking beans and bake blind for 15 minutes. Remove the paper and the baking beans. If you think the pastry is a bit wet, then transfer back to the oven for 2 or 3 minutes.
Reduce the oven temperature to 160 °C or 320 °F.
Beat the eggs and keep some of the egg apart. You need it later to give some extra colour to the crown. Beat together cream, eggs, herbs and fresh black pepper. Scatter half of the grated cheese in the blind-baked base, top with the chopped spinach and then the beans, and finally pour over the mixture with cream, eggs, herbs and pepper. Finish by sprinkling the remaining cheese.

Use the remainder of the dough to make a crown. Coat with the egg mixture. You could apply an extra coating halfway the baking process.

Place the quiche and the crown into the oven and bake for 30 – 35 minutes until set and lightly golden. The crown is ready after some 10 – 15 minutes.

Moules Marinière

A Delicious Classic

Moules Marinière, Mosselen met Look, Mussels in Beer, Mussels with Piri Piri and Mussels with Anise, served with crusted bread, with French Fries or just a glass of wine, as a starter or for lunch: mussels are great to combine. And did we mention delicious?
Preparing Moules Marinière is not difficult at all. Make sure you buy tasty mussels (we prefer small ones) and lots of tarragon and parsley. Don’t simply add the herbs; create a simple sauce. You want to coat the mussels with the powerful flavour of tarragon and parsley. A drop of Henri Bardouin’s award winning Pastis is recommended.

Wine Pairing

White wine of course: Pinot Blanc, Sylvaner, perhaps Pinot Gris or Riesling. In general a fresh, dry white wine with medium acidity and fruit aromas like citrus. Mussels are very flexible, both in preparation and accompagnement.

What You Need

  • 1 kilo of Mussels
  • 1 Shallot
  • 1 Garlic Clove
  • Olive Oil
  • White Wine
  • Bouquet Garni (Parsley, Bay Leaf, Thyme)
  • Tarragon
  • Parsley
  • Pastis
  • Black Pepper

What You Do

Start by finely chopping the shallot and the garlic. Take a large, heavy pan and heat the oil. Add the shallot and the garlic, cook for 5 minutes until soft and glazed. Add a glass of white wine and the bouquet garni. Cook on low heat for 10 minutes. In parallel clean the mussels. Increase the heat to (nearly) maximum, add the mussels, close the lid and cook until all mussels are open; perhaps 4 minutes. Shake the pan during the cooking process or give the mussels a quick stir with a wooden spoon. Remove the mussels with a slotted spoon, transfer to a large plate and put in a luke warm oven. Discard the bouquet garni, add chopped parsley and tarragon, a splash of pastis, some black pepper and leave to simmer for 1 or 2 minutes. Transfer mussels to two warm (soup) plates and pour the sauce over the mussels.

Moules Mariniere ©cadwu

Fennel, Radish and Tarragon Salad

The Third Ingredient

Fennel and radishes go together very well. Radishes come with a spicy, piquant flavour; fennel comes with the flavour of anise. Both have a touch of sweetness and a lovely crunchy texture. Combine with a simple dressing of oil and vinegar and you’ll have a tasty salad.
But, yes, agreed, something is missing. What to add? Search the Internet and you’ll find additions such as lemon (zest and juice), cucumber, apple, Parmesan cheese et cetera. All very nice, but we think the not-very-obvious third ingredient is tarragon. It supports the anise flavour and unites the fennel and the radishes, especially after two of more hours in the refrigerator.

When on the Internet you will also see that most chefs put the vegetables in ice-cold water to make them extra crispy and that using a mandoline slicer is required. We much prefer coarsely dicing the ingredients in order to create one, flavourful, refreshing salad. By dicing the ingredients and letting the salad rest, the flavours will be much better distributed. Take your time to chew, allow the salad to linger in your mouth and enjoy the development of the flavour.

Food Pairing

Fennel and tarragon point in the direction of fish, which is indeed a good idea, provided the fish is one with lots of flavours. Think monkfish, skate, mackerel, red gurnard et cetera. You could also think of a home-made burger with first class beef, mustard, spring onion, a splash of soy sauce, Worcestershire sauce, garlic, black pepper, capers and dill.

What You Need

  • One small Fennel
  • Ten Radishes
  • Three sprigs of Tarragon
  • Olive Oil
  • White Wine or Cider Vinegar

What You Do

Cut the fennel and radishes into small cubes. Cut a large amount of tarragon leaves; similar size. Make a dressing with olive oil and vinegar. Don’t make the dressing very oily and don’t make too much dressing, it should only coat the ingredients. Combine in a bowl, mix well and store in the refrigerator for at least two hours.  Just before serving taste the salad. You may want to add some vinegar.

Fennel, Radish and Tarragon Salad © cadwu

The Art of Sauces: Kimizu with Tarragon

Béarnaise

After having prepared Kimizu with White Asparagus, we continued our experiment by making Kimizu with tarragon, indeed, Béarnaise based on Kimizu. Great result! The taste was wonderful with the tarragon clearly present in combination with a touch of sweetness (shallot) and acidity (rice vinegar). The sauce is elegant on the stomach compared to Béarnaise, which can be rather filling (as a result of the butter) in combination with red meat.

Wine Pairing

Obviously we want to drink a glass of red wine with our steak and Béarnaise. In general the fattier or more marbled the meat is, the more robust the wine needs to be. A Côte du Rhône, Syrah or blend of Grenache, Syrah and Mourvèdre is perfect with a rib eye. A Bordeaux with clear tannins would also be a good choice. With a leaner fillet we would serve a Pinot Noir or a Gamay (Beaujolais).

What You Need

  • Two Egg Yolks
  • 4 Tablespoons of Castrique
    • 3 Tablespoons of Rice Vinegar
    • 3 Tablespoons of White Wine
    • 2 Tablespoons of Fresh Tarragon
    • 1 Shallot
    • 2 coarsely crushed Peppercorns
  • Chopped Fresh Tarragon
  • Optional: Shopped Fresh Parsley and/or Chervil
  • Rib Eye
  • Olive oil

What You Do

Start by making the castrique. Basically this is a tarragon and shallot flavoured liquid with some acidity that replaces the water in the Kimizu. Same difference between Hollandaise and Béarnaise. Thinly chop the shallot. Combine the vinegar, shallot, white wine, peppercorns and tarragon in a small pan and slowly reduce the liquid until you have four tablespoons of castrique. Check the acidity. If needed add an extra table spoon of rice vinegar or an extra tablespoon of water and reduce again. Pass through a sieve, let cool and set aside.

Whisk the two egg yolks, add the castrique and whisk some more. Now transfer to the microwave and give it let’s say 10 seconds of 30%. Remove from oven and whisk well. Repeat. You will now feel the consistency changing. If not, don’t worry, just repeat the step. After 2 or 3 steps of 10 seconds, move to steps of 5 seconds on 30% power. Whisk, whisk again and feel free to find your own way. When the sauce is ready take it out of the microwave, continue whisking gently and (optional) cool slightly in a water bath.

In parallel add olive oil to a hot iron skillet and quickly sear the rib eye. Once it has a nice colour and is saignant transfer it to some aluminium foil and let rest for 10 minutes. Don’t wrap the meat in the foil, because then the cooking will continue and the meat will be medium.
If you however prefer the meat to be medium, then reduce the heat after having seared the meat, add some butter to the pan and turn the meat for a few minutes.

Add chopped tarragon (and chervil and parsley) to the sauce, stir and serve with the steak, rib eye or fillet.

Rib Eye with Kimizu and Tarragon def

Chicken with Tarragon, Leek and Nero d’Avola

Some combinations are made in heaven. Chicken and Tarragon is such a combination: it simply works brilliantly. Tarragon is a very powerful, aromatic herb, full of flavors such as anise and licorice. It’s the key ingredient of the sauce Béarnaise and it is of course wonderful when combined with vinegar and mustard. For kitchen purposes you need to buy French tarragon. The other well-known variety is called Russian tarragon. It’s a nice plant for your garden or balcony, with flowers and lots of leaves, but the taste is very bland, so not one to use in the kitchen.

We use butter to carry the taste of the tarragon to the chicken and to the sauce. It’s the principle behind enfleurage and maceration in the perfume making industry: fat is used to absorb the fragrance. So yes, you need an excellent chicken with lots of fat under the skin.

This recipe works with a whole chicken, with breasts and legs, provided they come with a skin. The crux of this recipe is to create a layer of tarragon butter between the meat and the skin, allowing for a crispy skin in combination with rich, flavored meat. You can stuff the chicken in the morning or the day before. Ideal when you’re having guests!

The sauce is very rich, so instead of using flour or cream, we create an emulsified sauce by blendering the mixture. The result is a velvety, filming sauce.

We enjoyed our chicken with a glass of Inycon Nero d’Avola. The wine is elegant, fruity, not too full bodied and it has soft tannins and a gentle acidity. You will also taste licorice, which is a nice reflection of the tarragon and the Pastis. The balance of the acidity of the wine and the filming structure of the sauce is essential to the dish.

Here is what you need

  • 2 Chicken Legs
  • 8 Sprigs of Tarragon
  • 20 + 10 grams of Butter
  • Olive Oil
  • Pastis
  • Chicken Stock
  • Optional: Leek, olive oil and water

Strip the tarragon leaves from the stem and chop. Let’s say you need one or two sprigs of tarragon per chicken leg. Use a fork to make the tarragon butter. Use your fingers to create space (a pocket) between the skin and the meat. Start for instance in the middle of the leg (outside) or at the rear of the whole chicken. Be careful not to open the edges, otherwise the tarragon butter can’t do its work. Put some of the butter between the skin and the meat and use your fingers to create a thin layer by pressing the butter to the sides. Coat the bottom of a shallow baking pan with olive oil.
Transfer the chicken legs to the pan. Add some additional butter to the pan (not on top of the chicken). Also add the sprigs you haven’t used. Put the pan in an oven of 200˚ Celsius or 390˚ Fahrenheit for 30 minutes.
Transfer the chicken legs and two sprigs of tarragon to a plate and keep them warm in the oven (just switch it of and keep the door open). Deglaze the pan with chicken stock and Pastis. Deglazing simply means that you add a liquid and then by stirring the mixture you capture the residue in the pan. As if you are cleaning the pan. Blender the mixture and poor through a sieve into a small saucepan. You now have a homogenous, emulsified sauce. Warm the sauce and stir occasionally for five minutes. Serve the chicken with the sauce, the fried sprigs of tarragon and the briefly cooked leek.

(P.S. Clean the leek, making sure you have removed the sand and dirt. Slice thinly and cook with some olive oil and a drop or two of water. Five minutes maximum should do the trick.)