Panna Cotta with a Twist

Recently we enjoyed mouth-watering Indian food thanks to Asma Khan’s cookbook Ammu. When we were looking for a dessert in her book, we hoped to find a recipe for Kulfi or for Kheer, both delicious creamy desserts with ingredients such as cardamon and saffron. Unfortunately these recipes are not included in the book.
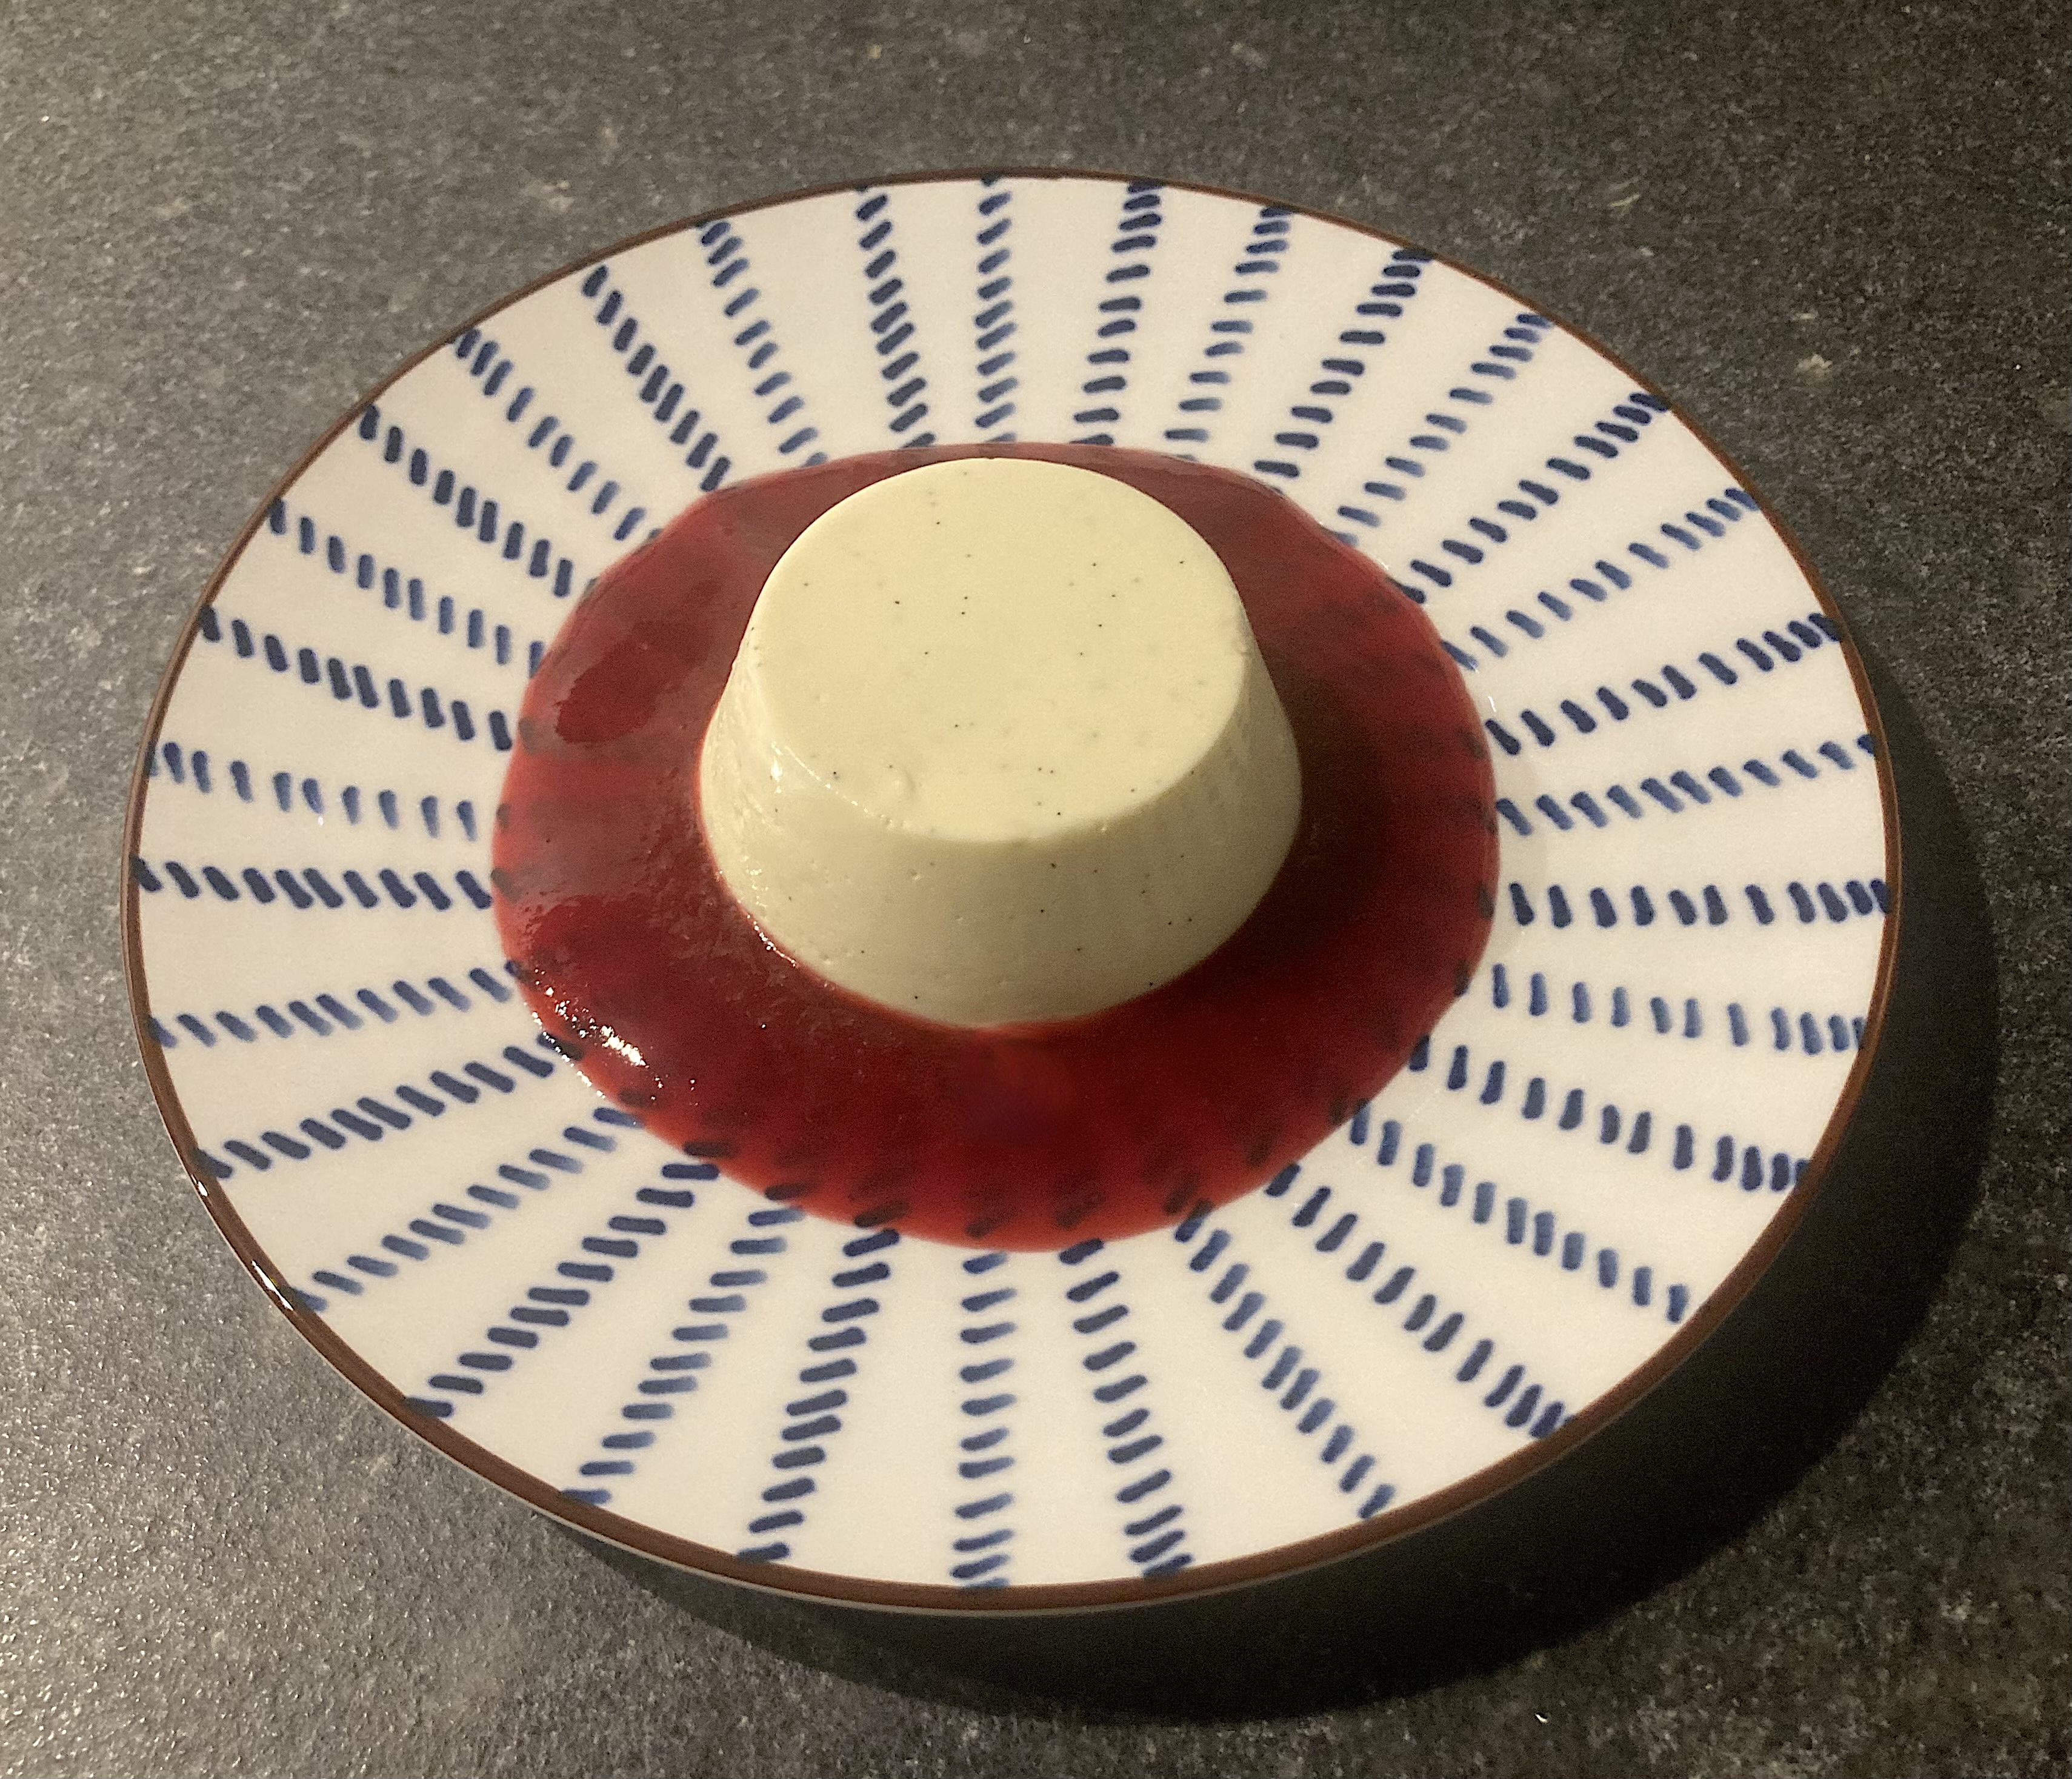
Cream? Dessert? Why not try making a panna cotta with cardamon?
The combination turned out to be very tasty, not too rich, a touch sweet and the cardamom was present in just the right way. Decorate with pistachios and rose petals for a delectable Panna Cotta with an Indian twist.

What You Need (for 6)
  • 500 ml Cream
  • 30 Cardamom Pods
  • 20 grams of Sugar
  • 3,5 leaves of Gelatine (5,25 grams)
  • Rose Petals
  • Pistachios
What You Do
  1. Peel the cardamon pods
  2. Use a pestler and mortar to lighly crush the seeds
  3. Add the seeds to the cream
  4. Slowly bring the cream with the seeds to the boil
  5. Keep close to boiling for 15 minutes. Stir when necessary
  6. Remove from the heat and while stirring add sugar until totally dissolved
  7. Follow the instruction of the gelatine and soak the leaves
  8. Pass the mixture through a sieve
  9. Add the gelatine to the mixture and stir well
  10. Cool the liquid somewhat before filling the forms. We used a silicone mold. Nice and easy! The only thing you need to do is to make the mold a bit moist with water
  11. Let the panna cotta cool and than store in the refrigerator until set
  12. Don’t forget to seal with cling foil, otherwise your panna cotta will absorb aromas from other food in the refrigerator
  13. Decorate with pistachios and rose petals
Panna Cotta with Cardamom based on a classic Italian dessert, with cardamon, pistachios and rose petals
Panna Cotta with Cardamom ©cadwu

Tartelette au Citron

Earlier we wrote about Tarte au Citron, or Lemon Pie. This is a recipe for a Tartelette au Citron, a small but very different pie. The filling is lemon curd, which you add to the pastry case just before serving. You can easily make both components a day ahead. The crunchy, slightly sweet pastry case and the soft, rich, tart filling go together very well. You could decorate the tartelette with meringue or chocolate sprinkles, but we prefer them as they are. Great with a strong cup of coffee.

What You Need
  • Pâte Sucrée
    • 50 grams of Unsalted Butter
    • 40 grams of Caster Sugar
    • 125 grams of All Purpose Flour
    • 1 gram of Salt
    • 1 Organic Egg
    • Water (optional)
  • Curd
    • 65 ml of Lemon Juice
    • 65 grams of Unsalted Butter
    • 80 grams of Fine Sugar
    • One Organic Egg
What You Do (Curd)
  1. Beat the egg
  2. Melt the butter
  3. Combine all ingredients.
  4. Cook Au Bain Marie until you have the right consistency.
  5. Or transfer to your microwave, put it on 50% or 70% power (depending on your microwave) and heat with intervals of 20-30 seconds. Mix between the intervals. This is a very precise way of heating the mixture and it gives you full control over the process. Towards the end of the process, you may want to reduce the power or shorten the intervals. The percentage and the duration of the intervals depend on your microwave and the bowl you use.
  6. Set aside and allow to cool.
  7. Transfer the curd to the refrigerator. It will keep for a few days.
What You Do (Pastry Case)
  1. Combine sugar, flour and salt.
  2. Dice butter, add to the mixture and combine. Use a hand mixer with kneading hooks.
  3. Beat the egg and add.
  4. Use your hands to make the dough. It should not be sticky, so it must be easy to make a ball. If too dry, add just a bit of water. If too wet, add some flour.
  5. When done, remove from the bowl and wrap in kitchen foil. Store in the refrigerator for at least two hours. It can be stored for a few days.
  6. Flour your work surface and roll out the pastry to a circle a larger than the top of the tartelette forms. We used 8 cm or 3 inch (quiche-) forms. The dough should be approximately 2 or 3 mm (0.1 inch) thick.
  7. Coat the forms with butter.
  8. Line the forms with the pastry. Press the pastry well into the sides and bottom. Use a knife to remove the excess dough.
  9. Cover and let rest for 30 minutes in the refrigerator.
  10. Preheat the oven to 190 °C or 375 °F.
  11. Use a fork to prick small holes in the pastry.
  12. Line the forms with greaseproof paper or aluminum foil, add baking beans and bake blind for 10 minutes.
  13. Remove the paper and the baking beans.
  14. Reduce the oven temperature to 160 °C or 320 °F.
  15. Transfer back to the oven for 5 minutes or until golden
  16. Transfer to a wire rack and let cool.
  17. When the pastry cases are completely cool, add the curd and serve
PS
  • Two other very tasty Tartelettes: one with Blueberries and the other with Raspberries
  • To be published: Tartelette with Pear
Tartelette au Citron ©cadwu

Tarte Au Citron

The key to a tasty lemon pie is the quality of the lemon. Sounds obvious but unfortunately not every lemon is tart, aromatic and a touch sweet. Best are lemons used for limoncello: Sorrento (or Femminello), Eureka, Amalfi or Lisbon lemons. In all cases the lemons must be fresh, vibrant yellow, firm, untreated and organic.
The lemons we used needed a small aromatic push, that’s why we added one mandarin to the filling.
This recipe is for a classic tarte au citron or lemon pie. You could also make it with lemon curd, which we will do in a few weeks. 

What You Need 
  • Pâte Sucrée
    • 50 grams of Unsalted Butter
    • 40 grams of Caster Sugar
    • 125 grams of All Purpose Flour
    • 1 gram of Salt
    • 1 Organic Egg
    • Water (optional)
  • Filling
    • 2 Organic Eggs
    • Juice and Zest of 2 Organic Lemons
    • Juice and Zest of 1 Organic Mandarin
    • 50 – 70 grams of Caster Sugar (depending on the flavour of the Lemons)
What You Do
  1. Recipe for a 16 cm or 6 inch form or baking tin
  2. Combine sugar, flour and salt.
  3. Dice butter, add to the mixture and combine. Use a hand mixer with kneading hooks.
  4. Beat the egg and add.
  5. Use your hands to make the dough. It should not be sticky, so it must be easy to make a ball. If too dry, add just a bit of water. If too wet, add some flour.
  6. When done, remove from the bowl and wrap in kitchen foil. Store in the refrigerator for at least two hours. It can be stored for a few days.
  7. Flour your work surface and roll out the pastry to a circle larger than the top of the form. The dough should be approximately 4 mm thick.
  8. Coat the form with butter.
  9. Line the form with the pastry. Press the pastry well into the sides and bottom. Use a knife to remove the excess dough.
  10. Cover and let rest for 30 minutes in the refrigerator.
  11. Preheat the oven to 190 °C or 375 °F.
  12. Use a fork to prick small holes in the pastry.
  13. Line the pastry with greaseproof paper or aluminium foil, add baking beans and bake blind for 15 minutes.
  14. Remove the paper and the baking beans.
  15. Reduce the oven temperature to 160 °C or 320 °F.
  16. Transfer back to the oven for 5 minutes.
  17. Transfer to a wire rack and let cool.
  18. Mix eggs, sugar and zest.
  19. Add the mixture to the pastry case.
  20. Bake for 20 – 30 minutes or until set.
  21. Transfer to a wire rack, allow to cool. Remove from the tin and allow to cool completely.
Tarte Au Citron ©cadwu

Panna Cotta with Yuzu

When you shop at an Asian supermarket, you will see many products with yuzu: ponzu, yuzu dressing, jelly with yuzu flavour, yuzu marmalade, yuzu soy sauce, yuzu tea and even yuzu skincare. Probably the shop will also sell fresh yuzu juice. And if you’re lucky, they will have the real thing: yuzu!

Yuzu (Citrus Junos) is a citrus fruit and it looks like a small lemon or clementine, with an uneven skin. It is of Chinese origin and it was introduced in Japan during the Nara period (710-794). It’s expensive (we saw them on the market for 5 euro a piece), they have lots of seeds and very little juice. The flavour is tart but gentle, very aromatic and will make you think of mandarin, only different. The peel is as delicious as the juice. The combination of flavors and fragrancy makes it a unique citrus. Not a fruit to eat on its own. Use it to add freshness and aroma to a dish or sauce.

Yuzu juice costs between 30 and 100 euro per liter (because of the small amount of juice per yuzu) and therefore products with yuzu tend to be expensive. If not, check the label and make sure it contains yuzu. Especially ponzu shoyu (made with mirin, rice vinegar, katsuobushi, kombu, yuzu and soy sauce) is often made with lemon.

We also noticed the term ‘yuzu style’ which is a clear indication no yuzu is used. We spotted a bottle of Yuzu Style Dressing. It contains mandarin, lemon, apple, vinegar and lots of other ingredients, but no yuzu.

We bought our yuzu at a farmers’ market and on our way back home we thought about things to make with it. Perhaps our own yuzu kosho (a paste made with chili, yuzu and salt)? Or combine it with miso and cod? Or yuzu syllabub (with cream and sugar)?

Why not panna cotta?

What You Need
  • 500 ml Cream
  • 30 ml Yuzu Juice
  • 10 ml Lemon Juice
  • Yuzu Zest
  • 25 grams of Sugar
  • 3,5 leaves of Gelatine (5,25 grams)
What You Do (for 4)
  1. Slowly bring the cream to the boil.
  2. Keep close to boiling for 15 minutes. Stir when necessary.
  3. Add the juice and some of the zest.
  4. Remove from the heat and while stirring add sugar until totally dissolved.
  5. Follow the instruction of the gelatine and add the leaves.
  6. Stir well until homogeneous.
  7. Cool the liquid somewhat before filling the forms. We used a silicone mold. Nice and easy! The only thing you need to do is to make the mold a bit moist with water.
  8. Let the panna cotta cool and then store in the refrigerator until set.
  9. Don’t forget to seal with cling foil, otherwise your panna cotta will absorb aromas from other food in the refrigerator.
  10. Decorate with yuzu zest.
PS
  • If you can’t find yuzu or find them too expensive, then use 30 ml Lemon Juice and 10 ml Mandarin (or Clementine) Juice.
  • The amount of gelatine you need is a bit tricky. The acidity of the yuzu will thicken the cream and it will reduce the gelling effect of the gelatine. We decided to use the normal quantity.

Tourtes de Blettes Sucrée

A sweet pie with vegetables, Parmesan cheese and black pepper? It does sound a bit odd but actually the pie is very tasty and the savoury ingredients support the sweet character of the pie.
The pie is made with Blette, also known as Swiss ChardLeaf BeetSilver BeetSpinach BeetBietola (Italy), Bléa (France), Acelga (Spain), Krautsteil (Germany, Switzerland) and Snijbiet (the Netherlands). Once a popular vegetable, it can be hard to find or expensive. When preparing a savoury Tourte de Blettes we used Water Spinach (also known as Kang Koen or Ong Choy) which is a very popular vegetable in Asia. The leaves have lots of structure and the (hollow) stems are tasty and crunchy. 

As you would expect with a classic pie like this, recipes vary, Very often the tourte is made with sweet shortcrust pastry (butter, eggs, sugar and sometimes orange blossom water). The filling contains chard, Parmesan cheese, sugar, eau de vie, raisins, eggs, apples and pine nuts. We’re not keen on using pine nuts, so we didn’t add these to our filling. We thought it would be nice to add the orange blossom aroma to the filling, not to the pastry.

What You Need (Pastry)
  • 50 grams of White Caster Sugar
  • 100 grams of soft Unsalted Butter
  • ½ Egg (beaten)
  • 1 gram of Salt
  • 150 grams of All Purpose Flour
  • Cold Water (if the pastry is dry)
What You Do

Adding egg to the dough makes its flavour richer and easier to handle when lining the baking tin. Start by combining the sugar and the butter. Use a hand mixer with kneading hooks. When mixed, add halve of the beaten egg. Combine salt and flour. Pass through a sieve and add to the mixture. Use the kneading hooks to mix. When done, remove from the bowl and wrap in foil. Store in the refrigerator for at least two hours. The dough freezes well, so it’s a great idea to make a bit extra.

What You Need (Filling)
  • 500 grams of Chard
  • Handful of Raisins
  • 25 grams of Parmesan Cheese
  • 50 grams of Sugar
  • 1 or 2 teaspoons of Orange Blossom Water
  • Black Pepper
  • 1 Egg
  • Olive Oil
  • ½ Sour Apple (Bramley, Goudrenet)
What You Do
  1. Wash the chard, remove and discard the stems.
  2. Coarsely slice the leaves.
  3. Whisk the egg.
  4. Soak the raisins for 15 minutes in water (or rum). Pat dry.
  5. Peel and slice the apple into small cubes.
  6. Combine chard, raisins, grated cheese, sugar, orange blossom water, black pepper and a splash of olive oil. Be generous with the black pepper and the cheese. Mix.
  7. Add the beaten egg and mix.
  8. Divide the pastry in two.
  9. Line a baking tin with the pastry, prick holes in the pastry using a fork (docking).
  10. Add the filling, sprinkle with apple cubes, top with the remaining pastry and close.
  11. Prick holes in the pastry. Or apply the method of Cornish pasty, as we did.
  12. Bake in the oven at 180 °C or 355 °F for 30 minutes.
  13. Allow to rest on an oven rack.
  14. Best to be enjoyed the next day, so you must be a little patient.
  15. Dust with icing sugar.
PS

We must admit we took a short cut by using readymade Pâte Brisée. This is shortcrust pastry, without sugar. Perhaps it’s a good idea to reduce the amount of sugar in the pastry or skip it all together!

Baba Au Mandarine Napoléon

On April 27th, we celebrate the birthday of the King Willem-Alexander of the Netherlands. The Dutch royal family is also known as ‘de Oranjes’, which is reflected in the use of the colour orange when referring to Dutch royalty. Actually, there is no link between the royal family and the colour. The ‘orange’ in their name refers to the French city of Orange, a Principality one of his ancestors inherited in 1544.

Over the years we prepared Orange Sabayon, Queen’s Soup, Orange and Almond Cake, Bouchée à la Reine, Orange Flan and Canard à l’Orange on this day. What better way to celebrate a birthday than baking a Baba, a flavourful and moist cake? Traditionally a Baba au Rhum (preferably with raisins or currents) is served with a syrup based on brown rum. Today we use a delicious Belgian liqueur: Mandarine Napoléon. It’s a unique mandarin liqueur, made from macerated Sicilian mandarins and cognac. It was originally created in 1892 by Napoleon’s physician. Rich, long, intense en delicious!

What You Need
  • 10 large Baba’s
    • 4 grams of dried Yeast
    • 100 ml Milk
    • 15 grams of Sugar
    • 200 grams All Purpose Flour
    • 2 Egg Yolks
    • 2 Eggs
    • 100 grams of Butter
    • 80 grams of chopped Candied Orange Peel
    • 2 grams of Salt
    • Butter to coat the moulds
    • Finely chopped Candied Orange Peel
  • Syrup
    • 500 ml of Water
    • 200 grams of Sugar
    • 200 ml Mandarine Napoléon
What You Do

The milk should be lukewarm and the butter melted but not hot. Start by combining milk, yeast and sugar. Mix well. Add the sieved flour and mix. Now it’s time to add the eggs and the egg yolks. Use kneading hooks to mix very, very well. This may take 10 minutes. The result should be an elastic, sticky dough. Add the butter, mix and then add the salt. The dough is now even stickier. Coat the moulds with butter. Add the dough to the moulds and let rise for approximately 2 hours. They should double in size. Preheat your oven to 200 °C or 400 °F and bake for 15 minutes depending on the size. Keep an eye on the baba’s, you may want to reduce the heat after 10 minutes.
In the meantime add water and sugar to a pan. Warm the mixture until nearly boiling. Stir and make sure the sugar is completely dissolved. Now add Mandarine Napoléon to taste. Leave to cool. Add an extra splash of Mandarine Napoléon to give the syrup an extra push. Allow the baba’s to cool somewhat, remove from the mould and let them soak in the syrup for a few hours, or longer. A day or two will be perfect, Sprinkle with finely chopped candied orange peel and serve at room temperature.

Baba au Mandarine Napoléon

Panna Cotta with Agar

A few days ago Suzanne’s Mom wrote about Piper McAloon. At 17 she became Pastry Chef at Foglia, an award-winning plant-based restaurant located in Bristol, Rhode Island. A truly inspiring story!
When asked what she is making right now, she mentioned Panna Cotta. At Foglia she makes a gluten-free version with agar. Which was something we wanted to do for a long time. We love Panna Cotta, but using gelatine (made from animals from the meat industry) is far from ideal. Agar is made from the cell walls of red algae. Popular throughout Asia and fortunately also available where we live.
We served our Panna Cotta with a coulis of red berries. Very tasty, but was it a real Panna Cotta? It didn’t seem as creamy as the version with gelatine. The texture was certainly different. The version with gelatine was smoother and firmer; more how we think panna cotta should feel in your mouth. We were happy with the result, but we’re not sure if we will use agar next time we’re preparing Panna Cotta. To be continued!

What You Need (for 4)
  • 500 ml fresh Cream
  • 1,5 grams of Agar (powder)
  • 1 Vanilla Bean
  • 30 grams of Sugar
What You Do

Add the agar, the seeds of the vanilla bean and the sugar to the cream. Mix very well, the agar must to be completely dissolved. Bring to the boil on slow/medium heat. Stir frequently. Keep close to boiling for 1 or 2 minutes. Continue stirring. Transfer to a water bath with cold water. Cool the liquid somewhat before filling the forms. This is where you need to be careful. Gelatine gels at a lower temperature than agar. You need to transfer the mixture when it’s relatively warm.  Use silicone molds; they work very well panna cotta. Let cool and then store in the refrigerator. Don’t forget to seal with cling foil, otherwise your panna cotta will absorb aromas from other food in the refrigerator. 

PS

Cook the red berries in some water for perhaps 5 to 10 minutes. Transfer to a sieve and use the back of a spoon to squeeze out the liquid. Add sugar and lemon juice to taste. Reduce the liquid somewhat. Let cool. You could also start by blending the berries. This makes squeezing out the liquid easier plus you will get a richer taste and some bitterness.

Eton Mess

For some reason we were talking about summer, about typical summer food, about strawberries, green peas, melon, okra, peaches, spinach and new potatoes. Of course, most of these are available all year round, but we like to enjoy the season. Today was different, we really wanted to eat strawberries and we decided to make Eton Mess.
According to Hilaire Walden in her excellent Book of Traditional English Cookery the strawberry dessert is eaten on June 4th in Eton during a picnic for pupils and parents of Eton College, as part of the annual prize giving ceremony. Others say it was first served during the annual cricket match between pupils of Harrow School and Eton College.
One anecdote is that a chef planned to make Pavlova but it collapsed, the other anecdote is that the Pavlova was perfect but a dog sat on it, making a mess, an Eton Mess.

Mascarpone is sometimes added to the cream, but that’s a bit over the top. No need to add sugar to the cream because the meringue is sufficiently sweet. Hilaire Walden suggests soaking the strawberries for two hours or longer in kirsch, an idea we liked. She also suggests using ready-made meringues, which make it even easier to make Eton Mess.

What You Need

  • Strawberries
  • Raspberries (optional)
  • Kirsch (or Brandy)
  • Cream
  • Merengue
  • Lemon Zest

What You Do

Clean the fruit, chop, place in a bowl and sprinkle with kirsch or brandy (one or two small tablespoons per portion). Leave in the refrigerator for at least two hours. Whip the cream. Add some lemon zest, mix. Start assembling the Eton Mess: first a layer of merengue crumbles, then fruit, then whipped cream, then a second layer, same order but make sure you can see some of the red fruit. Serve immediately.

PS

In case you want to make your own (French) meringues: you need 2 egg whites and 100 grams of (finely granulated) sugar. The weight ratio should be 1:2, egg white to sugar. Set your oven to 90 °C or 190 °F. Whip the egg whites until somewhat stiff. Start slowly adding the sugar and continue whipping until the egg white mixture shows stiff peaks. Pipe the mixture on a baking sheet, transfer to the oven for 2 hours. The shape of the meringues is not important because you will need crumble for the Eton Mess

  • Eton Mess ©cadwu
  • Book of Traditional English Cookery - Hilaire Walden

Tiramisù

Such a simple, tasty, fairly easy to make dessert. No oven needed and the result is always a pleasure to serve. We rely on the recipe of an expert, in our case Dutch pastry chef Cees Holtkamp. Renowned for his excellent patisserie and his truly delicious croquettes. If you ever have the opportunity to visit the shop in Amsterdam, please do so.

After his retirement he started working on his book Dutch Pastry (De Banketbakker in Dutch). The recipes are very clearly written and easy to follow. One of the remarkable aspects of this book is that he prepared all pies, cookies, doughs etcetera in his own home kitchen with basic home cook utensils.

If you want to see his amazing technique and his gently style of creating wonderful patisserie, then visit FoodTube and enjoy how chef Cees Holtkamp and his granddaughter Stella Meijles prepare Pavlova, Black Forest Cake, Lemon Meringue Pie, Saint Honoré, Cheese Butterflies, Tiramisù and many more.

Dutch Pastry is available via the usual channels or via the publisher for 20 euro.

Liqueur

Let’s go back to the Tiramisù. It’s all about eggs, mascarpone, sugar, ladyfingers (savoiarde, sponge fingers or boudoirs) coffee and cocoa powder. Most recipes suggest adding a liqueur to the coffee, for instance rum, cognac, amaretto or marsala. Obviously, we want to add an Italian liqueur to our Tiramisù, so perhaps marsala? This is a fortified wine from Sicily, dry or sweet. A good choice but for some reason the idea of an almond based liqueur is tempting, perhaps because of its slight bitterness in combination with the coffee and the cocoa?

Unfortunately, most amaretto’s taste nasty and artificial. We decided to spend a bit more money and bought a bottle of amaretto produced by Lorenzo Inga. The distillery is located near Gavi, a city known for its amaretti cookies. They produce grappa, bitters and liqueurs such as sambuca and limoncello. Their amaretto is all about almonds. It has a soft structure with a sweet and full mouth feeling. We added it to our Tiramisù and the result was delicious.

Leftovers

The next day we noticed that we had some leftover ladyfingers and also some coffee-amaretto mixture. Why not combine them with whipped double cream and perhaps some vanilla sugar? Would that work? We followed the same approach and stored it in the refrigerator for half a day. We were pleasantly surprised!

  • Tiramisù ©cadwu
  • Amaretto Originale Lorenzo Inga
  • Cees Holtkamp

Macaron à l’Ancienne

A few weeks ago we stayed at the French city of Toulouse, a city on the banks of the river Garonne and well known for its impressive Place du Capitole and for the use of red bricks to construct houses and buildings. We walked through the old city centre, along the Canal du Midi, visited the beautiful Japanese garden and explored Carmes, a very nice neighbourhood with lots of small shops and restaurants. One day per week you’ll find a market with local products on the Place Du Salin. We saw very nice vegetables, dried sausages, cheese and Macaron a l’Ancienne, produced by Maison Boudiou from Saïx. The macarons came in various flavours, such as pistachio, orange, chocolate, natural and rose. All incredibly yummy.

The history of the macaron goes back a long time, perhaps to the 8th century. This kind of macaron, also known as TraditionnelAmaretties or Macaron Italien, is made with almonds, sugar and egg white. Indeed, exactly the same ingredients as today’s popular macaron. The main difference is that in case of the Macaron à l’Ancienne the egg white is only slightly beaten, and not turned into meringue. The egg white is used to connect the sugar and the grounded almonds.
Its taste made us think of marzipan, obviously, and a Dutch biscuit called bitterkoekje. No filling required and surprisingly simple to make.

What You Need

  • 150 Grams of Fine Granulated (or Caster) Sugar
  • 150 Grams of Almonds
  • 2 Egg Whites
  • 4-6 teaspoons of Orange Blossom Water

What You Do

This is a recipe for some 20 macarons. We use relatively little sugar; feel free to add more.
Preheat your oven to 180°C, upper and lower heat (the fan function will make the macarons dry and crunchy on the outside). Finely ground the almonds or (much quicker) use pure almond flour. In a bowl, mix the sugar and the almond powder. In another bowl, beat the egg whites until lightly foaming. Gently add the egg whites into the bowl and then fold them in until you have a batter. Add the orange blossom water, taste and if necessary, add some more. Make balls the size of a walnut. Place them on parchment paper and leave in the oven for 15 – 20 minutes, depending on the shape and color. Let cool on a rack.