Classic Beef Stew

Wintery weather, sunny and cold, the best time of year to enjoy a beef stew. We decided to cook an old-fashioned version, with red wine, bay leaf, mustard and black pepper. And patience of course, because it will take hours.

Regardless if you want to cook a Flemish Stew, Bœuf Bourguignon, Daube à la Provençale or this beef stew, you must use fatty, structured meat. The idea to use lean meat because fat is unhealthy or altogether wrong is one to forget quickly. Fat, structured meat is the key to a delicious stew. In general you’re looking for meat from the neck or the shoulder (beef chuck roast, sucadepaleron). When in doubt, ask your butcher.

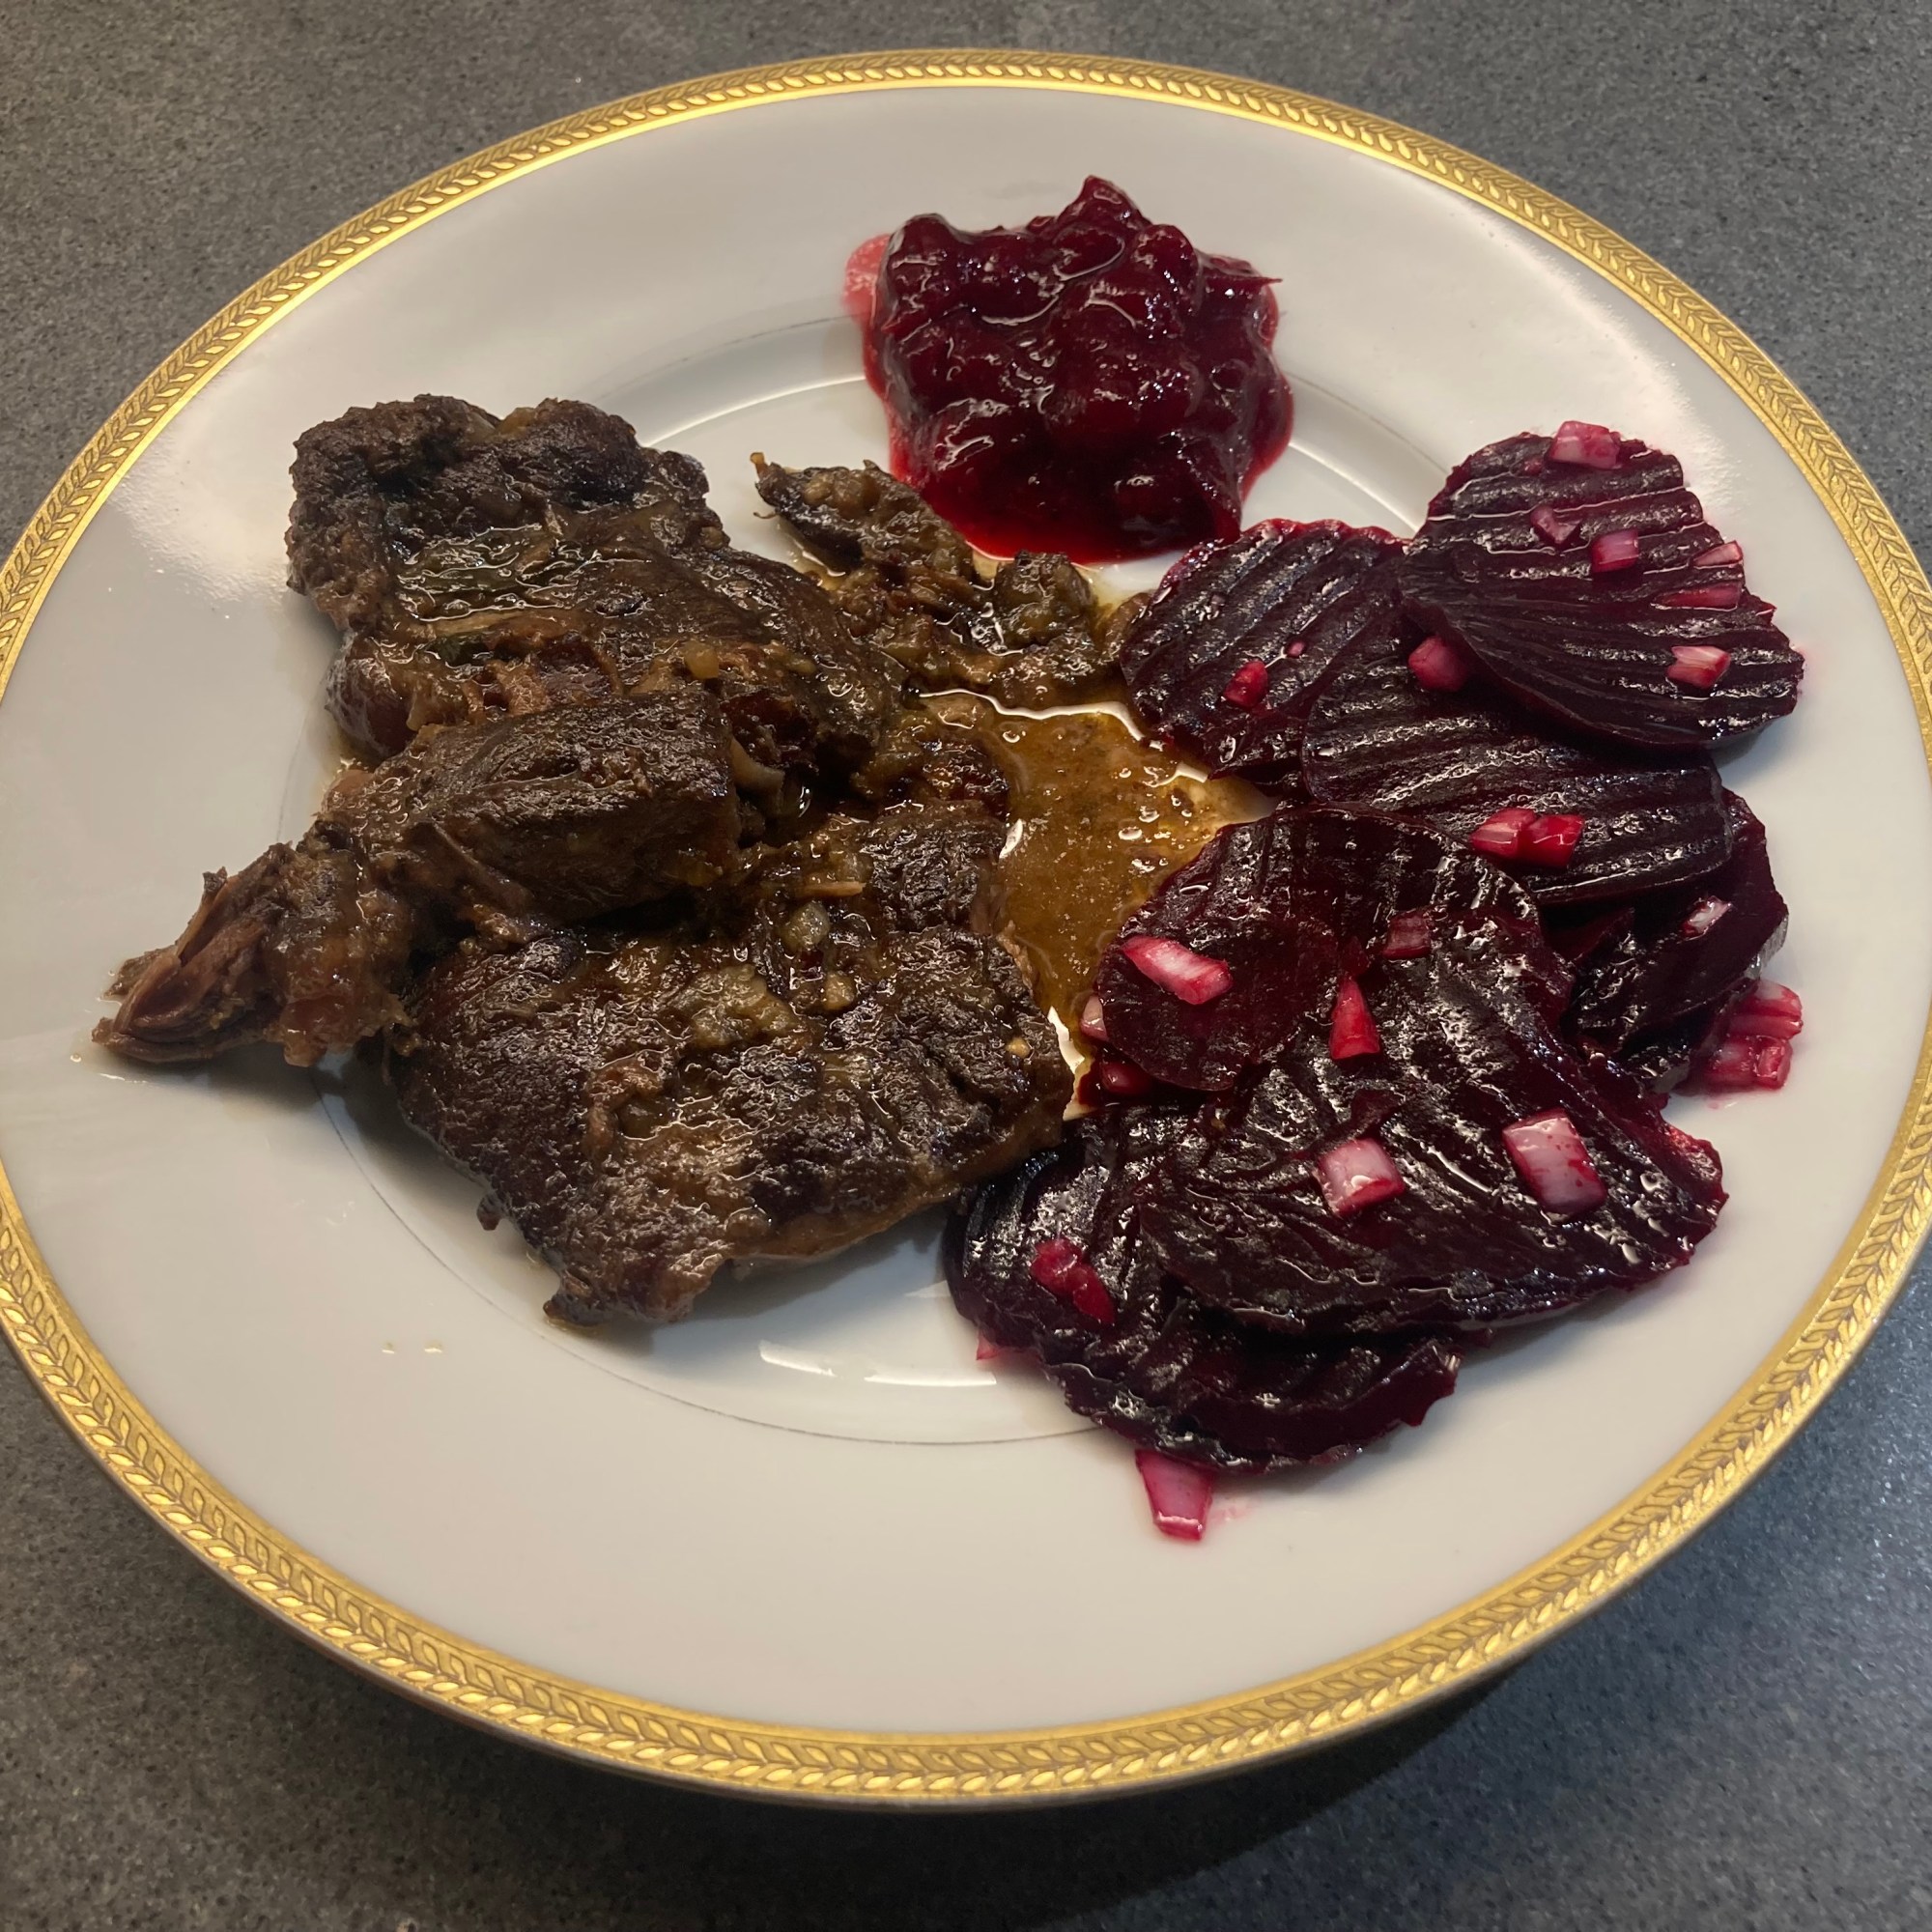
Most recipes suggest dicing the meat. We didn’t want to do that. When cutting the meat before serving, we followed the structure of the meat, which gives the plate a rustic feel.

We served the beef stew with a beet root salad and cranberry compote.

Drink Pairing

A rich beer or a full-bodied red wine will be a great accompaniment with the stew. The dish comes with some sweetness (the stew, the salad and the compote, obviously) so the wine should have some acidity and tannins. A robust wine with aromas of dark fruit (plums, blackberries, cherries), a touch of oak and a long taste will be perfect. 

What You Need

  • 400 grams of excellent Fat, Structured Beef
  • 50 grams of organic Bacon
  • Butter
  • Shallot
  • Mustard
  • Red Wine
  • 2 Bay Leaves
  • Bouquet Garni (Thyme, Parsley, Sage)
  • Black Pepper
  • Water

What You Do

Heat a heavy iron skillet, pat the meat dry with kitchen paper, add butter to the pan and fry until golden-brown. Reduce the heat and remove the meat from the pan. Add the sliced bacon and fry until golden. Add the shallot and glaze. Return the meat to the pan, add red wine, some water, mustard, bay leaves, bouquet garni and crushed black pepper. Allow to simmer for 6+ hours. You could close the pan with a lid. We prefer to cook it without a lid. The meat will take longer to become tender and soft. Our impression is that a stew prepared in a skillet without a lid is more moist. In all cases check the pan every 30 minutes, turn the meat and add water if required.
You could reduce the jus or turn it into a sauce, but you could also keep it as is.

What You Need – Beet Root Salad

  • One Beet Root
  • Excellent Olive Oil
  • White Wine Vinegar
  • Shallot
  • Black Pepper

What You Do – Beet Root Salad

The day before wash the beetroot and wrap in aluminium foil. Leave in the oven on 180° Celsius or 355° Fahrenheit for 45 – 60 minutes depending on the size. Cool and store in the refrigerator.
The next day peel the beet root and use a vegetable slicer (or mandoline) to make ridges. This will not only make the dish look more inviting, it will also enhance the taste given there is more coated surface and more air when chewing it. Make a simply, relatively acidic dressing with olive oil and vinegar. Finely chop the shallot and add to the dressing. Test a small slice of beet with the dressing and adjust when necessary. Perhaps some fresh black pepper? If you’re happy with the combination, toss the slices with the dressing making sure everything is nicely coated.

No-Knead Bread – Easier Method

Recently Le Creuset introduced a Cast Iron Bread Oven. A great way to make bread at home. The oven is well designed, making it easy to transfer the dough to the pan. It has a domed lid, ergonomic handles and looks amazing. Typical Le Creuset quality.

On their website you’ll find several recipes, including one for sesame bread. It is made with 600 grams of wheat flour, 14 grams of salt (wow!) and 400 grams of water. The recipe is based on slow-rise fermentation. With only 1 gram of yeast in combination with 19+3 hours of rest, the yeast does a wonderful job. And kneading, as you would expect, is not required.

Le Creuset’s approach is slightly different from Jim Lahey’s, owner of Sullivan Street Bakery, New York, promotor of no-knead bread since 2006 and author of the excellent book My Bread.
After the first rise, Jim Lahey folds the dough four times, dusts it with flour and bran, transfers it to a cloth for 3 hours before transferring it to a hot pan, a step that requires some practice and skills.
Le Creuset folds the dough twice and then transfers it to a cold pan. Wait for 3 hours and then transfer the cold pan to the oven. This approach is clearly quicker and easier.
And the result? A beautiful, tasty bread with a crispy crust.

What You Need

  • 430 gram of Flour (we use 200 gram of Whole Grain Flour and 230 gram of All Purpose Flour)
  • 25 grams Blue Poppy Seed
  • 30 grams Brown Linseed
  • 1 gram of Instant Yeast
  • 4 grams of Salt
  • 355 grams of Water
  • Additional Flour
  • Bran

What You Do

We use a 20cm Le Creuset Casserole with a heat resistant knob. Make sure the pan is well coated. If not, coat with oil and kitchen paper before using.
Mix flour, yeast, seeds and salt. Add water and create one mixture. Let rest in a covered bowl for 19 hours. Dust your kitchen worktop with flour, remove the dough from the bowl, fold 4 times, dust the pan with a touch of flour and bran, transfer the dough to the pan, sprinkle some bran on the top of the dough and close the lid. Let rest in the pan for 3 hours. Heat your oven to 235˚ Celsius or 450˚ Fahrenheit. Transfer the pan to the oven and bake for 35 minutes. Remove the lid and bake for 10 to 15 minutes until it is nicely browned. Remove the bread from the pan and let cool on a wire rack for at least an hour before slicing it.

Date with Foie Gras and Bacon

It’s such a pleasure to serve a warm snack (appetizer, finger food, quick nibble). In an earlier post we described how to make crostini with mushrooms and taleggio. A delicious vegetarian appetizer. This one is also simple and quick, but requires some shopping.

Let’s start with the bacon. Ideally you would use bacon made of pork belly, cooked in water with spices such as cloves, bay leaf and mustard seed, then rubbed with sugar, smoked and dried. The result is a moist, slightly sweet, cured bacon. The Dutch call it Katenspek.

Foie gras is always a bit of a debate. We are flexible and enjoy eating it, provided it comes with an authenticity label, perhaps with an award of an agricultural show and of course with positive reviews from connaisseurs. Ethical foie gras, made without force feeding the geese, is of course the preferred option. One that is nearly impossible to find. The Guardian published an interesting article about making Foie Gras without gavage.

The combination of these three ingredients is savoury and sweet, with a texture that is soft, crispy and a touch chewy. We love it.

What You Need

  • Excellent Dates
  • Excellent Terrine de Foie Gras (Goose preferred)
  • Sweet Cured Bacon

What You Do

Make sure all ingredients are at room temperature. Stuff the dates with foie gras and wrap it in one rasher of bacon. Fry quickly in a non-stick pan. The bacon should be crispy, the foie gras soft, the date warm. Serve immediately on a warm plate.

Date with Foie Gras and Bacon ©cadwu

Crostini

You don’t want to spend hours in the kitchen when serving drinks and you want to enjoy a warm appetizer (snack, finger food, quick nibble)? What to do? Of course: serve crostini! You can prepare them in advance and the only thing you need to do is put them under the grill for 3-5 minutes. A nice crunchy appetizer with a rich taste and intense aroma.

We use taleggio, a semi-soft cheese from Italy with a mild taste. It melts easily, so you need to keep an eye on your oven! If you can’t get hold of taleggio, then use mozzarella instead and add a bit more flavour to the mushroom topping.

What You Need

  • For the Mushroom Topping
    • Button Mushrooms and Shiitake
    • Garlic Cloves
    • Olive Oil
    • Thyme and Rosemary
    • Black Pepper
    • (Excellent) Olive Oil
  • For the Crostini
    • Old, stale Bread (Baguette preferred)
    • Garlic (optional)
    • Excellent Olive Oil
  • Taleggio

What You Do

One day before serving the crostini: clean and chop the mushrooms. Finely chop the rosemary, the thyme and the garlic. Fry the mushroom in olive oil in a heavy iron skillet. Reduce heat, add herbs and garlic. Continue on low heat for 10-15 minutes. Transfer the mushroom mix to a plate and let cool. Transfer to a kitchen aid and on low speed add some olive oil. Taste and add some black pepper. You’re looking for a coarsely chopped mixture, one that you can easily distribute over the crostini. Store in the refrigerator.

Also one day before serving the crostini: slice the bread and toast it. Halve a garlic clove, very gently rub the top of the toasted bread with the garlic and then brush with olive oil. An alternative is to preheat your oven to 180 °C or 350 °F, brush both sides with olive oil and bake until golden, 15 to 20 minutes. Perhaps you need to turn the slices over once. Store in a plastic container.

A few hours before serving the crostini: slice the taleggio (with crust!), top the bread with the mushroom mixture and then with a slice of cheese.

Set your oven to grill, transfer the crostini to the top of your oven, wait for a few minutes and serve immediately.

Crostini with Mushrooms and Taleggio ©cadwu

Salad of Small Artichokes

The season of artichokes varies depending on the variety and where you are based. In Italy it’s from mid-winter until early spring, in other countries from March to June, or September and October. And in other countries they peak in August. Best is to decide based on quality and price. An artichoke should feel heavy, look fresh and the leaves should be closed. If the leaves are wide open, the artichoke is older and it could be dry with lots of choke (the hairs) and dry inner leaves.

Don’t cook artichokes in boiling water. They must cook for 45+ minutes and during the long cooking process they will lose most of their flavour. Best is to steam artichokes.

Serve large artichokes as a relaxing starter or use them to make Artichoke Barigoule or a Pie. We use smaller ones to make a salad.  You can serve it to accompany an aperitif, or with some bread as a starter. Make sure you have plenty of dressing!

Wine Pairing

It’s not straightforward to pair artichokes with wine. According to various researchers this is due to cynarin, a chemical especially found in the leaves of the artichoke. When the wine and the cynarin meet in your mouth, the natural sweetness of the wine is enhanced, making it taste too sweet. So you have to pair freshly cooked or steamed artichokes with a bone-dry, crisp, unoaked white wine with clear, present acidity. For instance, Sauvignon Blanc, Grüner Veltliner or Albariño.
We enjoyed a glass of Château Pajzos Tokaj Furmint 2019. This dry, white wine made from the well-known Hungarian Furmint grape is fresh, clean and slightly floral. It supports the Salad of Artichokes beautifully.

What You Need

  • 6 small Artichokes
  • Olive Oil
  • Vinegar
  • Mayonnaise
  • Mustard
  • Garlic
  • Thyme
  • Black Pepper

What You Do

Remove the stem of the artichokes and steam the artichokes for 45 – 60 minutes, depending on the size. Remove and let cool. Peel of the first layers of the outer leaves. Make the dressing by turning the mustard and the crushed garlic into a smooth paste. Then gently add the other ingredients and whisk well to make it really smooth, thick dressing. Cut the artichokes in 6 or 8 parts. Add to the dressing, mix well, coating all artichokes. Sprinkle lots of thyme and mix again. Put in the refrigerator for at least 3 hours. Mix again, taste, add some more thyme and serve!

Potato and Truffle Purée

The combination of potatoes and truffle is an interesting one. Because one is the opposite of the other in terms of price and availability? Because both grow underground?

Dutch chef John Halvemaan (also winner of the prestigious Johannes van Dam prize) created a no doubt delicious combination, using butter, veal stock, parsley and cooked bacon. Also very tasty: a recipe for a gratin with crème fraîche and eggs and a recipe by chef Claude Deligne (Le Taillevent in Paris) with foie gras. All far too complex for us, so we prepared a very rich and tasty potato purée with lots of truffle.

If you look for recipes with potatoes and truffle, you will find suggestions using truffle oil. It’s not the real thing, however, if you find quality truffle oil and use only a little bit, your purée will be yummy. The sad news is that some (most?) truffle oil comes with 2,4-dithiapentane, a synthetically produced, aromatic molecule. Producers add this because it gives the impression that the oil contains truffle. Unfortunately, the flavours of 2,4-dithiapentane are not even close to the aromas and taste of a real truffle.

In this case you have to spend some money on both the truffle and the potatoes.

We combined our purée with an excellent rib eye and served it with its own jus and the purée.

Wine Pairing

We enjoyed a glass of Camino de Caza Almansa Garnacha Tintorera-Monastrell 2020. An organic red wine produced by Bodegas Piqueras and made grapes from the Almansa region in Spain. It’s a full-bodied wine with soft tannins and a hint of vanilla and chocolate. In general, you’re looking for a smooth wine with notes of red fruit and oak, medium acidity and with a long, dry finish. One that goes very well with for instance red meat and game (hare, deer).

What You Need

  • Potatoes
  • Butter
  • Egg Yolk
  • Cream
  • Milk
  • Salt
  • Winter Truffle

What You Do

Make your favourite purée! Cook the potatoes until ready (meaning: until the blade of a knife inserted in the potato goes easily through it). Drain. Mash with a fork, add cold butter, combine, add warm milk and/or cream and use a spatula to get the right consistency. You could add a beaten egg yolk (also because eggs and truffle work together wonderfully). Add salt to taste. Perhaps some white pepper. Grate the truffle and add half of it to the purée. The taste of a winter truffle benefits from the warmth of the purée. Just before serving add the remaining truffle.

Potato and Truffle Purée ©cadwu

Tiramisù

Such a simple, tasty, fairly easy to make dessert. No oven needed and the result is always a pleasure to serve. We rely on the recipe of an expert, in our case Dutch pastry chef Cees Holtkamp. Renowned for his excellent patisserie and his truly delicious croquettes. If you ever have the opportunity to visit the shop in Amsterdam, please do so.

After his retirement he started working on his book Dutch Pastry (De Banketbakker in Dutch). The recipes are very clearly written and easy to follow. One of the remarkable aspects of this book is that he prepared all pies, cookies, doughs etcetera in his own home kitchen with basic home cook utensils.

If you want to see his amazing technique and his gently style of creating wonderful patisserie, then visit FoodTube and enjoy how chef Cees Holtkamp and his granddaughter Stella Meijles prepare Pavlova, Black Forest Cake, Lemon Meringue Pie, Saint Honoré, Cheese Butterflies, Tiramisù and many more.

Dutch Pastry is available via the usual channels or via the publisher for 20 euro.

Liqueur

Let’s go back to the Tiramisù. It’s all about eggs, mascarpone, sugar, ladyfingers (savoiarde, sponge fingers or boudoirs) coffee and cocoa powder. Most recipes suggest adding a liqueur to the coffee, for instance rum, cognac, amaretto or marsala. Obviously, we want to add an Italian liqueur to our Tiramisù, so perhaps marsala? This is a fortified wine from Sicily, dry or sweet. A good choice but for some reason the idea of an almond based liqueur is tempting, perhaps because of its slight bitterness in combination with the coffee and the cocoa?

Unfortunately, most amaretto’s taste nasty and artificial. We decided to spend a bit more money and bought a bottle of amaretto produced by Lorenzo Inga. The distillery is located near Gavi, a city known for its amaretti cookies. They produce grappa, bitters and liqueurs such as sambuca and limoncello. Their amaretto is all about almonds. It has a soft structure with a sweet and full mouth feeling. We added it to our Tiramisù and the result was delicious.

Leftovers

The next day we noticed that we had some leftover ladyfingers and also some coffee-amaretto mixture. Why not combine them with whipped double cream and perhaps some vanilla sugar? Would that work? We followed the same approach and stored it in the refrigerator for half a day. We were pleasantly surprised!

  • Tiramisù ©cadwu
  • Amaretto Originale Lorenzo Inga
  • Cees Holtkamp

Bouchot Mussels

When you buy champagne, Cornish Clotted cream, Parmigiano-Reggiano or Kalamate Olives, you want to be sure it’s really champagne, clotted cream, Parmigiano or a Kalamata olive. There are various ways of protecting food (and wine) for instance by law, by creating and protecting a brand, or by systems such as the Appellation d’Origine Protégée (AOP) also known as Protected Designation of Origin (PDO). AOP/PDO is based on unique aspects of a region. For instance, the AOP for Comté cheese reflects the use of milk from specific cows from a region in the French Jura with a unique flora. This determines the cheese, its flavour and quality.

Another system focuses on the way food is produced. If this is done in a unique traditional way, the product can be labelled with Spécialité Traditionnelle Garantie (STG) or Traditional Speciality Guaranteed (TSG).

Bouchot Mussels carry both labels and they come with a special logo. Obviously, you wonder why.
The mussels grow in a unique way, benefitting from the large tide near Mont-Saint-Michel in Normandy. They grow on ropes strung from wooden poles (so called bouchots) in the sea. During a significant part of the day the mussels sit above sea level and therefore they grow slowly. The influence of the tide makes the bouchot mussels typical for the region and the use of poles makes the way the mussels grow unique.

Perhaps you also wonder if these aspects have an impact on the mussel and its taste. The answer is yes. They are small, clean, very tasty, flavourful, juicy and meaty plus they are free of sand and grit.

Preparing bouchot mussels is very simple, because adding flavours will only interfere with the already delicious taste.

Perhaps a bit more expensive than other mussels, but given they are so very tasty and rich, we think it’s perfectly fine to buy less than usual.

Wine Pairing

We enjoyed our Bouchot Mussels with a glass of Muscadet Sèvre et Maine, Domaine Raphaël Luneau. The wine originates from the Loire Valley and is made with 100% Melon de Bourgogne. The wine is stored on its ‘lees’ for several months before bottling. Lees are leftover yeast particles. They add flavour and structure to the wine.
In general, you’re looking for a white wine with minerality, fruit, structure and expression. It must be aromatic with a long taste.

What You Need (Starter)

  • 500 grams of Bouchot Mussels
  • White wine
  • One garlic Glove
  • Parsley
  • Crusted Bread

What You Do

Finely chop the garlic and the parsley. Add white wine to a pan and add the garlic. Bouchot mussels don’t release much liquid when you cook them, so use a little more wine than you would do with regular mussels. Leave for 10 minutes. Clean the mussels. Cook the mussels as quickly as you can, lid on the pan, until they are open. Add the parsley and combine. Serve immediately on a hot (soup) plate.

Partridge with Sauerkraut and Parsley Root

Partridge is perhaps the most delicate of game birds. Tasty, aromatic, mild. It is also one of the most vulnerable birds, given it is under threat from loss of habitat. Especially the grey partridge is becoming scarce. They are also expensive (we paid 10 euro per partridge) and the best part of the season (September-November) is relatively short, so don’t wait too long if you want to enjoy partridge once a year, like we do.

The meat of a partridge is lean and tends to become very dry when preparing it. So what to do? Of course! Put a strip of bacon on each breast and transfer the partridge to a hot oven.
Not really. The bacon will impact the delicate taste of the partridge. And placing such a small, lean bird in a hot oven is a massive risk. Just a few minutes too long (simply because something else you are preparing takes a bit longer) and the meat is bone dry. Stuffing the partridge doesn’t help either; the filling will be moist, but the meat will be dry anyway.

The key to an excellent partridge is to be brave enough to use an oven on a really low temperature, meaning on the temperature the meat should have when it’s served, which is 70 °Celsius or 160 °Fahrenheit.  Dutch chef Peter Lute presents this method in two highly recommended videos.

Partridge combines very well with a range of vegetables and herbs. You could celebrate the end of summer by enjoying your partridge with a thyme-courgette cake. Easy to make and full of flavours. This year we decided to combine our annual partridge with Sauerkraut (Elzas-style) and Parsley Root Puree. 

Wine Pairing

We enjoyed our Partridge with a glass of Riesling, produced by Markus Molitor. A classic Moselle Riesling from Germany. Clear mineral aromas, also fruit, herbal, delicate and pure. Excellent with the flavors of the partridge and the sauerkraut.
In general you’re looking for an aromatic white wine, with perhaps a touch of sweetness.

What You Need
  • For the Partridge
    • Two Partridges
    • Two Garlic Cloves
    • Bay Leaf
    • Butter
    • Olive Oil
  • For the Sauerkraut
    • 250 grams of Sauerkraut
    • 50 grams of Bacon
    • One small Shallot
    • Bay Leaf
    • Caraway (Cumin)
    • Pink (or Red) Peppercorns
    • Juniper Berries
    • White Wine
    • Butter
  • For the Parsley Root Puree
    • Parsley Root
    • Cream
    • White Pepper
    • Nutmeg
What You Do
  1. Start with preparing the sauerkraut
  2. Slice the bacon and chop the shallot
  3. Fry the bacon in some butter in a small iron skillet
  4. After a few minutes add the shallot
  5. Mix sauerkraut, pink peppercorns, crushed juniper berries, crushed caraway, white wine and a splash of olive oil
  6. Add the sauerkraut to the skillet, add bay leaf, some butter, cover with foil and transfer to the oven (110° Celsius or 230° Fahrenheit)
  7. Leave in the oven for 4-6 hours
  8. Check the sauerkraut every hour, mix and add water if needed.
  9. A very helpful instruction (in Dutch) how to prepare partridge is presented and demonstrated by Peter Lute in two excellent videos. Please watch them and see how it should be done.
  10. In summary: prepare the partridge by carefully cutting off the two legs and removing the lower part of the back of the bird (the tail bone area)
  11. Warm a heavy iron pan and add butter
  12. Coat the birds with butter, making sure they have a very light brown colour
  13. Transfer the pan to a warm oven: 70° Celsius or 160° Fahrenheit
  14. Leave in the oven for 50-60 minutes
  15. Since the oven is on the ideal temperature for the meat, it doesn’t really matter if you leave them in the oven longer.
  16. Set aside.
  17. Peel the parsley root, chop and put in a pan with water and bring to a boil
  18. When the parsley root is halfway remove the water and add cream
  19. Let cook on low heat until tender
  20. Use a blender to create a puree. Add white pepper and nutmeg. You could also use a fork for a more structured puree
  21. Add a touch of olive oil to a non-stick pan, and quickly brown the meat, skin side only
  22. Just before serving separate the tenderloin from the breast and remove the fleece before serving the breasts
  23. If all is well you will see a beautiful pink colour, indicating your cuisson is perfect and your partridge as tasty and delicate as possible
Partridge with Sauerkraut and Parsley Root ©cadwu

Weever

Fish and Chips, such a tasty combination, especially when the fish is fried with beer-based batter and served with triple-cooked chips, mushy peas and tartare sauce. Commonly it is made with cod or haddock. We prefer haddock because of its flavour and more importantly its texture. Both haddock and cod are expensive and in these days of high inflation we are keen to find a cheap alternative.

That’s why we recently tried this dish with weever, also known as Pieterman in Dutch and Vive in French. We were not disappointed, not at all. Excellent texture, taste a bit stronger compared to haddock but nevertheless yummy.
Weever is actually a really interesting fish. Weevers hide in the sand, waiting for prey. Their defence is based on a poisonous dorsal fin which makes it very painful when you step on it or want to get gold of them. Therefore it is unpopular with anglers, making it bycatch. And because of that, weever is not expensive. Great combination: save money and enjoy delicious food!

Drink Pairing

A nice, cold beer will go very well with this dish. Wine wise the choice is yours: unoaked Chardonnay, Semillon, dry Riesling, Rueda, Chenin Blanc or Picpoul de Pinet. The wine must be fresh, a touch citrussy and have balanced acidity.

What You Need
  • For the Haddock, Cod or Weever
    • Boneless Fillet
    • All Purpose Flour
    • Breadcrumbs (see below)
    • Egg
    • Butter
    • Olive Oil
    • Black Pepper
  • For the Pickled Radish
    • Red Radishes
    • Shallot
    • White Wine Vinegar
    • Sugar
  • Mayonnaise
What You Do – Pickled Radish
  1. Take a cup of white wine vinegar, add it to a bowl, add sugar, perhaps some water (depending on the acidity of the vinegar), mix very well and taste
  2. The mixture should be both sweet and sour
  3. Slice the radishes and the shallot
  4. Add to the mixture, stir and leave in the refrigerator for a few hours
  5. Over time the colours will blend
  6. The vegetables will keep well for a few days
  7. Feel free to use the same approach with other (firm) small vegetables
What You Do – Haddock, Cod or Weever
  1. Pat the fillet dry with kitchen paper
  2. Check if there are really no bones
  3. Take three plates, one with flour, one with beaten egg, one with breadcrumbs
  4. Coat the fillet with flour, then dip it into the egg mixture and finally coat with the crumbs
  5. Fry in hot butter (with olive oil) until lovely golden brown
  6. Serve immediately on a warm plate
What You Do – Breadcrumbs
  1. Also known as chapelure
  2. Use old, stale but originally very tasty bread. Obviously, we use our home-made bread
  3. Toast the bread and let cool
  4. Cut in smaller bits and then use a cutter or blender to make the crumbs
  5. They keep very well in the freezer, so best to make in advance, when you have some left over bread