Oyakodon

Hope you enjoyed Netflix’s The Makanai: Cooking for the Maiko House as much as we did. Two friends (Kiyo and Sumire) move from rural Japan to Kyoto, following their dream of becoming maiko’s. Once in Kyoto it turns out that their dreams are very different. Kiyo is passionate about food and becomes the person to prepare the makanai, the food for the people living in the Maiko house. Every episode shows Japanese food, from dumplings in red bean soup to baked sweet potato and onigiri (rice balls).

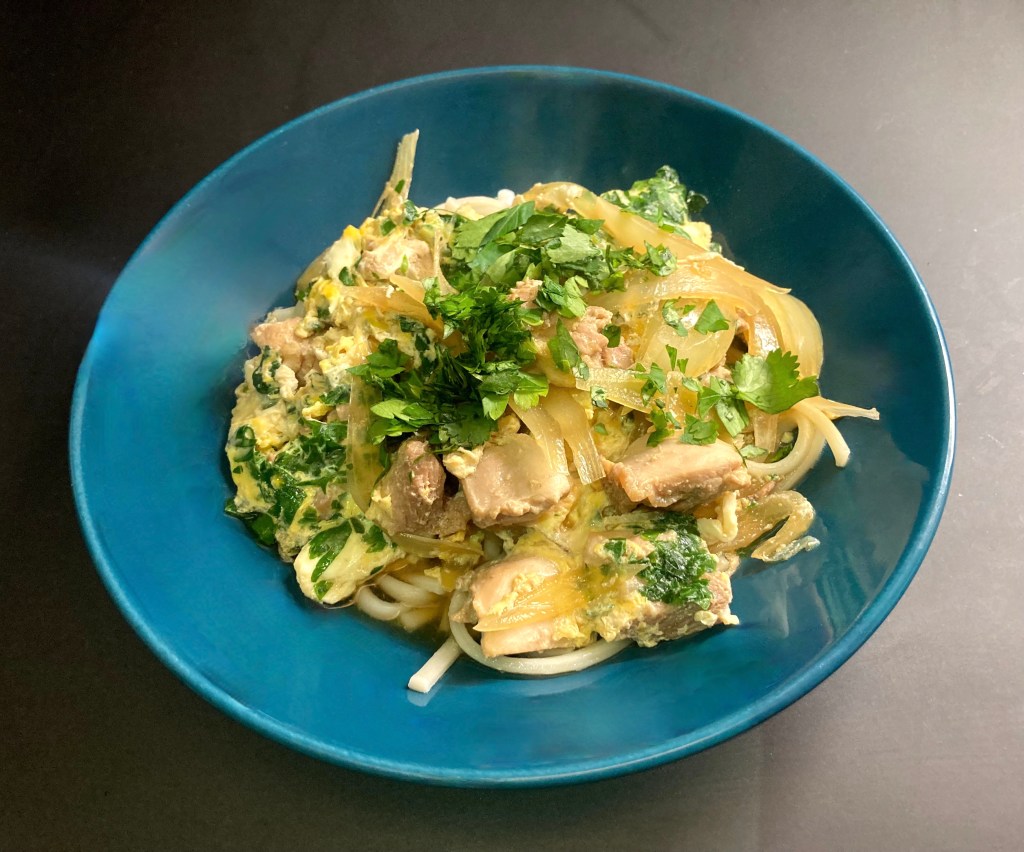
The first dish Kiyo prepares for the house is Oyakodon, a rice dish with egg and chicken, a popular dish in Japan. Easy to make, nutritious and the flavours and aromas are very satisfying. On Cooking With Dog you’ll find a helpful video showing you how to make Oyakodon. 

San Francisco based chef Namiko Hirasawa Chen (founder of Just One Cookbook, an award winning blog about food) was brave enough to cook all the food shown in the series. Obviously you’ll find all makanai recipes on their website.

What You Need

  • 100 grams of Chicken Breast (skin off)
  • 1 medium White Onion
  • 2 Eggs
  • 100 ml Dashi
  • 2 tablespoons Mirin
  • 2 tablespoons Soy Sauce
  • Mitsuba (or a mix of Parsley and Cilantro)
  • Rice

What You Do

Make sure your dashi is full of flavours, perhaps a bit stronger than usual. Make a broth with mirin and soy sauce. Peel the onion and slice from top to bottom (banana shaped slices). Chop the chicken breast in comfortable slices. Add the onion and the chicken to the broth, cover the pan with a lid and cook until nearly done. Add half of the mitsuba (or the combination of parsley and cilantro). Add the eggs to a bowl and lightly beat the eggs but don’t mix. You should be able to distinguish the white and the yolk easily. Add the first half to the broth and use chopsticks to distribute the combination in the pan. Wait for a few moments and add the second half. Serve over a bowl of warm rice. Decorate with mitsuba.

PS

Perhaps you noticed that we used udon for our oyakodon, basically because we love udon, but it should be served with rice. Most (all?) recipes suggest adding sugar. We think the mirin brings sufficient sweetness to the dish, but feel free to add just a bit of sugar.

Tuna Tartare

A starter that is tasty, appetizing and easy to make, one that will always put a smile on your face. The only challenge is to buy excellent, fresh tuna. Since most tuna species are overfished or at the risk of becoming overfished, make sure the tuna you buy is from sustainable fishing practices, for instance if it’s certified by MSC (Marine Stewardship Council). Whatever you do, look for skipjack or albacore and don’t buy bluefin (or yellowfin).

Wine Pairing

In general, enjoy the tartare with a white wine, for instance a Picpoul de Pinet or a Muscadet-Sèvre-et-Maine with aromas such as apple and peach. Flavour wise the wine must be dry with a mild citrussy flavour and some minerality.
We happily opened a bottle of Château de Crémat Blanc 2021. A wine with a light-yellow colour, with complex aroma’s (toast, floral, grapefruit) and a long finish.

What You Need

  • 150 grams of Tuna
  • Capers
  • Organic Lemon (Zest and Juice)
  • Chives
  • Black Pepper

What You Do

Make sure you have all ingredients ready before you combine it with the tuna. If you mix too often, the tartare will become soggy.
Wash the lemon, make a teaspoon or so of zest, squeeze the lemon. If using salted capers, make sure to wash them carefully (and long); a salty taste will ruin the tartare. Better to use capers in brine. Dry the capers and chop. Take 5 or 10 sprigs of chives, cut in small bits using scissors. Dice the tuna. Add tuna, chopped capers, zest, chives and some black pepper to a bowl. Add a drizzle of lemon juice. Combine, taste and adjust. Cover with cling foil and transfer to the refrigerator for one or two hours. Decorate with mayonnaise and two sprigs of chives.

Tuna Tartare ©cadwu
Tuna Tartare ©cadwu

Leek with Truffle

This winter truffles are even more expensive than usual, due to a warm and dry season in the Italian and French truffle regions. The number of truffles is limited and the ones that are harvested are small. Bad news for the truffle-lover.

The first to talk to us about truffles were Fred and Yolanda de Leeuw. Not only did they run a very special butcher in Amsterdam, they also imported truffles and truffle related products. 
Their shop was the only place in Amsterdam where you could buy Wagyu beef before it became popular, foie gras, quails, Spanish veal, bread from Paris, oysters with wasabi sabayon, capon, home-made pastrami and black pudding. Expensive, delicious and always of the highest quality.

Fred and Yolanda contributed to various cookbooks with recipes for truffle-based dishes. In 1999 chef Alain Caron and author Lars Hamer published a book about the shop, the meat, the patés, the sausages, the salads and the dishes they prepared. One of these recipes is for a leek salad with summer truffle and Jus de Truffe. The truffle juice is obtained after maceration of the truffles for six months to one year in the juice of the first cooking process for conserved truffles. Jus de Truffe has the deep earthy aromas and flavour of fresh truffle.

We prepared the leek salad as a tribute to two people who were genuinely passionate about what they did, what they sold and what they prepared.

Wine Pairing

The dish comes with a range of flavours: the leek is buttery with a hint of onion and the vinaigrette earthy and fresh with a touch of bitterness. Wine wise we suggest a Soave, a white wine made with garganega grapes, because it goes very well with the citrus and the aromatic leek flavour. 

What You Need

  • Young Thin Leek
  • Lemon
  • Olive Oil
  • Jus de Truffe
  • Mustard

What You Do

Clean and wash the leek. Slice in three, making sure all slices have the same length. Cook in hot water for 20-30 minutes until they have a soft, creamy texture. Cool quickly and set aside. Make a dressing by adding jus de truffe to a bowl. Add half a teaspoon of mustard, a few drops of lemon juice and half a teaspoon of excellent olive oil. Now it’s a matter of adjusting. It all depends on the intensity of the jus de truffe, the tartness of the lemon and flavour of the olive oil. Dry the leek carefully, whisk the dressing and serve. And if you can afford it, add some freshly grated truffle.

Artichokes Roasted In the Oven

We love artichokes, as a salad, stuffed, with pasta, always a treat. We saw young, small, purple artichokes on the market and decided to take a different approach. Let’s roast them in the oven with lots of fresh thyme, rosemary and bay leaf.
The bitter, nutty taste of the artichokes was clearly present, and it was delicious in combination with the mouthfeel (the olive oil) and the aromatic herbs. Compared to steamed artichokes the roasted ones come with stronger but not too strong flavours.

The artichokes were clearly young because there was no centre choke (the hairy part), which meant that we could eat most of the artichoke, including the stem.

Wine Pairing

Normally pairing artichokes and wine is a real challenge. According to various researchers this is due to cynarin, a chemical especially found in the leaves of the artichoke. When the wine and the cynarin meet in your mouth, the natural sweetness of the wine is enhanced, making it taste too sweet. Meaning you must pair artichokes with a bone-dry, crisp, unoaked white wine with clear, present acidity. Roasting the artichokes in the oven seems to reduce the impact of the cynarin. We suggest serving the artichokes with a medium bodied, dry red wine, not too complex. Could be Merlot, perhaps Malbec or Carménère.

What You Need

  • Young, Small Artichokes
  • One Garlic Clove
  • Fresh Thyme, Rosemary and Bay Leaf
  • One Lemon
  • Olive Oil

What You Do

Heat your oven to 150 °C or 300 °F. Press the lemon and add the juice to a bowl of cold water. Slice the artichokes lengthwise in two. Add them to the water. Check if they have a centre choke. If so, try to remove. Let the artichokes soak for a few minutes. In the meantime peel the garlic and chop, coarsely. Add a generous amount of olive oil to your baking dish, dry the artichokes somewhat, add them to the dish, add the garlic, the sprigs of thyme and rosemary, the bay leaf. Mix. Sprinkle with more olive oil. Cover with aluminium foil and transfer to the oven for 15 minutes. After 15 minutes increase the temperature to 180 °C or 355 °F. Leave for 30 minutes. Check if the artichokes are ready. The trick is simple. If you can remove a leave without too much trouble, they are ready, if not, give them 5 more minutes. You could also check the stem, it should be soft. Remove the foil and leave in the oven for another 5-10 minutes. In parallel fry some merguez sausages.

PS

Artichokes require eating with your hands. Given the olive oil you may need an extra napkin or two.

Cabbage Stew

This delicious dish with cabbage, sausage and potatoes looks a bit wintery but actually thanks to the taste and the texture of the Savoy Cabbage it’s uplifting and even a bit refreshing. The structure of the leaves is very firm, so we cook the leaves before adding them to the stew. The risk is, as with all cabbages, to overcook them, which will cause the typical nasty sulphur smell. The leaves can also be used to make a roulade, or a dolma shaped snack.

We used Saucisse de Morteau which is a smoked sausage from the Franche-Comté region. In general, you’re looking for a smoked pork sausage. The Saucisse de Morteau is smoked for 48 hours so the taste is very present, which allows you to buy a small sausage. The main role in this dish is for the Savoy Cabbage!

Drink Pairing

A medium bodied red wine will be great, but we could also imagine enjoying it with a beer. The flavours are bold, so a not too complex beer or wine will be perfect.

What You Need

  • One Onion
  • Two Garlic Cloves
  • Half a Savoy Cabbage
  • One Potato
  • One Smoked Sausage
  • Olive Oil
  • Parsley
  • Black Pepper

What You Do

Heat a pan with water. Wash the potato and cook until nearly ready. Use a potato that remains firm when cooked. We used Mona Lisa, a tasty, starchy all purpose potato. Remove the potato from the boiling water. Peel off the outer leaves of the cabbage and discard. Peal off the reaming leaves, remove the veins and cook for 3-5 minutes in hot water. Remove the leaves, cool with cold water and let dry. Add the sausage to the pan, 20 minutes in hot (not boiling) water should be fine. In parallel quarter the onion and fry in olive oil. After a few minutes add the chopped garlic. Now it’s time to combine all ingredient in an oven dish. Cover with aluminium foil. Set your oven to 160 °C or 320 °F and leave for 3*10 minutes . Toss gently after 10 minutes. Remove the aluminium foil and set your oven to 180 °C or 355 °F . Allow to cook for another 10 minutes. Add some chopped parsley and black pepper just before serving

Scallops with Roe

Where you are in the world influences how you enjoy your scallops: with or without the roe? That’s probably why we are used to discarding the roe, even if we buy our scallops in the shell.
We were talking to our fish monger, and he completely disagreed with us. He feels the roe is a tasty bonus, perhaps a bit more intense than the white of the scallop (the muscle). The texture of the roe gives a very pleasant mouthfeel, he told us.
We bought six scallops and promised him to eat both the muscle and the roe.
The flavours are very similar and the combination is a real treat. As our fish monger mentioned, it is a tasty bonus. We served the scallops with a potato purée. It creates a nice balance in the dish and it allows you to taste the scallops even better.

Wine Pairing

We enjoyed our Scallops with a glass of Muscadet Sèvre et Maine sur Lie produced by Château de la Noë. This is an aromatic wine with fruity aromas, minerality and a long finish, which goes very well with the taste of the scallops and the purée.
The term ‘sur lie’ indicates that during a few months the wine stays in contact with the dead yeast cells left over after fermentation. This technique makes the wine more complex.
In general you’re looking for an elegant, fresh, light wine with clear acidity.

What You Need

  • For the Seared Scallops
    • 6 fresh Scallops (best if in their shell)
    • Olive Oil
    • Black Pepper
  • For the Potato Purée
    • One Potato
    • Butter
    • Cream
    • Nutmeg
    • Black Pepper

What You Do

  1. Clean and steam (or cook) the potato until done.
  2. Use a fork to mash the potato (we love a bit chunky purée in this combination; therefore we suggest using a potato that’s also suitable for making fries)
  3. Add butter, mash some more, add cream
  4. Taste and add more butter and/or cream
  5. Just before serving add freshy grated nutmeg and black pepper
  6. Clean the scallops
  7. Heat a non-stick pan, add some olive oil to the pan and fry the muscle and the roe quickly
  8. When on the plate, add some black pepper.

Cod Cheeks

Cod has been a popular fish for hundreds of years. Much appreciated for its taste and structure. Its popularity unfortunately also means it has been heavily overfished. During the nineties the population dropped significantly. Thanks to various restrictions, cod is slowly on its way back to recovery, especially in the Northeast Atlantic Ocean, although it is still on the red list in many countries. Sea Food Watch provides a very helpful buying guide.

When you buy cod, in most cases you buy cod fillets. But what happens to the remainder, what happens for instance to the head? You could roast it in the oven, you could use it to make stock (don’t forget to remove the skewers), in some countries dried cod heads are appreciated as a delicacy, but in reality, most fish heads seem to end up in animal food or biofuel.

Recently our fish monger surprised us by selling cod cheeks, an absolute delicacy. They are moist with a firm structure and have a delicate taste. Great to combine with parsley, capers and lemon. Or make a batter with beer, flower and egg, coat the cheeks and fry them in oil at 180 °C or 360 °F.

Wine Pairing

A medium bodied white wine will do very well in combination with the Cod Cheeks, for instance an unoaked Chardonnay or Chenin Blanc. We enjoyed a glass of Clin d’Oeil, Saumur Blanc from the Loire region in France produced by Les Vignobles Edonis. It’s a dry wine with clear acidity, fruit, green apples, some minerality and length.

What You Need

  • 200 grams of Cod Cheeks
  • All Purpose Flower
  • Egg
  • Bread Crumbs
  • Butter
  • Pepper
  • Tartar Sauce

What You Do

  1. Carefully remove the skin and white membranes of the cod cheeks
  2. Separate the egg, whisk the egg yolk
  3. Heat a pan and add butter
  4. Dry the cod cheeks with kitchen paper, dust with flower, then dip in the egg yolk and coat with bread crumbs
  5. Fry until golden
  6. Add some black pepper and serve on a warm plate
  7. A dish to share!
PS
  • Make your own bread-crumbs by using old, stale but originally very tasty bread. Obviously, we use our home-made bread.
    Toast the bread and let cool. Cut in smaller bits and then use a cutter or blender to make the crumbs. They keep very well in the freezer, so best to make in advance, when you have some left over bread.
  • Make your own tartar sauce by combining mayonnaise, pickles, lemon juice, capers, dill and Dijon mustard.
Cod Cheeks ©cadwu
Cod Cheeks ©cadwu

Eton Mess

For some reason we were talking about summer, about typical summer food, about strawberries, green peas, melon, okra, peaches, spinach and new potatoes. Of course, most of these are available all year round, but we like to enjoy the season. Today was different, we really wanted to eat strawberries and we decided to make Eton Mess.
According to Hilaire Walden in her excellent Book of Traditional English Cookery the strawberry dessert is eaten on June 4th in Eton during a picnic for pupils and parents of Eton College, as part of the annual prize giving ceremony. Others say it was first served during the annual cricket match between pupils of Harrow School and Eton College.
One anecdote is that a chef planned to make Pavlova but it collapsed, the other anecdote is that the Pavlova was perfect but a dog sat on it, making a mess, an Eton Mess.

Mascarpone is sometimes added to the cream, but that’s a bit over the top. No need to add sugar to the cream because the meringue is sufficiently sweet. Hilaire Walden suggests soaking the strawberries for two hours or longer in kirsch, an idea we liked. She also suggests using ready-made meringues, which make it even easier to make Eton Mess.

What You Need

  • Strawberries
  • Raspberries (optional)
  • Kirsch (or Brandy)
  • Cream
  • Merengue
  • Lemon Zest

What You Do

Clean the fruit, chop, place in a bowl and sprinkle with kirsch or brandy (one or two small tablespoons per portion). Leave in the refrigerator for at least two hours. Whip the cream. Add some lemon zest, mix. Start assembling the Eton Mess: first a layer of merengue crumbles, then fruit, then whipped cream, then a second layer, same order but make sure you can see some of the red fruit. Serve immediately.

PS

In case you want to make your own (French) meringues: you need 2 egg whites and 100 grams of (finely granulated) sugar. The weight ratio should be 1:2, egg white to sugar. Set your oven to 90 °C or 190 °F. Whip the egg whites until somewhat stiff. Start slowly adding the sugar and continue whipping until the egg white mixture shows stiff peaks. Pipe the mixture on a baking sheet, transfer to the oven for 2 hours. The shape of the meringues is not important because you will need crumble for the Eton Mess

  • Eton Mess ©cadwu
  • Book of Traditional English Cookery - Hilaire Walden

Fried Large Prawns

Prawns and shrimps are very popular, just think shrimp cocktail, paella, salad with shrimps, pasta with seafood, stuffed eggs with shrimps, curry with shrimps and fried shrimps with garlic and lemon. Most of these prawns and shrimps are cultivated, frozen and then shipped. For this recipe you need really large, fresh, wild or organic prawns because the dish is all about the prawn, its flavour and aromas. The result fully depends on the quality of the prawn.
We use the shell, the legs and the so-called swimmerets of the prawns to create a sauce; a bisque like sauce. 

Wine Pairing

We enjoyed our Prawns with a glass of Picpoul de Pinet produced by Gérard Bertrand. A dry white wine, with a pale straw yellow color. It has aromas of citrus and gooseberries. The wine is full and round with minerality which is typical for a Picpoul de Pinet.
You could also combine the prawns with a glass of Chablis, Verdejo or Soave.

What You Need

  • Two large Prawns, fresh, either wild or organic
  • For the Bisque
    • One small Shallot
    • Chili Pepper
    • Olive oil
    • Armagnac or Cognac
    • Garlic
    • Tomato Paste
    • One Saffron Thread
    • Water
    • Bouquet Garni (Thyme, Parsley)
  • For the Tomato
    • One excellent dark Tomato
    • Olive Oil
    • Vinegar
  • Olive Oil
  • Black Pepper
  • Crusted Bread

What You Do

We start by making a bisque-like sauce, using the shell of the prawns.
Chop the shallot and a bit of chili pepper and glaze gently for 10 minutes in olive oil. In parallel use scissors to cut the shell of the prawn. Start behind the head and cut towards the tail. Just before the tail turn 90 degrees and make a cut around the prawn. This allows you to remove the shell and the legs of the body but keep the head and the tail on the prawn. Remove the black vein (the prawn’s intestines) and the slurry in the head (if any). Since you serve the prawn with the head (and tail) it is essential that the prawn is clean. You could gently rinse the prawn if you want to be absolutely sure about this. Transfer the prawns to the refrigerator.

Break the shell into smaller chunks. Add these to the pan and fry for a few minutes until red. Add a small splash of Cognac or Armagnac and flambé. Never do this when using the exhaust or range hood. Add one garlic glove, water, a teaspoon of tomato paste, the bouquet garni and the saffron. Stir well, cover the pan and let rest on low heat for 30 minutes.
Remove the bouquet and the shells from the pan. Use a spoon and a sieve to squeeze the juices from the bouquet and the shells, then discard. Blender the mixture and pass through a sieve. Taste the mixture, add pepper if so required. Leave for another 30 minutes on very low heat, allowing for the flavors to integrate and for the liquid to reduce.

Make a dressing by combining olive oil and vinegar. Wash and slice the tomato. Coat the slices with the dressing. Dry the prawns and fry them in a skillet in oil (depending on the size maximum 4 minutes in total) on both sides and on the back. Use warm plates, and serve the prawn on top of the sauce. Touch of black pepper on the prawn is fine. Enjoy with crusted bread.

PS

A few years ago we made a video showing you in detail how to prepare this dish.

Fried Large Prawn ©cadwu

Mashua

This edible, very productive plant (Tropaeolum Tuberosum ) is originally from the Andes. It grows very well in colder climates, it’s not very demanding and comes back year after year thanks to its tubers. Other names include Capucine TubéreuseKnollige Kapuzinerkresse en Knolcapucien.
We saw Mashua Tubers in our local bio supermarket and we bought them, without having a clue how to prepare the tubers.

The leaves are supposed to taste like Indian Cress (same family) and the deep orange-red trumpet flowers will do very well in a salad. The leaves can also be turned into pesto or prepared like spinach. The tubers (vibrant yellow with an intriguing purple pattern) are often used in stews and soups. They can be eaten raw in a salad, grated or thinly sliced. Not our favourite. The taste is radish like, but sharper and not very elegant.
The taste and the texture of the cooked mashua tubers took us by surprise: delicate cocoa but not sweet, moist and with a pleasant structure thanks to the peel.

We combined our Mashua with chicken and shiitake, a combination that worked very well, although we must admit we were a bit overwhelmed by the Mashua!

Wine Pairing

A medium bodied, fruity, non-oaked red wine will go very well with the Mashua. A glass of Merlot perhaps?

What You Need
  • For the Mashua
    • 5 Mashua Tubers
    • Cumin
    • Shallot
    • Olive Oil
  • For the Chicken
    • 2 Organic Chicken Thighs
    • 50 grams of Shiitake
    • Olive Oil
    • Black Pepper
What You Do
  1. Wash the mashua (don’t peel them)
  2. Cook for 5 minutes
  3. Let cool
  4. Slice the tubers lengthwise in two
  5. Dry with kitchen paper
  6. Peel the shallot, quarter and slice
  7. Warm a small skillet
  8. Add a generous amount of olive oil to the pan and glaze the shallot for a few minutes
  9. Add cumin (crushed seeds preferred)
  10. Add the halved mashua
  11. Leave for 30+ minutes until just a bit soft
  12. Turn them occasionally to coat the roots with the flavours of the oil, the shallot and the cumin
  13. No need to colour them
  14. Add some extra cumin 5 minutes before serving
  15. In parallel, fry the chicken thighs and transfer to the oven (60 °C or 140 °F). Clean and slice the shiitake, add to the pan and fry. Add the chicken, allow to integrate. Add black pepper to taste.