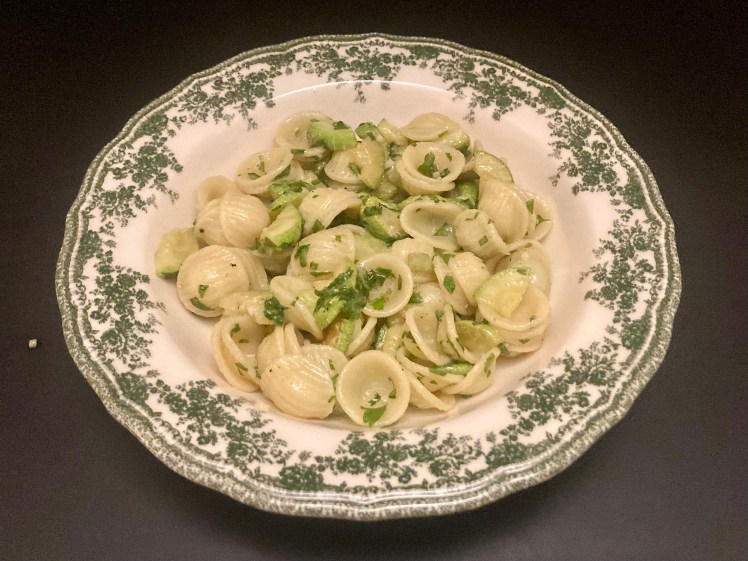
Risotto with Porcini

Risotto is amongst our favourite dishes, especially risotto with mushrooms. Preparing risotto is not difficult, as long as you pay attention to the cooking process and use the right ingredients.
It’s nearly the end of the porcini-season. We enjoyed them several times this year, but not yet in a risotto. Time to start cooking!

Wine Pairing

We enjoyed a nicely oaked, buttery South African chardonnay with our risotto with porcini. A full-bodied white wine with aromas of tropical fruit and toast. A wine that paired very well with the earthiness of the risotto and its rich flavours.

What You Need
  • 90 grams of Carnaroli or Arborio rice
  • 1 Shallot
  • Olive Oil
  • 150 grams of fresh Porcini
  • Chicken or Vegetable Stock
  • Parmesan Cheese
  • Butter
  • Black Pepper
What You Do
  1. Peel and chop the shallot
  2. Clean the porcini
  3. Slice the porcini; cube smaller parts
  4. Warm the stock
  5. Add olive oil to a pan and glaze the shallot
  6. Add the smaller parts of the porcini
  7. Add the rice to the pan and coat for 2 minutes
  8. Keep the pan on medium heat; be patient
  9. Start adding stock, spoon by spoon and stir frequently
  10. Heat a heavy iron skillet and fry the sliced porcini in butter and oil
  11. In total it may take 15 – 18 minutes before the rice is al dente
  12. 5 Minutes before the risotto is al dente, coarsely cut some of the fried porcini, making sure you have a few nice slices for decoration
  13. Add the coarsely cut and fried porcini to the risotto
  14. When the risotto is ready, transfer the pan to the kitchen countertop and leave to rest for 2 minutes.
  15. Add grated Parmesan cheese and combine
  16. Add butter and combine
  17. Add some black pepper, taste, add more Parmesan cheese and/or butter if so required.
  18. Decorate with slices of porcini
  19. Serve immediately.
PS

We have four other risotto recipes, with squid, with beetroot, with mushrooms and with peas.

Risotto with Porcini is a delicious combination of creamy, rich rice and nutty, umami flavours. Risotto is not difficult to make if you use the right ingredienst and follow the instruction.
Risotto with Porcini ©cadwu

Saffron Milk Cap with Octopus and Tomatoes

Saffron Milk Cap with Chorizo and roasted Bell Pepper is one of our favourites. More recently we followed a recipe by Antonio Carluccio for a combination with Halibut. Another great combination. They can also be combined with Squid, with gamba and with Potatoes and Eggplant.
Saffron Milk Caps (Rovelló de Botó) are very popular in Spain. The picture below shows fresh Saffron Milk Caps on the Mercado Central in Valencia. Thinking about Spain we came up with the idea of combining the mushroom with octopus.

Wine Pairing

We opened a bottle of Domaine Font-Mars Picpoul de Pinet. Picpoul de Pinet (Son terroir c’est la mer) is a white wine from the South of France between Narbonne and Montpellier. The terroir (think calcareous soil) is influenced by the sea, which is reflected in the mineral taste of the wine. The story is that Picpoul could be read as pique poul which translates into something like ‘stings the lip’; a nice reflection of the high acidity of the grapes. This acidity guarantees a refreshing white wine, which is exceptional given the warm climate. The wine is bright yellow with a very subtle touch of green. It’s aromatic, floral and fruity. The taste has notes of citrus and apple.
In general we suggest drinking a refreshing, unoaked white wine that goes well with seafood.

What You Need

  • For the Sauce
    • 4 Tomatoes
    • 1 Shallot
    • 1 Garlic Clove
    • Red Wine
    • Thyme
    • Olive Oil
  • 150 grams of Saffron Milk Cap
  • 200 grams of pre-cooked Octopus Tentacles
  • Parsley
  • Cayenne Pepper
  • Olive Oil

What You Do

  1. Peel, seed and dice the tomatoes.
  2. Don’t discard the skin and the seeds: use a strainer to get as much tomato juice as possible
  3. Chop the shallot
  4. Chop the garlic finely
  5. Heat a skillet, add olive oil and add the shallot.
  6. Fry for a few minutes
  7. Add garlic and tomatoes
  8. Reduce heat
  9. After a few minutes add the tomato juice, half a glass of red wine and thyme
  10. Leave to simmer on low heat for 2 hours or until the sauce is ready both in flavour and texture
  11. Cool and transfer to the refrigerator
  12. The next day clean the mushrooms and slice (not too thin)
  13. Chop the parsley
  14. Heat a skillet, add olive oil
  15. Add the sliced mushroom
  16. Fry for one minute
  17. Reduce heat
  18. In parallel grill the pre-cooked octopus tentacles (4-6 minutes)
  19. Add the tomato mixture to the pan with mushrooms and cook for a few minutes
  20. Taste and add cayenne pepper. You’re looking for a fairly sharp, spicy taste
  21. Add parsley to the mixture and combine
  22. Slice the octopus
  23. After a few minutes add octopus to the mixture without combining,

Risotto with Peas

Risotto is amongst our favourite dishes, especially one with mushrooms. Preparing risotto is not difficult, as long as you pay attention to the cooking process and use the right ingredients.
Recently a dear friend who lived in Italy for many years told us how to make Risotto with Peas. In the region where he lived (Liguria) this risotto is made without butter. We were not sure about not using butter, so we had it on standby. No need for that: the result was delicious. The rice was creamy thanks to the combination of the starchy cooking liquid and the Parmesan cheese. The peas were cooked to perfection and their taste nutty. The dish as a whole was light and energizing.

Wine Pairing

In general, a dry white wine will pair well with the Risotto with Peas. We enjoyed a glass of lightly oaked Chardonnay produced by Abbots & Delaunay. Aromas of apples and toast; the taste refreshing, long and a touch buttery. 

What You Need
  • 80 grams of Carnaroli or Arborio rice
  • 1 Shallot
  • Olive Oil
  • Fresh Peas
  • Stock (Chicken, Vegetable)
  • Parmesan Cheese
What You Do
  1. Peel and chop the shallot
  2. Shell the peas
  3. Warm the stock
  4. Add olive oil to the pan and glaze the shallot 
  5. Add the rice to the pan and coat for 2 minutes
  6. Keep the pan on medium heat. Be patient
  7. Start adding the stock, spoon by spoon and stir frequently
  8. After 10 minutes add the peas
  9. In total it may take 15 – 18 minutes before the rice is al dente
  10. Transfer the pan to the kitchen countertop and leave to rest for 2 minutes
  11. Add grated Parmesan cheese, combine, add some black pepper, taste, add more Parmesan cheese if so required
  12. Serve immediately
PS

We have three other risotto recipes: one with mushrooms, one with squid and one with beetroot.

Risotto with Peas is a tasty, uplifting dish. A delicious starter.
Risotto with Peas ©cadwu

How to Make a Roulade (part 2)

Earlier we wrote about ‘butterflying’ meat, a technique that allows you to turn a bigger piece of meat into a roulade. Ideal for pork loin or turkey. But what to do when you have smaller pieces of meat and butterflying is not possible? Then it’s a matter of flattening the meat, for instance with a hammer. Better to ask your butcher to do it for you with the head (blade) of a butcher’s axe: easy, quick and a much better result. Thin is better!
Once you have flattened pieces of meat it’s a bit of a puzzle to create the roulade. Just give it a try and see what works best. When you think you have the right combination, make sure the kitchen twine is in place and the filling ready.
Obviously, you want to match the filling with the side dishes. We served the roulade with caponata and decided to make a filling with sage and thyme.

Wine Pairing
homemade roulade: chicken thighs, sage and pancetta. Served with caponata

We enjouyed a non-oaked Nero d’Avola from Sicily. The ruby red coloured wine has aromas of cherries and plum. The taste is fruity and long with subtle tannins. Great combination with the Mediterranean flavours in both the roulade and the caponata.

What You Need
  • 4 Boneless Chicken Thighs
  • 1 small Shallot
  • 1 clove of Garlic
  • 10 leaves of Sage
  • Thyme
  • Butter
  • Pancetta
  • Olive Oil
  • Lemon
  • Black Pepper
What You Do
  1. Ask your butcher to flatten the chicken thighs
  2. Chop the shallot and the garlic
  3. De-vein the sage
  4. Remove the thyme leaves from the stalk
  5. Grate the butter
  6. Add olive oil to a heavy iron skillet and gently fry the shallot
  7. After a few minutes reduce the heat
  8. Add garlic and thyme. Stir
  9. Add some lemon juice
  10. Allow the filling to cool
  11. Put strings of kitchen twine on your work top
  12. Decide on the pattern for the meat and put it on top of the kitchen twine. This way you can easily roll up the meat and tie the twine
  13. Cover the meat with sage
  14. Spread the mixture over the sage. Keep the edges free
  15. Add grated butter
  16. Cover with slices of pancetta
  17. Roll up the meat
  18. Tie with kitchen twine
  19. Tightly wrap in plastic foil and transfer to the refrigerator for at least 2 hours
  20. Remove the roulade from the refrigerator and allow to rest at room temperature for 30 minutes
  21. Preheat your oven to 180 °C or 350 °F
  22. Remove the foil
  23. Put the roulade on a rack (this way it will brown evenly)
  24. Add water to the pan
  25. Fry in the oven until the internal temperature is between 70 °C and 75 °C, or 160 °F and 165 °F
  26. Transfer to your worktop, wrap in aluminium foil and allow to rest for 10 minutes
  27. Serve with caponata

Panna Cotta with a Twist

Recently we enjoyed mouth-watering Indian food thanks to Asma Khan’s cookbook Ammu. When we were looking for a dessert in her book, we hoped to find a recipe for Kulfi or for Kheer, both delicious creamy desserts with ingredients such as cardamon and saffron. Unfortunately these recipes are not included in the book.
Cream? Dessert? Why not try making a panna cotta with cardamon?
The combination turned out to be very tasty, not too rich, a touch sweet and the cardamom was present in just the right way. Decorate with pistachios and rose petals for a delectable Panna Cotta with an Indian twist.

What You Need (for 6)
  • 500 ml Cream
  • 30 Cardamom Pods
  • 20 grams of Sugar
  • 3,5 leaves of Gelatine (5,25 grams)
  • Rose Petals
  • Pistachios
What You Do
  1. Peel the cardamon pods
  2. Use a pestler and mortar to lighly crush the seeds
  3. Add the seeds to the cream
  4. Slowly bring the cream with the seeds to the boil
  5. Keep close to boiling for 15 minutes. Stir when necessary
  6. Remove from the heat and while stirring add sugar until totally dissolved
  7. Follow the instruction of the gelatine and soak the leaves
  8. Pass the mixture through a sieve
  9. Add the gelatine to the mixture and stir well
  10. Cool the liquid somewhat before filling the forms. We used a silicone mold. Nice and easy! The only thing you need to do is to make the mold a bit moist with water
  11. Let the panna cotta cool and than store in the refrigerator until set
  12. Don’t forget to seal with cling foil, otherwise your panna cotta will absorb aromas from other food in the refrigerator
  13. Decorate with pistachios and rose petals
Panna Cotta with Cardamom based on a classic Italian dessert, with cardamon, pistachios and rose petals
Panna Cotta with Cardamom ©cadwu

Cacio e Pepe

It takes only four ingredients to create an international culinary incident: a classic Italian recipe, a well-known British food website, Parmesan cheese and butter. What happened? BBC Good Food published a recipe for a quick and easy lunch meal, called Cacio e Pepe, with Spaghetti, Butter, Black Pepper and Parmesan Cheese. Claudio Pica, president of the Fiepet Confesercenti Roma (an association representing restaurants in Italy) couldn’t disagree more and expressed his astonishment in several letters, including one to the UK Ambassador.

Cacio e Pepe is a traditional, Italian classic, typical for the Lazio region, made with Tonnarelli or Spaghetti, Water, Salt, Pecorino Romano and Black Pepper. No cream, no butter, no olive oil, no Parmesan cheese. And it may seem simple to prepare, but serving Cacio e Pepe requires skills, passion and experience, according to Claudio Pica.

The incident made us think of Sophia Loren adding cream to her Spaghetti Carbonara and Jamie Oliver putting chorizo on his Pizza. Don’t mess with Italian traditions!

Now that we agree on the ingredients, we need to understand how to prepare the dish. The heart of the dish is a sauce made with pasta water and pecorino. We found various ways of making this sauce, ranging from adding pepper and grated cheese to the pasta just before serving (no sauce, just sticky pasta) to a scientific one whereby the sauce is made au bain marie (complicated).

We think the main points of the recipe are:

  • Use less water than usual, because you need starchy water to create the sauce
  • Use less salt in the pasta water because the Pecorino cheese is rather salty
  • The Pecorino must be relatively young, older cheese may make the sauce lumpy
  • The Pecorino must be very finely grated

We humbly present our version of this delicious Italian classic dish.

Wine Pairing

We enjoyed a glass of Pima Luna Frascati with our Cacio e Pepe. This is a white wine from the Lazio region, or to be more precise: from the hills overlooking Rome. The wine is made by wine maker Mauro Merz with malvasia bianca di candia and trebbiano grapes. It’s a light and refreshing wine with hints of green apple and citrus. Notes of slightly bitter almond on the finish. Its freshness matched very well with the creamy Cacio e Pepe. The aroma of the wine comes with a hint of butter, which is a nice connection to the Pecorino.

What You Need
  • 130 grams of Spaghetti
  • 70 grams of Pecorino cheese
  • 2 grams of Black Pepper
  • 1 litre of Water
What You Do
  1. Heat the water in a large pan and add the spaghetti
  2. Warm your plates (50 °C or 120 °F)
  3. Cook the spaghetti for a few minutes. Our spaghetti needed 11 minutes in total; we cooked it for 7 minutes in the pan.
  4. Crush the peppercorns
  5. Roast them in a pan over medium heat until they become very aromatic
  6. Reduce heat and wait for the spaghetti to be somewhat cooked
  7. Add some pasta water to the pan with the toasted pepper
  8. Increase the heat
  9. Transfer the pasta to the pan and combine
  10. Add a large spoon of pasta water to the pan
  11. Leave to cook
  12. Repeat steps 10 and 11 until the pasta is al dente. At this moment the pan should be nearly dry
  13. In parallel add some pasta water to the finely grated pecorino and make a smooth paste
  14. When the pasta is al dente remove the pan from the heat
  15. Allow to cool for perhaps one minute
  16. Quickly add the paste and combine everything in the pan
  17. Add pasta water to reach the right consistency
  18. Serve immediately on warm plates
  19. No need to add pepper or cheese
PS

The Good Food website mentioned they would be happy to post the original recipe. We looked for it, but couldn’t find it. We did however find a recipe for Cacio e Pepe with Gnocchi (and butter and Parmesan cheese, obviously).
Perhaps another letter to the Ambassador? Or one to the Prime Minister?

How to Make a Roulade (Part 1)

Butterflying meat is a technique that allows you to turn a thicker piece of meat (for instance pork tenderloin or turkey breast) into a piece that you can use to make a roulade, without damaging the texture. The first step is to slice the meat lengthwise, but not through and through. The second and third step are a bit more challenging: take your knife and half the meat, again lengthwise, from the centre to the right and then from the centre to the left. Basically, you have now quartered the meat but it still in one piece. Difficult? This helpful video shows you how to do it.
Some instructions stop after the first step and use a meat hammer to flatten the meat. Nice, but the result is not even close to the real thing.

Once the pork tenderloin is butterflied, it’s time to add the filling, on the outside. Sounds odd, but our butcher was right, if you fry the roulade inside-out, you get a much better result.

We have made pork tenderloin roulades with various fillings. This recipe is for a Mediterranean approach. You could also go for a spicy mixture with red pepper paste, garlic, onion, ginger and soy sauce.

Wine Pairing

In general both red and white wine can go very well with a roulade of pork tenderloin. It all depends on the filling. In case of this Mediterranean filling, we would suggest a more robust wine, for instance Syrah. This is a full-bodied red wine with medium to high levels of tannin. It has fruity flavors and a slightly peppery finish.
In case of a filling with red pepper paste, garlic, ginger and soy sauce you could pair the roulade with a more spicy red wine, for instance Zinfandel, or with a white wine with a touch of sweetness (Riesling, perhaps Viognier).

What You Need
  • Pork Tenderloin
  • Black garlic
  • Sage
  • Black Olives
  • Rosemary
  • Fennel Seed
  • Pancetta
  • Black Pepper
What You Do
  1. Butterfly the meat
  2. Devein and chop the sage
  3. Halve the black olives
  4. Crush the fennel seeds
  5. Make a mixture of black garlic, sage, black olives, rosemary, fennel seed and black pepper. It should be a powerful mixture
  6. Spread the mixture over the meat. Keep the edges free.
  7. Cover with slices of pancetta. 
  8. Roll up the meat
  9. Tie with kitchen twine
  10. Tightly wrap in plastic foil and transfer to the refrigerator for at least 2 hours
  11. Remove the roulade from the refrigerator and allow to rest at room temperature for 30 – 60 minutes
  12. Preheat your oven to 160 °C or 320 °F
  13. Fry in the oven until the internal temperature is between 65 °C and 75 °C, or 145 °F and 165 °F (pink and well-done respectively)
  14. Transfer to your worktop, wrap in aluminium foil and allow to rest for 10 minutes
  15. Slice and serve on a warm plate, for instance with green peas, or pommes dauphinois, or a salad or ratatouille. Just think about the filling and be inspired!

Pasta with Duck

A few weeks ago we enjoyed Pappardelle al Ragù d’Anatra at restaurant Rigatoni in Haarlem. We loved the combination of pasta and duck so we decided to look into this Italian classic. We found a recipe in La Scienza in Cucina e l’Arte di Mangiar Bene by Pellegrino Artusi, published in 1891. His recipe (number 272) combines a whole duck with celery stalk, parsley, carrot and onion. When everything is nicely cooked, he removes the duck from the pan, passes the sauce through a sieve, removes the duck fat and adds some butter. The duck is served with Pappardelle and Parmesan cheese. The vegetables are served separately.

We decided to use orecchiette and fresh duck leg. Orecchiette is a pasta typical for the very south of Italy whereas Pappardelle al Ragù d’Anatra is typical for Venice. Using orecchiette is probably not-done from an Italian point of view, but we simply love the way it combines with this duck-based sauce.

Wine Pairing

The restaurant served the dish with a glass of Corvina, which we think was an excellent choice. The wine is made in the Veneto region, not far from Venice, with 100% corvina grapes. In general, we suggest a light to medium bodied, unoaked, red wine with aromas of red fruit. Its taste should be pleasant and warm with good acidity. A red wine that should be served slightly chilled.

What You Need
  • Duck leg
  • Olive Oil
  • Carrot
  • Celery stalk
  • Onion
  • Bay Leaf
  • White wine
  • Tomatoes
  • Stock
  • Orecchiette
  • Black Pepper
What You Do
  1. Start by preparing the duck.
  2. Preheat the oven to 150 °C or 300 °F
  3. Heat a skillet and fry both sides of the leg until golden.
  4. Transfer the duck to the oven for one hour, skin on top
  5. After an hour, check if the duck is well done and moist
  6. Let cool
  7. Remove the skin from the meat and the meat from the bones
  8. Very coarsely chop (or pull) the meat.
  9. Set the skin aside
  10. Chop onion, finely chop carrot, thinly slice the celery stalk
  11. Heat a large pan, add olive oil and gently fry onion, carrot and celery.
  12. After 5 minutes add the duck meat and the bay leaf
  13. Add a splash of white wine and allow to evaporate
  14. Add the tomatoes (if using fresh tomatoes, then peeled and deseeded)
  15. Add stock
  16. Cook for 60 minutes
  17. Add more stock if required
  18. In parallel
    • Cook the orecchiette al dente
    • Heat a small skillet
    • Add some olive oil
    • Slice small squares of the skin of the duck
    • Fry these until crispy
    • Add some black pepper and Parmesan cheese to the ragù
  19. Serve the pasta with the sauce and decorate with the crispy duck skin and grated Parmesan cheese
PS
  • You can skip steps 1 to 6 by using Confit of Duck. We tried it, even though we assumed it would be too salty or its flavour not suitable. But we were wrong, it worked very well.
  • Some recipes use breast of duck, which we think is too lean for a ragù.
Orecchiette al Ragù d’Anatra ©cadwu
Pasta with Duck ©cadwu

Pear Pie with Frangipane

Juicy, sweet ripe pears, frangipane and a crunchy crust, what more can you ask for! This very tasty pear pie is not difficult to make. The only challenge is finding ripe pears. The juicer the better!

Frangipane is a classic from the French pâtisserie and was first mentioned in 1652 by François Pierre (de) La Varenne. His recipe for Tourte de Franchipanne describes a crust made with puff pastry and a filling with what we would call crème pâtissière, enriched with crushed pistachios and almonds.
In her book Tarte TatinGinette Mathiot includes a recipe for Strawberry Frangipane. Same approach, but with crushed almonds only.

The current Larousse Gastronomique takes a different approach by beating sugar and butter until creamy (beurre pommade in French), then adding the eggs, one at a time, and the almond flour. No cooking required. Our approach is fairly similar, we combine soft butter, sugar and almond flour and then add the beaten egg.

Obviously, the recipe provided by Varenne is for a rich sauce whereas the second method is about making a paste, which is very suitable for a Pear Pie.

What You Need
  • For the Crust
    • 50 grams of White Caster Sugar
    • 100 grams of soft Unsalted Butter
    • ½ Egg (beaten)
    • 1 gram of Salt
    • 150 grams of All Purpose Flour
    • Cold Water (optinal)
  • For the Frangipane
    • 50 grams of Almond Flour
    • 40 grams of Sugar
    • 40 grams of Unsalted Butter (room temperature)
    • One Egg
    • Lemon Zest (optional)
  • For the Filling
    • 4 Ripe Pears (Williams, Bartlett, Conference)
  • For the Coating
    • Apricot Jam
    • Water
What You Do
  1. Start by making the dough
  2. Combine sugar and butter. Use a hand mixer with kneading hooks
  3. When mixed, add halve of the beaten egg
  4. Combine salt and flour
  5. Pass through a sieve and add to the mixture
  6. (optional) add some baking powder if you want a crispier crust)
  7. Use the kneading hooks to mix
  8. If the dough is too dry, add some cold water
  9. It’s ready when the pastry comes together in a ball that doesn’t stick to the surface
  10. When done, remove from the bowl and wrap in foil. Store in the refrigerator for at least two hours. The dough freezes well, so it’s a great idea to make a bit extra
  11. Now make the frangipane
  12. Combine almond flour, sugar and butter. Beat until fluffy
  13. Add the beaten egg
  14. Mix
  15. (optional) Add lemon zest
  16. Transfer to the refrigerator
  17. Preheat the oven to 180 °C or 355 °F
  18. Roll out the dough on a lightly floured surface and use it to line a 16 cm (6 in) tin. Best is 2 millimetres
  19. Transfer to the refrigerator and leave for 30 minutes
  20. Prick the pastry with a fork, to prevent air bubbles forming during baking
  21. Add the frangipane to the pastry case and spread evenly
  22. Peel and slice the pears, add on top of the frangipane
  23. Transfer to the oven for 30 – 40 minutes or until golden
  24. Use a fork to combine apricot jam and water, ratio 4:1
  25. Warm the apricot mixture
  26. When the pie is still warm, coat with the apricot mixture
PS
  • We made the crust with pâte sucrée, or sweet shortcrust pastry. The result is a flaky, crumbly crust. You could also use (ready-made) puff pastry or pate sablée. Adding a few grams of baking powder is an option when you want a lighter, crispier crust.
  • When we first saw a recipe for frangipane with pistachios, we wondered if that would be a good idea. Now that we have read the 1652 recipe, we will definitely give it a try.
Pear Pie ©cadwu
Pear Pie ©cadwu

Zucchini with Taleggio

Zucchini, or courgette, is a favourite summer vegetable. Just think about sliced Trombetta’s, or Stuffed Flowers, or a combination with Farfalle and Fennel. Recently we bought beautiful round zucchinis, ideal to stuff and serve as a side dish. We’ve made these many times, with herbs like rosemary, thyme, oregano and Parmesan cheese. Tasty and not difficult to make. However, we think there’s room for improvement. How would it taste if we would use a richer, fatter, more aromatic cheese? We looked in the fridge. Perhaps Appenzeller? Or a traditional Dutch cheese? We decided to use Tallegio, a semi-soft cheese from Italy made from raw cow milk, with a mild taste. It melts easily, which makes it very suitable for this dish and for instance crostini.

Wine Pairing

The zucchini will be a great accompaniment with grilled lamb or chicken. You could also combine the zucchini with pasta or rice, making for a vegetarian meal.
We decided to drink a glass of red wine from the Douro region, produced by Quinta do Crasto. The wine is made from traditional Douro red grape varieties: tinta roriztouriga nacionaltinta barroca and touriga franca. The wine is fresh, fruity and very pleasant. Its colour is deep ruby and the wine has aromas of ripe red fruit.
In general, we suggest a red wine with flavours and aromas of red fruit and with light tannins.

What You Need
  • 2 round Zucchinis
  • One Garlic Clove
  • Thyme
  • Black Pepper
  • Taleggio
  • Olive Oil
What You Do
  1. Remove the top of the zucchinis
  2. Preheat your oven to 180 °C or 355 °F
  3. Use a teaspoon to remove the inside of the zucchini, also of the cap. Be careful not to damage the skin of the zucchini
  4. Use a knife to chop the ‘meat’
  5. Add olive oil to a pan
  6. When warm, add the meat and fry/glaze for a few minutes
  7. Finely chop the garlic and add to the pan
  8. Finely chop the thyme
  9. Add thyme and black pepper. Mix and leave on low/medium heat for a few minutes
  10. Let cool
  11. Fill the bottom half of the zucchini with the mixture
  12. Add a slice of taleggio
  13. Fill the zucchini with the mixture
  14. Add a second slice of taleggio on top
  15. Transfer the stuffed zucchinis and the tops to the oven and fry for 15 minutes or until golden
  16. Serve with the top on the zucchini
PS

The winemaker, Quinta Do Crasto, provides excellent background information. Interesting to read about the weather, the harvest, the production and the timing.

Zucchini with Taleggio ©cadwu