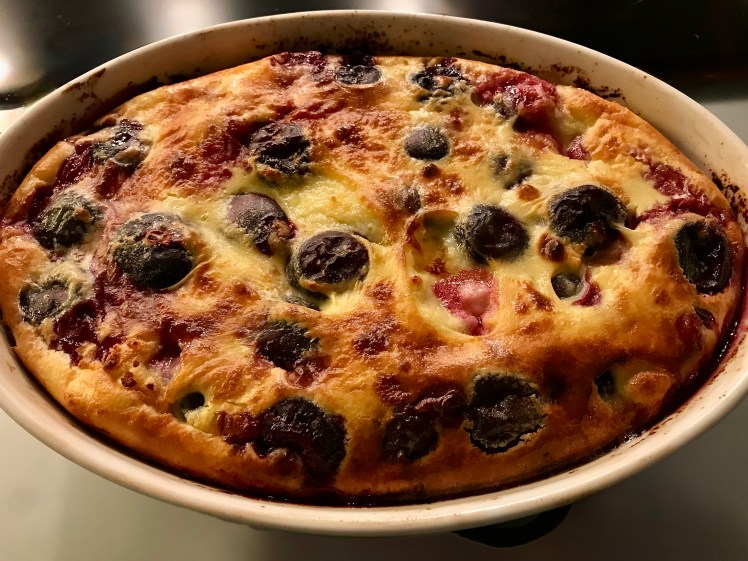
Cherries, cherries, cherries! We love their rich, sweet taste, the touch of tartness and their firm, succulent texture! They just want to be eaten, one after the other. So what better summer dessert than Clafoutis?
Should you use whole cherries or pitted ones? Not removing the pits is less work for you (obviously) and it reduces the risk of a soggy Clafoutis. Unpitted cherries will give a subtle almond flavour to the clafoutis. On the other hand, you don’t want to bite into a pit while enjoying your dessert. Also important: the pits contain amygdalin, a toxic compound that can also be found in almonds, apple seeds and apricot stones. We decided to pit the cherries and compensate for the lack of almond taste by adding some almond flour to the batter. If you decide to remove the pits, make sure you remove all of them!
Finally, yes, you can replace the cherries with fresh apricots, berries, peaches or prunes. The result is called a Flaugnarde. But nothing as tasty as Clafoutis made with fresh cherries!
What You Need
2,5 dl of regular Milk
2 Eggs
30 grams of plain Flour
10 grams of Almond Flour
20 grams of Sugar
500 grams of Cherries, pitted
10 grams of Butter
What You Do
Pre heat the oven to 180° Celsius or 350° Fahrenheit
Whisk together the eggs, plain flour, almond flour and sugar
Bring the milk almost to a boil
Stir the milk into the mixture
Butter a large, shallow baking dish, add cherries to the dish
Make sure the bottom is nicely covered with cherries; no need to have two layers of cherries
Pour the mixture over the cherries
Bake (lower third of the oven) for 20 minutes
Add a few dots of butter
Continue baking for another 20 minutes or until the Clafoutis is golden
Leave to cool for 60 minutes or so, this will enhance the taste
Recently we enjoyed mouth-watering Indian food thanks to Asma Khan’s cookbook Ammu. When we were looking for a dessert in her book, we hoped to find a recipe for Kulfi or for Kheer, both delicious creamy desserts with ingredients such as cardamon and saffron. Unfortunately these recipes are not included in the book. Cream? Dessert? Why not try making a panna cotta with cardamon? The combination turned out to be very tasty, not too rich, a touch sweet and the cardamom was present in just the right way. Decorate with pistachios and rose petals for a delectable Panna Cotta with an Indian twist.
What You Need (for 6)
500 ml Cream
30 Cardamom Pods
20 grams of Sugar
3,5 leaves of Gelatine (5,25 grams)
Rose Petals
Pistachios
What You Do
Peel the cardamon pods
Use a pestler and mortar to lighly crush the seeds
Add the seeds to the cream
Slowly bring the cream with the seeds to the boil
Keep close to boiling for 15 minutes. Stir when necessary
Remove from the heat and while stirring add sugar until totally dissolved
Follow the instruction of the gelatine and soak the leaves
Pass the mixture through a sieve
Add the gelatine to the mixture and stir well
Cool the liquid somewhat before filling the forms. We used a silicone mold. Nice and easy! The only thing you need to do is to make the mold a bit moist with water
Let the panna cotta cool and than store in the refrigerator until set
Don’t forget to seal with cling foil, otherwise your panna cotta will absorb aromas from other food in the refrigerator
It’s not every day that we visit a museum to explore the world of food, let alone the world of desserts. End of last year the Kunstmuseum in The Hague (the Netherlands) opened the exhibition Grand Dessert about the history and joy of European desserts. According to guest curator Janny Van der Heijde (author of cookbooks and member of the jury of the Dutch version of the Great British Bake Off), “A dessert is more than just the ultimate ending to a meal. It reflects changes in culture, society and tastes down the centuries. You can tell a lot of stories using desserts. Stories about wealth and poverty, about temptation and deception, dominance and oppression, but first and foremost about love of all things sweet.”[1]
On Display
The exhibition shows a variety of pastries (glass and ceramic, made by Shayna Leib), moulds, recipe books, baking tins and fun objects such as dessert-bags (made by Rommydebommy), dessert-clothing and knitted desserts (Kate Jenkins). It shows how ice-cream was made, what desserts would be served during royal banquets and how sugar was used to create centrepieces, for instance Sugar Flower pieces (Natasja Sadi). Also on display a large, pink, moving jelly, created in 2024 by Chinese artist Rong Bao.
Moulds
We were especially intrigued by the vast collection of moulds, in all kinds of shapes, classic ones, fish, lobster, pineapple, shells, elephant, cow, pig and a young child (very odd). Pudding can be both savoury and sweet, just think of the blancmange as it was made in 1510 with chicken, salt, flour, egg yolks, saffron, pepper, nutmeg, cinnamon, ginger and mace.
Jellies
The moulds made us think of jelly pudding, something we haven’t eaten for many, many years. We noticed a book by Sam Bompas and Harry Par, called Jelly, obviously. The book includes recipes for Campari & Orange jelly, Cherry jelly, Lavender jelly, Sex on the Beach jelly and many more. It discusses the history of jellies and techniques such as marbling. The shapes are incredible, look at their Jelly Parlour! We bought the book and will write about it in a future post. But first we must buy a pudding mould…
Practical
The exhibition Grand Dessert runs until October 26th. Jelly by Bompas and Par seems to be out of print. We bought our copy for 7 euro.
Always a pleasure to serve a tartelette, with lemon, with blackberries, with raspberries or in this case with pear. The challenge is to capture the delicate flavour of the pears. Making the filling is simple and quick. Making the pastry requires much more time. Feel free to use ready-made pastry!
What You Need
Filling
Pears
Butter
Lemon Juice
Pâte Sucrée
50 grams of Unsalted Butter
40 grams of Caster Sugar
125 grams of All Purpose Flour
1 gram of Salt
1 organic egg
Water (optional)
What You Do (Filling)
Peel and core the pears
Chop coarsely
Melt the butter
Add some water
Slowly cook the pears until soft
Taste and perhaps add a drop of lemon juice
Pass gently through a sieve, without applying pressure. You want as much liquid as possible without damaging the texture of the pears
Set the pears aside and allow to cool.
Reduce the liquid until it becomes thick
What You Do (Pastry Case)
Combine sugar, flour and salt
Dice butter, add to the mixture and combine. Use a hand mixer with kneading hooks
Beat the egg and add
Use your hands to make the dough. It should not be sticky, so it must be easy to make a ball. If too dry, add just a bit of water. If too wet, add some flour
When done, remove from the bowl and wrap in kitchen foil. Store in the refrigerator for at least two hours. It can be stored for a few days.
Flour your work surface and roll out the pastry to a circle a larger than the top of the tartelette forms. The dough should be approximately 2 or 3 mm thick
Coat the forms with butter
Line the forms with the pastry. Press the pastry well into the sides and bottom. Use a knife to remove the excess dough
Cover and let rest for 30 minutes in the refrigerator
Preheat the oven to 190 °C or 375 °F
Use a fork to prick small holes in the pastry
Line the forms with greaseproof paper or aluminium foil, add baking beans and bake blind for 10 minutes
Remove the paper and the baking beans
Reduce the oven temperature to 160 °C or 320 °F
Transfer back to the oven for 5 minutes or until golden
Transfer to a wire rack and let cool
Assembling the Tartelette
When the pastry cases are completely cool, add the pears
Use a spoon to drizzle the pear-syrop on top of the pears
Earlier we wrote about Tarte au Citron, or Lemon Pie. This is a recipe for a Tartelette au Citron, a small but very different pie. The filling is lemon curd, which you add to the pastry case just before serving. You can easily make both components a day ahead. The crunchy, slightly sweet pastry case and the soft, rich, tart filling go together very well. You could decorate the tartelette with meringue or chocolate sprinkles, but we prefer them as they are. Great with a strong cup of coffee.
What You Need
Pâte Sucrée
50 grams of Unsalted Butter
40 grams of Caster Sugar
125 grams of All Purpose Flour
1 gram of Salt
1 Organic Egg
Water (optional)
Curd
65 ml of Lemon Juice
65 grams of Unsalted Butter
80 grams of Fine Sugar
One Organic Egg
What You Do (Curd)
Beat the egg
Melt the butter
Combine all ingredients.
Cook Au Bain Marie until you have the right consistency.
Or transfer to your microwave, put it on 50% or 70% power (depending on your microwave) and heat with intervals of 20-30 seconds. Mix between the intervals. This is a very precise way of heating the mixture and it gives you full control over the process. Towards the end of the process, you may want to reduce the power or shorten the intervals. The percentage and the duration of the intervals depend on your microwave and the bowl you use.
Set aside and allow to cool.
Transfer the curd to the refrigerator. It will keep for a few days.
What You Do (Pastry Case)
Combine sugar, flour and salt.
Dice butter, add to the mixture and combine. Use a hand mixer with kneading hooks.
Beat the egg and add.
Use your hands to make the dough. It should not be sticky, so it must be easy to make a ball. If too dry, add just a bit of water. If too wet, add some flour.
When done, remove from the bowl and wrap in kitchen foil. Store in the refrigerator for at least two hours. It can be stored for a few days.
Flour your work surface and roll out the pastry to a circle a larger than the top of the tartelette forms. We used 8 cm or 3 inch (quiche-) forms. The dough should be approximately 2 or 3 mm (0.1 inch) thick.
Coat the forms with butter.
Line the forms with the pastry. Press the pastry well into the sides and bottom. Use a knife to remove the excess dough.
Cover and let rest for 30 minutes in the refrigerator.
Preheat the oven to 190 °C or 375 °F.
Use a fork to prick small holes in the pastry.
Line the forms with greaseproof paper or aluminum foil, add baking beans and bake blind for 10 minutes.
Remove the paper and the baking beans.
Reduce the oven temperature to 160 °C or 320 °F.
Transfer back to the oven for 5 minutes or until golden
Transfer to a wire rack and let cool.
When the pastry cases are completely cool, add the curd and serve
Today April 26th, we celebrate the birthday of the King Willem-Alexander of the Netherlands. Well actually, his birthday is tomorrow, but you can’t have a party on a Sunday, can you? The Dutch royal family is also known as ‘de Oranjes’, which is reflected in the use of the colour orange when referring to Dutch royalty. There is no real link between the royal family and the colour. The ‘orange’ in their name refers to the French city of Orange, a Principality one of his ancestors inherited in 1544. Over the years we prepared Orange Sabayon, Queen’s Soup, Orange and Almond Cake, Bouchée à la Reine, Orange Flan, Canard à l’Orange and Baba au Mandarine Napoléon on this day.
Today we finally have nice weather in the Netherlands, so let’s prepare something very special: a parfait of orange. The recipe we followed was published by Jeroen Meus, a well-known Belgian chef. He was inspired by Bernard Pacaud, a French chef who owns restaurant l’Ambroisie in Paris, awarded with three Michelin Stars.
Perfect
A (French) parfait is an ice cream made without churning, so no need for an ice cream maker. In this case the mixture is poured into an empty orange and frozen. One of the components of a parfait is the combination of egg yolks and sugar, beaten until ruban. This means that the mixture has become pale yellow and soft. It should resemble Greek yoghurt. The beaten egg whites will add lightness, as they do in mousse au chocolate. Then it’s a matter of richness (cream), flavour (coffee, orange, mango, passion fruit et cetera) and sugar. Making a parfait requires a number of parallel actions, but with the right mise-en-place it’s not difficult (although, to be fair, our kitchen was a bit of a mess).
Orange Parfait
The orange parfait as prepared by Jeroen Meus is a combination of:
Whipped Cream
Cooked Cream flavoured with Orange Peel
Whipped Egg White
Orange Juice
Mandarine Napoléon
Egg yolks and Sugar (beaten until ruban)
Gelatine
A salad of Oranges and Blood Grapefruit
Details can be found on the website of Jeroen Meus, including a helpful video (in Dutch).
There is so much fun and creativity in baking! Just think about the aromas in your kitchen when you bake an apple pie, the positive vibes when you transfer it to a plate, the joy when sharing and eating it. Baking can also be challenging, just think about techniques as tempering chocolate, but this apple pie is really simple. No spectacular ingredients and no complex skills required. Serve it with a cup of tea or coffee or as a dessert, perhaps with vanilla ice cream.
What You Need
The quantities depend on the size of your baking tin.
(tart) Apples
Cinnamon
Butter
Sugar
Puff Pastry
What You Do
Place butter in a pan and melt
Peel, core and chop apples.
Add apples, cinnamon and sugar to the pan
Cook for 20 – 30 minutes, stirring from time to time
The compote should not be runny, perhaps you need to reduce
Allow for the compote to cool (room temperature is fine)
Preheat oven to 200 °C or 390 °F
Line a baking tin with puff pastry.
Use a fork to poke holes in the pastry
Peel, core and slice apples
Add compote to the baking tin, covering the bottom
Add the sliced apples
Bake until golden
PS
Best is to use apples such as gala, granny smith, jonagold or braeburn. It may take a bit longer to make a compote with these apples, but they remain nice and firm when baking the pie. Don’t use vanilla as ingredient of the compote. We feel it deteriorates the flavour of the apple. Cinnamon and sugar will be perfect. If buying readymade (frozen) puff pastry, make sure it’s made with flour, butter, water and salt only.
When you shop at an Asian supermarket, you will see many products with yuzu: ponzu, yuzu dressing, jelly with yuzu flavour, yuzu marmalade, yuzu soy sauce, yuzu tea and even yuzu skincare. Probably the shop will also sell fresh yuzu juice. And if you’re lucky, they will have the real thing: yuzu!
Yuzu (Citrus Junos) is a citrus fruit and it looks like a small lemon or clementine, with an uneven skin. It is of Chinese origin and it was introduced in Japan during the Nara period (710-794). It’s expensive (we saw them on the market for 5 euro a piece), they have lots of seeds and very little juice. The flavour is tart but gentle, very aromatic and will make you think of mandarin, only different. The peel is as delicious as the juice. The combination of flavors and fragrancy makes it a unique citrus. Not a fruit to eat on its own. Use it to add freshness and aroma to a dish or sauce.
Yuzu juice costs between 30 and 100 euro per liter (because of the small amount of juice per yuzu) and therefore products with yuzu tend to be expensive. If not, check the label and make sure it contains yuzu. Especially ponzu shoyu (made with mirin, rice vinegar, katsuobushi, kombu, yuzu and soy sauce) is often made with lemon.
We also noticed the term ‘yuzu style’ which is a clear indication no yuzu is used. We spotted a bottle of Yuzu Style Dressing. It contains mandarin, lemon, apple, vinegar and lots of other ingredients, but no yuzu.
We bought our yuzu at a farmers’ market and on our way back home we thought about things to make with it. Perhaps our own yuzu kosho (a paste made with chili, yuzu and salt)? Or combine it with miso and cod? Or yuzu syllabub (with cream and sugar)?
Why not panna cotta?
What You Need
500 ml Cream
30 ml Yuzu Juice
10 ml Lemon Juice
Yuzu Zest
25 grams of Sugar
3,5 leaves of Gelatine (5,25 grams)
What You Do (for 4)
Slowly bring the cream to the boil.
Keep close to boiling for 15 minutes. Stir when necessary.
Add the juice and some of the zest.
Remove from the heat and while stirring add sugar until totally dissolved.
Follow the instruction of the gelatine and add the leaves.
Stir well until homogeneous.
Cool the liquid somewhat before filling the forms. We used a silicone mold. Nice and easy! The only thing you need to do is to make the mold a bit moist with water.
Let the panna cotta cool and then store in the refrigerator until set.
Don’t forget to seal with cling foil, otherwise your panna cotta will absorb aromas from other food in the refrigerator.
Decorate with yuzu zest.
PS
If you can’t find yuzu or find them too expensive, then use 30 ml Lemon Juice and 10 ml Mandarin (or Clementine) Juice.
The amount of gelatine you need is a bit tricky. The acidity of the yuzu will thicken the cream and it will reduce the gelling effect of the gelatine. We decided to use the normal quantity.
Today, December 5th (actually December 6th), we celebrate the birthday (actually name day) of Sinterklaas or Sint Nicolas (270-343), patron saint of children (and Amsterdam), the Greek Bishop of Myra (now Demre), currently Turkey, but living in Madrid according to Dutch tradition and arriving end of November per steamboat. He rides a white horse over the rooftops at night and can be in different places at the same time. Very confusing but it makes perfect sense to children.
His assistants, (called Pieten), carry bags with sweets and presents. They used to be Zwarte Pieten (Black Pete) but thankfully that part of the tradition has now changed significantly making the Sinterklaas festivities more inclusive. Piet has become a Sooty Piet (they squeeze down and up sooty chimneys in order to deliver presents).
The celebration is not just about presents and sweets, it is about behaviour: Sinterklaas carries a big book with information about children: who has been good (sweets, presents) and who has been naughty (spanking with the birch rod that is used by Piet to sweep chimneys or being put in a now empty bag and taken back to Spain). Now you know why most Dutch and Belgian children become nervous and restless beginning of December!
Culinary
The culinary aspect of Sinterklaas is about sweets: chocolate letters (the first letter of your name), chocolate coins, marzipan figures, chocolate frogs (in a bathing suit, obviously) and mice (both stuffed with fondant), speculaas (spiced short crust), kruidnoten (as speculaas but slightly different) and pepernoten. Both kruidnoten en pepernoten were thrown through the room, for the children to look for. The smaller sweets were part of a ritual: in the evening you would put a shoe in front of the fireplace (or a similar apparatus, as long as it was connected to a chimney, things became challenging with the introduction of central heating) and you would sing a traditional Sinterklaas song. If possible you would put a carrot in your shoe for Sinterklaas’ horse. The next morning the sweets would be waiting for you in your shoe. Wonderful memories!
Pepernoten
If you shop these days in the Netherlands, you will see lots and lots of pepernoten. One Dutch company specialises in pepernoten and produces them in over 50 flavours. These pepernoten are actually kruidnoten. In 1593 Carolus Battusmentions Peper-coecxkens. The recipe for the original pepernoot goes back to 1756 when Gerrit van den Brenk writes a book called Volmaakte onderrigtinge, ten dienste der koekbakkers of hunne leerlingen (which translates into something like Perfect lessons for cookie bakers and their pupils). The ingredients are honey, white rye flour, potash and grinded anise seed. Dutch pâtissier Cees Holtkamp modernized the recipe, enabling us to recreate pepernoten.
What You Need
50 grams of Brown Caster Sugar
75 grams of Honey
150 grams of White Rye Flour
2 grams of Salt
20 grams of Water
5 grams of Baking Powder
6 grams of grinded Anise Seed
10 grams of Water
Neutral Oil
No Pepper (despite the name!)
What You Do
Best option is to watch Cees Holtkamp preparing pepernoten with support from his granddaughter Stella. The video comes with English subtitles. An even better idea is to buy his book Dutch Pastry. It’s available via the usual channels or order it at your local bookstore. Price is approximately 20 – 25 euro or US dollar. Combine sugar, honey and water in a pan. Heat the mixture without boiling. Remove from heat. Immediately add flour and salt. Use a kitchen aid with hooks to make the dough. It will be very sticky and odd. Allow to rest for a few hours. Add baking powder, anise seed and water. Kneed, cover with plastic foil and allow to rest until the next day. Preheat your oven to 180 °C or 355 °F traditional. Make small cubes and use your hands to turn these into balls. Generously coat a baking tin with oil. We used a spring baking tin, which is not what we should have done. It is better to use a seamless baking tin. Wet your hands with oil, coat every ball with oil and add to the tin. The tin must be completely filled, so the balls must touch each other. This way you get the typical rounded-cube-shape of pepernoten. If not, add some aluminium foil to the tin. Transfer to the oven and leave for 20 minutes. Detach the pepernoten as soon as possible.
PS
We could only find whole grain rye flour, which is not suitable for this recipe. Instead, we used all-purpose flour.
The cookbook review project hosted by Bernadette has come to an end, unfortunately! It was inspiring to read cookbooks from chefs that were new to us, like Patricia Wells and Nagi Maehahi. It was fun preparing dishes for our esteemed panel and sharing their views with you. Thank you so much Bernadette, for running the project!
Our suggestion to the cookbook review team was a book mentioned by Sheree: José Pizarro’s book Basque: Spanish Recipes from San Sebastián & Beyond, published in 2016. It’s a beautifully designed and edited book with a range of diverse dishes, for instance Veal Chops with Black-Eyed Peas, Pan Fried Cèpes with Egg Yolk and Cream Cheese Ice Cream with Blackcurrant and Camomile Syrup. The book is recommended by Claudia Roden (‘José Pizarro is an amazing cook who has brought us the best of Spanish food’) and Rick Stein (‘José’s recipes take us to the very heart of the best Spanish cooking’).
José Pizarro was born in the Extremadura region in Spain. Currently he owns seven restaurants in the UK and one in Abu Dhabi. He published six Spanish cookery books, received various awards and is often credited with making Spanish food popular in the UK.
We decided to make two dishes from the book, Grilled Octopus with Peppers and Aubergine and Roasted Lavender Peaches with Baked Custard. As a main dish we served Pork Belly with Sherry, Chickpeas and Chestnuts, following a recipe published in the Guardian. Our panellist Jan and Anton were happy to provide their feedback.
The starter: Anton mentioned the octopus was tasty, with the right texture and nicely grilled. Jan was also pleasantly surprised by the octopus and its flavours. We all felt the dish as a whole could do with a bit more flavour and some acidity. We also expected the parsley oil to bring the various components together, but that didn’t really happen.
We enjoyed our starter with a glass of Portuguese Vinho Verde, made by Cazas Novas. It comes with floral and fruity notes, has some acidity and a medium body with a good texture and a fresh aftertaste. In general, you’re looking for a wine with freshness, minerality and some acidity.
The dish with the pork belly strips was nice. Jan would have preferred the pork to be crispy. Perhaps prepare the stew and the pork separately? Anton enjoyed the chickpeas in the rich combination with sherry, onions, spinach and thyme. Surprisingly flavourful.
The recipe suggests leaving the pot in the oven for 30 to 40 minutes. The next day we decided leaving the leftovers in a warm oven for a few hours. The result was a very nicely integrated stew; a tribute to all ingredients. Next time we will prepare the vegetables a day ahead with some of the pork, perhaps allow for more time in the oven and serve with crispy fried pork. We enjoyed the dish with a glass of Portuguese red wine, produced by Vidigal. The wine is made with aragonez, castelão and cabernet grapes. The wine has a nice red colour and aromas of fruit and herbs. Its taste is light, with some tannins and a touch of oak. In general, you’re looking for a smooth, easy to drink red wine with character.
Time for dessert. Peaches with Lavender? Four peaches and a tablespoon of lavender? Served with custard? We were intrigued. We looked at the list of ingredients and noticed Patxaran, a sloe flavoured liqueur from the Basque country, normally served as a digestif. Even more intriguing.
The combination of peaches, lavender, patxaran and custard was a winner. One night we served it with vanilla ice cream, which was a nice and tasty combination. We served our panel the peaches with home-made custard, following the recipe of José Pizarro. It’s a delicious combination. Rich, smooth, silky custard with uplifting, sweet and aromatic peaches. The sauce is a mixture of honey, patxaran and peach juice. Like us you would probably expect the lavender to be over the top, but it worked brilliantly. A winner! Our panel was very pleased and enjoyed the combination. “Lovely custard, great way to prepare peaches, interesting how the lavender is supporting the fruit, present, never overwhelming, could I have another glass of patxaran?” Of course you can!
Bernadette final review-question was: should this book be on your shelf? Our answer would be yes, because of the inspirational recipes, the use of ingredients and the beautiful pictures of food and the Basque country.
Basque: Spanish Recipes from San Sebastián & Beyond is available via your local bookshop or the usual channels for 15 euro or 40 US dollar. You can also enjoy the recipes José Pizarro publishes on a monthly basis in the Guardian.