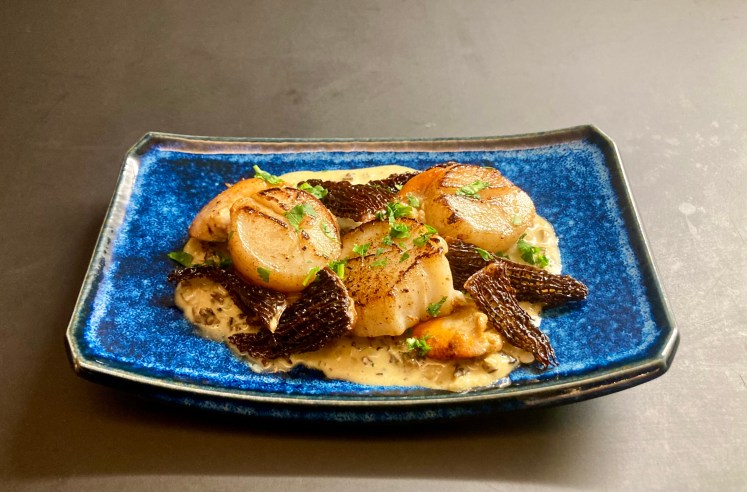
Fromage de Fribourg

When reading La Cuisine Niçoise d’Hélène Barale: Mes 106 recettes, we noticed that she uses only one kind of cheese in her recipes. Not Parmesan, not Pecorino, but Fromage de Fribourg. She adds it to her fish soup, to her ravioli, to her tourte de blette and to various other dishes. But what is Fromage de Fribourg?

It’s also known as Vacherin Fribourgeois and it originates from the region around the Swiss city Fribourg. It’s a semi-hard, creamy cheese made with raw cow milk. It matures for at least 6 weeks in a damp cellar. Its taste is aromatic, floral, full-bodied and lasting, with a touch of sweetness, bitterness and umami. It is used in a fondue called moitié-moitié (50% Gruyère and 50% Fribourg). It’s also possible to make a fondue with Fribourgeois only, using three ingredients: water, cheese and garlic.

Obviously we wanted to taste this cheese and we assumed that in the home town of Hélène Barale we would be able to buy it. We found a great cheese shop and bought a nice slice of this complex cheese. At home we decided to make an omelet with spinach, following a recipe from Hélène Barale for Omelette aux Blettes.

Omelet

For this omelet you need spinach, shallot, garlic, bay leaf, egg and freshly grated Vacherin Fribourgeois. No thyme, black pepper or salt. We were much surprised by the perfectly balanced flavours of spinach, cheese and eggs. Wonderful omelet.
You’ll find all the details you need in La cuisine niçoise d’Hélène Barale: Mes 106 recettes.

Wine Pairing

We enjoyed our omelet with a nice glass of Côtes de Provence Rosé. You could also enjoy it with an unoaked Chardonnay.
If you decide to eat the cheese as dessert, then we suggest a glass of full bodied red wine (Bordeaux, Côtes du Rhône etcetera).

PS

From a culinary point of view we think we understand why Madame Barale favored Fromage de Fribourg. If it’s her personal choice, something typical for the Niçoise cuisine, a culinary trend or perhaps because she was fond of Fribourg, that remains a mystery to us.

Green Gnocchi

We love eating Gnocchi, preferably as a starter with some olive oil and Parmesan cheese. Tasty and rich. Perhaps sometimes a bit too rich and too filling, especially the ones you can buy at your local shop or supermarket. Therefore it’s best is to make your own gnocchi, which is not too difficult, just time consuming.

We were pleasantly surprised when we found Green Gnocchi in Nice (France), made with Swiss Chard. The chopped leaves help improve the structure of the Gnocchi and add complexity and freshness to the dish. Yummy!

So all is good? Well, the name is a bit odd, to say the least. This Niçoise speciality is called Merda de Can, which translates into something from a dog – not very pleasant and certainly not something you want to eat. Very odd.

The name shouldn’t stop you from enjoying it. Merda de Can with Sage Butter is truly delicious.

Wine Pairing

We enjoyed our Merda de Can with a glass of Saint Roman Sable de Camargue Rosé. In general you’re looking for a well-balanced, fresh wine. Given the butter and sage sauce you could serve a Chardonnay or perhaps an Italian white wine such as Gavi di Gavi or Soave

What You Need for 8 starters

  • For the Merda de Can 
    • 600 Grams of Starchy Potatoes
    • 300 Grams of Swiss Chard, Spinach or Water Spinach (cleaned and ready to use)
    • Olive Oil
    • Nutmeg
    • 1 Egg
    • All Purpose Flour
  • For the Sauce
    • Butter
    • Sage
  • Parmesan Cheese or (preferred) Vacherin de Fribourgeois)

What You Do

Best is to follow the instructions by a Niçoise chef. 
Or prepare gnocchi as you would normally. Quickly fry the leaves in olive oil, remove from the pan, chop finely and drain. Add to the potato mixture, add the beaten egg, add freshly grated nutmeg and combine. Now start adding flour until you have the right consistency. You’re looking for a flexible, non-sticky dough. Flour your hands and start making short, small, thin, sausage like pasta. (Perhaps this is the moment to think about a small dog. Or perhaps not.) Don’t worry about the shape, it’s okay if they are not very similar. Devein the sage leaves. Warm butter in a pan and add the sage. In parallel heat a generous amount of water. Add the pasta to the boiling water and wait until the pasta surfaces. Remove from the water, add the pasta to the pan with sage butter, coat the pasta and freshly grated Parmesan cheese and serve.

PS

The Merda de Can we enjoyed was bought at a local Niçoise shop and had a more elegant shape.

Green Gnocchi (Merda de Can) ©cadwu

Quails and Snails in a Green Sauce

Many years ago we were looking for a place to eat in Fréjus. It was our last evening in France before returning home and obviously we were looking for something special, something typical Provençal. The area of our hotel wasn’t very promising, so we were ready to settle for pizza until we saw a small restaurant with a very interesting menu. It offered Tisane de RomarinCailles et Escargots and many other exciting dishes we unfortunately can’t remember. We entered the restaurant and had a perfect evening.

Combining quails and snails isn’t the most obvious idea, but rest assured, it works beautifully, also thanks to the very intriguing green sauce. It took us some time to make the sauce as it should be, but after a few attempts we think this is the right bridge between the quails and the snails.

Of course, we made a note of the name of the restaurant and of course, we lost it. A pity, although preparing this dish brings us back to a lovely evening in Fréjus.

Wine Pairing

Enjoy your Quails and Snails with a glass of Bourgogne: a chardonnay with a touch of oak. The wine must be dry, mineral and medium bodied. We enjoyed a glass of Bourgogne as produced by Louis Jadot. The wine partly matured in stainless steel tanks and partly in oak barrels. The result is a wine that has citrus and apple aromas in combination with oak and vanilla. Great with the freshness of the herbs and the richness of the sauce. It balances very well with both the quails and the snails. Two sides to everything in this dish!

What You Need

  • 2 Quails 
  • 6 Snails (click here when you want to know which snail to buy)
  • For the Sauce
    • 1 Bunch of Parsley
    • ½ Bunch of Tarragon
    • A few Leaves of Young Spinach
    • Cream
  • Vegetable Stock
  • Olive Oil
  • White Pepper

What You Do

Wash the snails with plenty of water. Set aside. Clean the quails. Best is to use the breasts only. (You could also serve the legs, provided you remove the main bone. It’s a bit of extra work, also for your guests.) Make sure you have a warm heavy iron skillet ready and a small pan with warm vegetable stock. Set your oven to 60 °C or 140 °F.

Blanch parsley, tarragon and spinach in boiling water and cool immediately in ice water. Blender parsley, tarragon and spinach with some ice water until you have a very smooth green liquid. Set your blender to turbo! Press using a sieve and store the green liquid. It will remain stable for at least an hour.

Fry the breasts quickly in olive oil. Warm the snails in the vegetable stock. Transfer the breasts to the warm oven. Clean the pan with kitchen paper, add cream and chicken stock. Let reduce for 5-10 minutes or until you’re happy with the consistency. Add liquid from the quails. Stir and taste. Perhaps some white pepper? Add green liquid until you have the right colour and taste. Be very careful, if you overheat the sauce it will lose its vibrant green colour. Serve the breasts and the snails in the sauce.

Quails and Snails in a Green Sauce ©cadwu

Escargots de Bourgogne

We noticed that more and more supermarkets and shops sell snails. Canned, frozen or with garlic butter ready to be cooked in the oven, all very tempting. Snails are high on protein, low on fat, high on minerals, low on calories. A glass of white wine and some crusted bread; what more do you need as a healthy starter?
But before buying snails it’s important to look at the label and find out what kind of snail you’re buying.

The snail used for the classic Escargots de Bourgogne is called Helix Pomatia. It’s protected in many countries. Farming of this snail is not profitable. Excellent taste, expensive and hard to find.
There are three alternatives: Helix Aspera (either the small one called Petit Gris or the large one called Gros Gris) and Helix Lucorum. The last one is considered to be less tasty than the other three, but when prepared well, it’s a very nice, affordable alternative. All three can be farmed.

It could also say Achatina on the label. This is a different kind of land snail, much larger than the first four. It’s taste and texture are okayish.

Sometimes it simply says ‘Escargots’ and ‘Gros’ on the tin. Sounds good, doesn’t it? Well, it may and it may not. Some companies cook larger (sea) snails, chop these, and sell the chunks as ‘Escargots’. The term ‘Gros’ is supposed to make you think of the Gros Gris. Don’t be fooled: they are rubbery, tasteless and a waste of money.

The classic Escargots de Bourgogne are prepared with butter, garlic and parsley. We like to add a bit of tarragon and a pinch of salt. Traditionally they are served in the shell and you need a tong and a special fork to eat them. The ones we use are from a can, so no special equipment required. 

Wine Pairing

The obvious choice is a glass of Bourgogne: a chardonnay with a touch of oak. The wine must be dry, mineral and medium bodied.

What You Need

  • 12 snails
  • Butter
  • Parsley
  • Garlic
  • Tarragon
  • Salt
  • 2 Snail Plates

What You Do

You could of course buy fresh snails (which makes us think of the amazing market in Valencia! So much choice, such excellent quality. Also various kinds of snails, fresh and alive, obviously, also the Caragolus, the snail that is required when you prepare a traditional Paella Valenciana) but otherwise buy them canned. Remove them from the can, wash carefully with lots of water and set aside.

Chop parsley, tarragon and garlic very fine. Using a fork, combine butter, herbs, garlic and a pinch of salt. Transfer six snails to a snail plate, add a chunk of butter to every snail, transfer the snail plate to an oven at 160 °C or 320 °F for 10 minutes or until boiling hot. Serve the snail plate on a cool plain white plate.

Escargots de Bourgogne ©cadwu

Mushroom Soup with Pancetta and Thyme

This morning when we looked outside, we saw a grey, foggy city. Knowing it would take hours for the fog to clear, we started thinking about something warm for lunch. Perhaps some soup with crusty bread? We opened our refrigerator. Various mushrooms, thyme, rosemary, cream, a carrot, some left over stock. Yes! We knew what we wanted to cook for lunch: Mushroom Soup with Pancetta. A hearty, rich soup, ideal for a cold, grey day. The combination of mushrooms, pancetta and cream works very well; the celery and leek add complexity and the thyme brings character.

Wine Pairing

It was much later that afternoon before the fog left the city, but since we also had some left over Chardonnay in the fridge, which we enjoyed with our soup, we didn’t mind that much.

What You Need

  • Pancetta
  • Shallot
  • Mushrooms (Best is a Mix of Champignons, Shiitake etcetera)
  • Celery
  • Leek
  • Carrot
  • Garlic
  • Stock (Chicken or Vegetable)
  • Bouquet Garni (Thyme, Rosemary and Bay Leaf)
  • Black pepper
  • Cream
  • Fresh Thyme
  • Olive Oil

What You Do

Keep two strips of pancetta apart (to be grilled just before serving). You probably need 4-6 strips in total. Slice the remaining pancetta and fry in olive oil on medium heat. Remove the pancetta from the pan, chop the shallot and glaze it in the fat and perhaps some extra olive oil. Clean and slice the mushrooms, slice half a stalk of celery, half a leek, a small carrot, chop two gloves of garlic and add this to the shallot. Gently fry for a few minutes. Add the pancetta, the stock and the bouquet garni. Allow to simmer for 30 minutes. Remove the bouquet garni. Blender the soup, pass through a sieve and leave on low heat for 10 minutes. The mushrooms will emulgate the soup, so no need to add a roux. Now it’s time to taste the soup and perhaps add some black pepper. Add cream and fresh thyme and leave for another 5-10 minutes. In the meantime grill the two strips of pancetta until brown and crispy. Cut the stripes in five pieces depending on the size. Serve the soup in a warm bowl with the pancetta on top of it.

Monkfish with Tomato Olive Sauce

Not the kind of fish you want to meet when swimming in the sea, but definitely one you want to meet when shopping at the fishmonger. Make sure you bring some money because monkfish tends to be expensive. Great meat, delicate yet distinctive taste and not difficult to prepare as long as you’re not in a hurry.
The sauce has to be made a day in advance. It needs time to cook and time to integrate.
You will need to remove the skin of the monkfish. There seem to be several layers of skin and one is (when cooked) really rubbery and inedible. So take you knife, start at the tail end and move forwards, thus removing the membrane. You will find useful videos on the Internet. Unfortunately these videos suggest removing the main bone of the fish, which is a mistake for three reasons. You lose taste and meat plus you lose a natural indicator of the cuisson of the fish.
Pitted black olives. Sounds simple but isn’t simple at all. Buy quality, for instance Niçoise or Kalamate and stay away from cheap and canned. Dry-cured black olives (the wrinkly ones like Nyon) can be overpowering.
Monkfish is an essential ingredient of Zarzuela because of its texture and taste. In this recipe we combine the obvious: monkfish and tomato. We add a bouquet garni consisting of rosemary, thyme and bay leaf. The black olives give the required twist to the sauce and the dish as a whole.

We suggest a glass of Chardonnay to accompany the monkfish, provided the wine is not too woody; a light touch of oak will be best. Soave could also be a good combination.

Here is what you need

  • one Shallot
  • one Garlic Glove
  • Olive Oil
  • two Tomatoes
  • Pitted Black Olives
  • Bay Leaf
  • Thyme
  • Rosemary
  • Monkfish (200 gram per person, bone included)
  • Black Pepper

Start by making the sauce. Gently fry the chopped shallot in a splash of olive oil. After a few minutes add the chopped garlic. Now add the chopped tomatoes and the pitted black olives (depending on their taste we suggest between 10 and 15). Add the bouquet garni and allow to cook on low heat for a number of hours. Make sure to check on a regular basis. When ready, remove the bouquet garni and transfer to a blender. Pass the mixture through a sieve. The sauce should be as smooth as possible. Transfer to the refrigerator and use the next day.
Use a heavy iron skillet to fry the monkfish in olive oil. When nicely coloured, reduce the heat and start adding the sauce. Since the sauce is cold, you need to do it spoon by spoon. Coat the fish with warm sauce, again, and again. Use your knife to try separating the meat from the bone. When this is possible without applying too much pressure, the fish is nearly perfect. Remove the bone, turn the fish on the side that was connected to the bone and cook for one or two minutes. Taste the sauce; maybe you want to add some fresh black pepper.
Serve on a warm plate with some crusted bread.

Caesar’s Mushrooms with Udon

Caesar’s mushroom (or Amanita Caesarea) is a true delicacy, especially when eaten very young. And raw. Since the young ones have the shape of an egg, they are called ovoli in Italian. It is not recommended to pick these young ones yourself, unless you’re an expert. The young Caesar’s mushroom looks very similar to young Fly Agaric, Death Cap or Destroying Angels. Ones we would not like to see on (y)our plate. The mature Caesar’s mushroom looks very distinct from these very dangerous mushrooms, so fewer risks involved.
When you’re in North America, you will probably be able to buy Amanita Jacksonii or Amanita Arkansana, which seem to be very similar, but not completely. As far as we know eating cooked Amanita Caesarea and Arkansana is not a problem; eating them raw could be.

The classic recipe for ovoli is to include them in a salad, with shaved white truffle, parsley, olive oil and parmesan cheese. Another option is to add them to your risotto.

In this recipe we combine the delicate flavour of the Caesar’s mushroom with lots of thyme, rosemary, bay leaf, a touch of garlic, Parmesan cheese and olive oil. Best would be to use Calamintha Nepeta, but using thyme will also do the trick. A garlic glove must be added because the garlic will turn black if your mushrooms are poisonous (not a story to rely on).

Ideally served with Japanese udon because the noodles will be nicely coated with the cooking juices, but feel free to use good pasta as an alternative. One of the benefits of udon is that it is really white, allowing for the yellow of the mushroom to be more present.

We enjoyed our Caesar’s mushrooms with a glass of traditional Burgundy wine from France (100% pinot noir). The wine should have delicate fruit aromas (black cherries, plum) and some earthiness. The wine should be medium bodied and have a crisp acidity. Not too much oak, because oak will overpower the mushrooms. The pinot noir should also be relatively light, allowing for herbal and floral tones.
Pinot Noir wines from the new world are in general rounder and higher in alcohol, making these wines more like Syrah or Malbec. We don’t recommend these wines, however tasty, in combination with the dish.
A glass of Chardonnay is also an option provided it’s fresh with just a touch of oak and butter.

Here is what you need

  • 200 grams of Caesar’s mushrooms
  • Olive Oil
  • Thyme
  • Rosemary
  • Bay Leaf
  • Garlic glove
  • Parmesan cheese
  • Japanese Udon (for instance from Hakubaku)

Clean the Caesar’s mushrooms and remove the white veil (or volva). Make a bouquet garni with lots of thyme, rosemary and a bay leaf. Start by making flavoured olive oil by warming the olive oil in a large skillet and adding the herbs and the garlic glove. Not too hot, you only want the flavours and essential oils to be added to the olive oil. After 15 minutes or so remove the garlic and the bouquet. Now add the sliced Ceasar’s mushrooms and very gently fry them. Just cooked is perfect. In parallel cook the udon. When ready (12 minutes in our case, you don’t want the udon to be al dente), drain the udon but keep some of the cooking liquid. If there is too much starch on the pasta, then think Japan and wash your pasta with cold water. This will remove the starch and allow for a better result. Remove the Caesar’s mushrooms from the pan and keep warm. Add the pasta to the pan, stir and make sure the pasta is fully coated. Add a spoonful or two of the cooking liquid to the pan. Add some grated Parmesan cheese and black pepper. Transfer the Caesar’s mushroom back to the pan and stir very gently, making it into one yellow, tasty mixture. Just before serving sprinkle with extra Parmesan cheese.

Grilled Swordfish with a Spicy Tomato Sauce

Red List

Before we start cooking, be aware that Swordfish is on the Greenpeace red list, so try to find the origin of your swordfish. Having done that assess the quality of the swordfish. No doubt it was frozen, so an extra reason to look carefully and smell. As always: if fish smells like fish, then don’t buy it.
If swordfish looks it has been pre-prepared (sometimes salt or smoke are used) or the flesh is not transparent: don’t buy it. For some reason you need to be extra critical when buying swordfish. But once you’ve found good, fresh swordfish, you have found yourself a great starter.
Also note that swordfish is a predator. Some organisations mention the risk of mercury when eating swordfish, so don’t eat it too often we would say.

If you scan the various recipes for swordfish, you will notice the massive use of marinades. We would not suggest using a marinade when preparing swordfish. The fish has a delicate, slightly sweet taste, which begs for a clever combination, not for a taste bomb like a marinade.
Often the fish is brushed with a mixture of oil and lemon. Sorry, wrong idea. Lemon is probably used to hide a fishy taste (in which case you shouldn’t have bought the fish). The lemon juice will burn when grilling because of the sugar in the juice, so your grilled stake will not just be grilled, it will also show traces of burned sugar. Not tasty, not healthy, not pleasant.
There are only three things you need to do pre grilling swordfish: prepare your tomato sauce, transfer the steak 30 minutes prior to grilling from the fridge to a plate and brush generously with a decent olive oil.

Wine Pairing

We enjoyed our grilled swordfish with a glass of Radacini from the Codru region in Moldova. The wine is made from chardonnay grapes and comes with a beautiful yellow colour. It made us think of apricots and maybe a touch of vanilla. It is not oaked, which is an exception for chardonnay. A wine with a round, velvety taste, but also fresh and fruity. The mouth feel is coating. The velvety aspect goes really well with the fish and the fruitiness is a great combination with the sweetness of the sauce. As an alternative go for an un-oaked, fruit-forward chardonnay.

What You Need

  • Steak of Swordfish
  • Olive Oil
  • Shallot
  • Chilli
  • Red Bell Pepper
  • 2 Garlic gloves
  • 2 Anchovies fillets
  • 2 Tomatoes
  • Bouquet Garni (Sage, Thyme, Rosemary, Parsley)
  • Capers (in brine)

What You Do

Start by slicing the shallot and glaze it gently in olive oil. Cut half of the bell pepper and the chilli in smaller chunks and add to the pan. Stir and then add the garlic. Cut the tomatoes in quarters, add the tomato meat to the sauce and press the remainder through a sieve, making sure you get all the lovely juices. Add the juice to the sauce. Add the bouquet garni and the anchovies. Leave on small heat for two hours.
Remove the bouquet garni, blender the sauce very well and make sure it is a spicy combination of tomatoes and a touch of bell pepper.
Brush the steak generously with olive oil, heat your grill (we use a Le Creuset pan, see picture) and grill for maybe 8 minutes. The meat of swordfish is firm and needs longer than you would expect when grilling fish.
Serve the fish on a hot plate with the tomato sauce. The capers are crucial; they add a bit of acidity, which works really well with the spiciness of the sauce and the gentle sweetness of both the fish and the tomatoes.

PS In case your swordfish looks great but is from the wrong region according to Greenpeace, simply buy the fish, enjoy eating it and donate some money to Greenpeace.


Omelet with Oyster Mushrooms and Nasturtium

Try This at Home

Oyster mushrooms were among the first mushrooms to be cultivated. They grow very well on straw so great to grow at home. See pictures!
The vast majority of oyster mushrooms are grey, but we have seen and tasted the yellow and sensational pink oyster mushroom. Since you can eat oyster mushrooms raw, the pink and yellow variety is great in a salad. Oyster mushrooms can be a bit watery, which impacts the taste. A pity because the taste is delicate and soft anyway. Not a mushroom to combine with more powerful mushrooms like shiitake. Oyster mushrooms cook quickly, so great to use in a stir-fry or a soup. You can try using them in a stew, but make sure your chunks are not too small.

Wine pairing

A crisp, floral white wine goes very well with this omelet. Best would be a Pinot Grigio or a combination of Chardonnay and Viognier.

What You Need

  • 250 grams Oyster mushroom
  • 3 Eggs
  • 1 Spring Onion
  • Butter
  • Olive Oil
  • Black Pepper
  • Chives
  • Nasturtium

What You Do

Harvest your oyster mushrooms or buy really fresh and tasty ones. Tear the mushroom into smaller but not too small chunks. Slice the spring onion in small rings. Fry the oyster mushrooms in olive oil and butter for 3 minutes or so until slightly cooked. Add the white of the spring onion. Perhaps you want to add some butter to the pan. Now make sure the pan is nice and hot. Whisk the eggs well, add the green of the spring onion and add to the pan. After a few seconds reduce the heat to very low and wait 5 to 10 minutes until the egg is nearly set. Take your time but keep an eye on the surface and the consistency. Check with your fingers if the omelet is beginning to set. A good omelet must be baveuse so Timing is All. There is no alternative to baveuse!
Serve the omelet on warm dishes with black pepper, chives and nasturtium (not just for fun, also for the peppery taste of the nasturtium leaves).