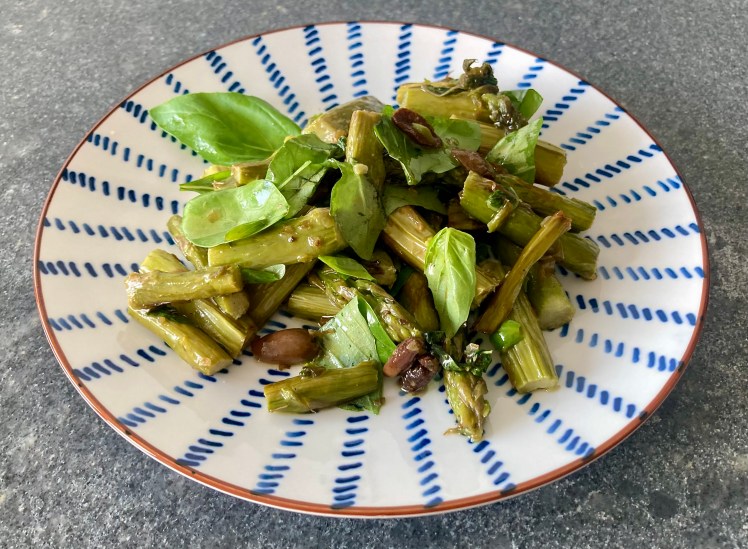
Clafoutis

Cherries, cherries, cherries! We love their rich, sweet taste, the touch of tartness and their firm, succulent texture! They just want to be eaten, one after the other. So what better summer dessert than Clafoutis?

Should you use whole cherries or pitted ones? Not removing the pits is less work for you (obviously) and it reduces the risk of a soggy Clafoutis. Unpitted cherries will give a subtle almond flavour to the clafoutis. On the other hand, you don’t want to bite into a pit while enjoying your dessert. Also important: the pits contain amygdalin, a toxic compound that can also be found in almonds, apple seeds and apricot stones.
We decided to pit the cherries and compensate for the lack of almond taste by adding some almond flour to the batter.
If you decide to remove the pits, make sure you remove all of them!

Finally, yes, you can replace the cherries with fresh apricots, berries, peaches or prunes. The result is called a Flaugnarde. But nothing as tasty as Clafoutis made with fresh cherries!

What You Need
  • 2,5 dl of regular Milk
  • 2 Eggs
  • 30 grams of plain Flour
  • 10 grams of Almond Flour
  • 20 grams of Sugar
  • 500 grams of Cherries, pitted
  • 10 grams of Butter
What You Do
  1. Pre heat the oven to 180° Celsius or 350° Fahrenheit
  2. Whisk together the eggs, plain flour, almond flour and sugar
  3. Bring the milk almost to a boil
  4. Stir the milk into the mixture
  5. Butter a large, shallow baking dish, add cherries to the dish
  6. Make sure the bottom is nicely covered with cherries; no need to have two layers of cherries
  7. Pour the mixture over the cherries
  8. Bake (lower third of the oven) for 20 minutes
  9. Add a few dots of butter
  10. Continue baking for another 20 minutes or until the Clafoutis is golden
  11. Leave to cool for 60 minutes or so, this will enhance the taste
  12. Clafoutis should be served luke-warm
  13. You could decorate the clafoutis with icing sugar
Clafoutis ©cadwu made with fresh cherries, milk, sugar, all purpose flour, butter and almond flour
Clafoutis ©cadwu

Garlic Soup

A few weeks ago John Rieber wrote about the miracle of garlic. He also explains the 10-minute rule and the way it creates additional benefits when using garlic. His post includes a recipe for a garlicky soup, a variation of Avgolemono.

The post made us think of ‘knofsoep’ (in English it would be ‘garsoup’) as described by author, poet and performer Johnny Van Doorn in 1988. He was known for his ecstatic performances, enabled by the use of various substances. His knofsoep, based on a recipe from Roman times, helped him through the day. The soup is uplifting, supports overall health and more specifically the liver. It is to be served with crusted bread and a glass of wine.
We adjusted the recipe slightly by using vegetable stock and adding some chives. The soup has a very mild, sweet garlic flavour (thanks to not roasting or frying the garlic) and complexity thanks to the herbs and the clove.

The original recipe (in Dutch) is available in his diary Door de Weken Heen, available for 5 euros, second hand only.

What You Need
  • 500 ml Vegetable Stock
  • 8 cloves of Garlic
  • 1 starchy Potato
  • Olive Oil
  • Bouquet Garni (Thyme, Sage, Rosemary, Parsley, Bay Leaf)
  • 1 Clove
  • 2 crushed Black Peppers
  • Parmesan Cheese
  • Chives
  • (optional) Black Pepper
  • (optional) Salt
What You Do
  1. Bring the stock to a boil
  2. Add garlic and potato
  3. Reduce the heat
  4. Add a small tablespoon of olive oil
  5. Add bouquet garni, clove and crushed black peppers
  6. After 40 minutes pass the soup through a sieve
  7. Use a spoon to capture all the flavours of the ingredients
  8. Reheat the soup
  9. Taste and adjust (salt, pepper)
  10. Garnish with Parmesan cheese and chives
Garlic Soup ©cadwu made with garlic, potatoes, clove, bouquet garni, vegetable stock and decorated with parmesan cheese and chives
Garlic Soup ©cadwu

Mapo Tofu with Mushrooms

The aromas and flavours of Mapo Tofu are powerful, also thanks to the use of Sichuan pepper. It gives the dish a floral, citrusy touch. The combination of silky, soft tofu with ground pork, Chili Bean sauce and scallions is very rich. It’s a delicious, heart-warming dish.
In this version we replace the meat with mushrooms (Wood Ear turned out to be the best choice, but Shiitake will also be fine). We think it’s a lighter, equally tasty but different, version of Mapo Tofu.

Sichuan pepper is not related to black pepper or chili. It’s actually not spicy. It causes a pleasant numbing sensation on your tongue and lips, for a few minutes only, which is surprisingly nice when eating spicy food. We recommend lightly toasting the peppers before grinding or crushing them.

Serving Mapo Tofu with rice is a great idea. Or enjoy it with some Bok Choy (Pak Choi) simmered in a combination of oyster and soy sauce.

Drink Pairing

Jasmine tea is an obvious choice. It has a nice aroma and floral taste. The combination with the spices and the Sichuan pepper works really well.

What You Need
  • 100 grams of fresh Wood Ear (or 25 grams dried Wood Ear)
  • 300 grams of Silken Tofu
  • 100 ml Vegetarian Stock
  • 2 tablespoons light Soy Sauce
  • 1 tablespoon Mirin
  • 3 teaspoons Sesame Oil
  • 2 Garlic Cloves
  • 1 small Onion
  • 1 Scallions
  • 3 teaspoons of chopped Fresh Ginger
  • ½ -1 tablespoon Chili Bean Sauce (Douban, Toban-Djan)
  • 1-2 teaspoons Black Bean Sauce (Douchi)
  • 1 teaspoon of Red Sichuan Pepper
  • Oil
  • Cornstarch
  • Rice
  • Pickled Spicy Cucumber
What You Do
  1. Toast the Sichuan peppers lightly in a non-stick pan
  2. Remove the peppers from the pan and let cool
  3. Pre-heat your oven to 65 °C or 150 °F
  4. Cook the rice according to the instruction on the package
  5. Chop the onion, the garlic and the fresh ginger
  6. Slice the scallions and separate the white from the green
  7. Clean and slice the mushrooms
  8. Slice the tofu and make cubes (2 cm, 1 inch)
  9. Warm the stock
  10. Add oil to the pan and fry the mushrooms
  11. After a few minutes, add soy sauce, mirin and sesame oil
  12. Combine and leave to simmer for a few minutes
  13. Remove from the pan and keep warm in the oven
  14. Grind the Sichuan peppers coarsely
  15. Add oil to the pan
  16. Fry the white part of the scallions, the onion, the garlic and the ginger
  17. Add the chili bean sauce and fry. Enjoy the aromas!
  18. Add half of the grounded Sichuan pepper
  19. Add the stock, the tofu, the mushrooms and the black bean sauce
  20. Use a spatula to mix
  21. Allow to simmer for 15 minutes or so until the sauce is nicely reduced and the flavours mixed
  22. In the meantime, finely crush the remaining Sichuan pepper
  23. Use cornstarch to create the right consistency
  24. Just before serving sprinkle with Sichuan pepper and the green of the scallions.
  25. Add spicy pickled cucumber to the rice
  26. Assemble and serve
Mapo Tofu with Mushrooms ©cadwu made with wood ear and Sichuan pepper
Mapo Tofu with Mushrooms ©cadwu

Rhubarb and Strawberry Crumble

The combination of rhubarb and strawberry is delicious. It’s sweet, sour, tangy and tart with a touch of bitterness. The seasons of rhubarb and strawberries overlap for only a few weeks (late spring, early summer) so don’t wait too long if you want to make jam or this dessert.
The crumble brings warmth and depth to the dessert, thanks to the use of allspice, cinnamon and nutmeg. Filling and crumble are complementary with regard to texture, flavour and aroma.

What You Need
  • Filling
    • 4 stalks of Rhubarb
    • 400 grams of Strawberries
    • 1 tablespoon of Lemon Juice
    • 2 teaspoons of White Sugar
  • Crumble
    • 40 grams of Unsalted Butter
    • 40 grams of Light Brown Sugar
    • 30 grams of All Purpose Flour
    • 70 grams of Almond Flour
    • 1/2 teaspoon of Cinnamon
    • dash of Nutmeg
    • 3 finely ground Allspice berries
What You Do
  1. Pre-heat your oven to 180 °C or 355 °F (traditional)
  2. Wash and dry the rhubarb and the strawberries
  3. Slice the rhubarb in 1 cm (0,4 in) slices
  4. Slice smaller strawberries lengthwise in 4, bigger ones in 6
  5. Combine sugar, flour, almond flour, cinnamon, nutmeg and allspice
  6. Cut the butter in small cubes
  7. Use your hands to combine butter and the mixture until you have a crumbly dough
  8. Combine rhubarb, strawberries, lemon juice and sugar
  9. Add the fruit mixture to a ceramic oval oven dish
  10. Top with the crumble
  11. Transfer to the oven for 25 minutes
  12. The crumble is ready when the colour is golden brown and the fruit is bubbly around the edges
  13. If the fruit needs more time, reduce the heat to 150 °C or 300 °F
  14. Serve at room temperature with a scoop of vanilla ice cream
PS

As many other we thought allspice should be spelled ‘all spice’ and that it is a mixture of various spices. It isn’t. Allspice is the lightly fermented and dried unripe berry of a tree called Pimenta Dioica. Best to buy berries and ground these in a mortar.
A few days later we added ground allspice to a beetroot salad. A winner!

Rhubarb and Strawberry Crumble ©cadwu with allspice, nutmeg and cinnamon
Rhubarb and Strawberry Crumble ©cadwu

Royal Carrot Cake

Today, April 27th, we celebrate the birthday ol King Willem-Alexander of the Netherlands. Hip hip hurray!
The Dutch royal family is also known as ‘de Oranjes’, which is reflected in the use of the colour orange when referring to Dutch royalty. There is no link between the royal family and the colour. The ‘orange’ in their name refers to the French city of Orange, a Principality one of his ancestors inherited in 1544.
Over the years we prepared Orange SabayonQueen’s SoupOrange and Almond CakeBouchée à la Reine, Orange FlanCanard à l’OrangeBaba au Mandarine Napoléon and Orange Parfait on this day.

This year we prepare a Carrot Cake. Given its English origin we thought it would be best to use an English recipe as a starting point. What better cookbook to use than Harrods Book of Traditional English Cookery by Hilaire Walden! It includes recipes for dishes such Jugged Kippers, Rabbit in the Dairy and Dorset Apple Cake. Buy this wonderful book via the usual channels for a few euros or dollars.

Bake the cake 2 days before serving. Add the topping, transfer to the refrigerator and serve cold.

The recipe is for a 19 cm (7,5 inch) baking tin and the cake will serve 8 people.

What You Need
  • Cake
    • 125 grams of Butter
    • 150 grams of light Brown Sugar
    • 3 Organic Eggs
    • 3 teaspoons of Orange Rind
    • 15 ml of Lemon Juice
    • 175 grams of Flour
    • 8 grams of Baking Powder
    • 35 grams of ground White Almonds
    • 75 grams of chopped Walnuts
    • 50 grams of White Raisins
    • 250 grams of grated Carrot
  • Topping
    • 200 grams of Soft Cheese
    • 1 teaspoon of Honey
    • 1 tablespoon of Lemon Juice
    • 25 grams of chopped Walnuts
    • 45 grams of white Marzipan for the carrots
    • 10 grams of white Marzipan for the green part
    • Food colouring: Red, Yellow and Green
What You Do (Cake)
  1. Preheat your oven to 180 °C or 350 °F, traditional
  2. Coat a round cake tin with butter
  3. Coarsely grind the almonds
  4. Coarsely grind the walnuts
  5. Sift flour and baking powder and combine
  6. Soak the raisins for 10 minutes; discard the water
  7. Grate the carrot
  8. Grate the orange rind
  9. Melt the butter until soft 
  10. Combine butter and sugar until relatively fluffy
  11. Combine flour, baking powder, chopped walnuts and almonds
  12. Separate the eggs
  13. Whisk the egg whites until stiff
  14. Add the egg yolks to the butter and sugar mixture, combine
  15. Add orange rind, raisins and lemon juice to the mixture, combine using a spoon
  16. Add the combination of flour, baking powder and nuts to the mixture
  17. Add carrots to the mixture and combine
  18. Fold in the egg white
  19. Transfer to the oven for 50 minutes
  20. Leave to cool on a wire rack
  21. Keeps well on room temperature for at least 2 days
What You Do (Topping)
  1. Make 3 small orange balls
  2. Press these into the shape of a carrot
  3. Use a knife to make a few superficial slices
  4. Roll out the green marzipan, cut out 3 circles and create the green part
  5. Beat cheese, honey and lemon juice
  6. Taste and adjust; we added extra lemon juice
  7. Spread evenly over the cake
  8. Sprinkle with walnuts
  9. Decorate with three carrots
  10. Once you’ve added the topping, store in the refrigerator

Easy Mushroom Pie

Thyme, oregano, nutty mushrooms and Parmesan cheese: a delicious combination at the heart of this easy mushroom pie. We used ready-made puff pastry, so making the filling is all you need to do.

Oregano (Origanum Vulgare) is typical for the Mediterranean cuisine. The leaves have an intense, earthy, slightly bitter taste. Use it when making tomato sauce, grilled vegetables or a lamb stew. Dried oregano is nearly as tasty as fresh oregano. When buying fresh oregano, make sure you’re not buying marjoram (Origanum Majorana) because its flavour is less intense and a bit sweet. To add to the confusion: oregano is also called wild marjoram whereas marjoram is called sweet marjoram.

Wine Pairing

We enjoyed our easy mushroom pie with a glass of Bardolino, made by Monte del Frà from Italy. The grapes used are Corvina, Rondinella and Molinara. It is a well-balanced, vibrant ruby red wine with lots of fruit and a hint of spices. Medium acidity. In general, you’re looking for a refreshing red wine with lots of fruit that should be served slightly chilled.

What You Need
  • 200 grams of firm Mushrooms, we used small Eryngii
  • 50 grams of Pancetta
  • 3 Eggs
  • 50 grams of Crème Fraîche
  • Parmesan Cheese
  • Thyme
  • Oregano
  • Shallot
  • 2 cloves of Garlic
  • Puff Pastry
  • Olive Oil
What You Do
  1. Warm a skillet
  2. Chop the shallot, the garlic and the oregano
  3. Clean the mushrooms and slice in two if so required
  4. Add some olive oil to the pan
  5. Add slices of pancetta
  6. Fry until crispy
  7. Transfer to a plate with kitchen paper
  8. Add the shallot to the pan and fry on low heat
  9. After a few minutes add the mushrooms and fry over medium heat
  10. After a few minutes add the garlic
  11. Reduce heat
  12. When all nicely done, add the thyme and the chopped oregano
  13. Set aside and let cool
  14. Preheat your oven to 180 °C or 355 °F
  15. Whisk the three eggs
  16. Add crème fraiche
  17. Add freshly grated Parmesan cheese and black pepper
  18. Cut or crumble the pancetta and add to the mushroom mixture
  19. Add the mushroom mixture to the egg mixture, combine
  20. Coat a 19 cm or 7.5-inch round baking tin with thin puff pastry
  21. Add the mixture and distribute evenly
  22. Transfer to the oven for 20-25 minutes or until nice and golden
  23. Allow to cool on a wire rack for a few minutes
  24. Remove from the tin as soon as possible
  25. If the bottom is not done, then transfer back to the oven (without the tin) for 10 minutes and set your oven to 160 °C or 320 °F, lower heat only
  26. Let cool and enjoy at 65 °C or 150 °F
PS

Skip the pancetta for a vegetarian version of this easy mushroom pie. Add extra thyme, oregano and Parmesan cheese.

Easy Mushroom Pie ©cadwu with thyme, oregano, nutty mushrooms and Parmesan cheese. The vegetarian version is as tasty as this one.
Easy Mushroom Pie ©cadwu

Tortang Talong

Perhaps you wonder what kind of fish we prepared for this post. Well, actually, it’s Tortang Talong, a Philippine dish made with charred eggplant. Earlier this year we made banana ketchup and the idea was to serve it with Tortang Talong, but we couldn’t find the right eggplants. For Tortang Talong you need long, purple, slender eggplants, known as Chinese or Japanse eggplants. They not only look different from the oblong eggplant, their taste is slightly sweeter and softer. The shape is key to a moist and homogenous result.

Thanks Monch Weller for introducing us to the delectable sauce and the very tasty Tortang Talong!

Food Pairing

Serve Tortang Talong with banana ketchup as a starter. We could also imagine it as a side dish with fried vegetables, rice and perhaps chicken.

What You Need
  • 2 Chinese or Japanese Eggplants
  • 1 Egg
  • Black Pepper
  • (optional) Salt
  • Oil
What You Do
  1. Grill the eggplants for 5-10 minutes using the wire rack, following the instructions of your oven
  2. Flip and grill for another 5-10 minutes or until charred
  3. Let cool
  4. Peel of the skin
  5. Use a fork to flatten the eggplants
  6. Combine egg, salt (if using) and pepper
  7. Beat the mixture well
  8. Heat a heavy iron skillet
  9. Add oil to the skillet
  10. Dip the eggplant in the mixture
  11. Fry the eggplant
  12. Flip and use a brush to coat the top with the egg mixture
  13. Repeat step 12, two or three times

Three Winter Soups

A few weeks ago, we enjoyed a delicious vegan dinner at Lokaal, a small restaurant in the centre of Gent, Belgium. Friendly service, relaxed atmosphere and nice music. One of the specialties of Lokaal is fermentation, for instance homemade Tempeh from Bulgur. Lots of umami and length. We loved it!
Our dinner at Lokaal started with a nice winter soup made with kale and kohlrabi. We’re not the biggest fans of kale, but in this case it worked very well. The kohlrabi gave a nice, uplifting touch to the soup.

It made us think of other winter soups, like parsnip and Jerusalem artichoke soup, and parsley root soup. Ah, those forgotten vegetables! They bring us new flavours and combinations.

We used vegetable stock for all three soups. It is made with Carrot, Onion, Leek, Celery and Black Pepper (and optional a bouquet garni). Easy to make and lots of flavour. It freezes well, which makes it an even more important asset.

What You Need (Kale and Kohlrabi soup)
  • 500 ml Vegetable Stock
  • 200 grams of Kohlrabi
  • 50 grams of Kale
  • French Mustard
What You Do
  1. Clean the vegetables
  2. Devein the kale
  3. Peel the kohlrabi
  4. Coarsely chop the vegetables
  5. Warm the stock
  6. Add the kohlrabi
  7. Leave to simmer for 10 minutes
  8. Add the kale
  9. Leave to simmer for 10 minutes
  10. Use a blender to make a relatively smooth soup
  11. Add mustard to taste
  12. Serve
  13. PS The soup doesn’t keep well, so not one for the refrigerator
What You Need (Parsnip and Jerusalem Artichoke soup)
  • 500 ml Vegetable Stock
  • 200 grams Parsnip
  • 200 grams Jerusalem Artichokes
  • White Pepper (optional)
What You Do
  1. Clean, peel and coarsely chop the vegetables
  2. Warm the stock
  3. Add the vegetables
  4. Leave to simmer for 15 minutes or until the vegetables are done
  5. Use a blender to make a smooth and creamy soup
  6. Depending on the Jerusalem Artichokes the soup can become fairly thick. Add some stock if so required
  7. Taste (optional: add some white pepper)
  8. Serve
  9. PS You can also enjoy the soup the next day, it keeps well in the refrigerator
What You Need (Parsley Root soup)
  • 500 ml of Vegetable Stock
  • 200 grams Parsley Root
  • 1 small Shallot
  • ½ Leek (white only)
  • 1 small clove Garlic
  • Butter
  • Parsley
What You Do
  1. Warm butter in a pan
  2. Peel and coarsely chop parsley root
  3. Coarsely chop leek and onion
  4. Glaze onion and leek in butter
  5. Add parsley root
  6. Add garlic
  7. Leave on low heat for 5 minutes
  8. Add stock
  9. Simmer for 20-30 minutes or until the parsley root is soft
  10. Blender
  11. Pass through a sieve
  12. Simmer for 10 minutes
  13. Cool
  14. Serve the next day
  15. Decorate with chopped parsley leaves
Kale and Kohlrabi Soup made with vegetable stock. An intriguing combination. The kohlrabi gives this winter soup an uplifting flavour. ©cadwu
Kale and Kohlrabi Soup ©cadwu

Artichoke Pie

A few weeks ago, we were shopping at the Albert Cuyp market in Amsterdam. We saw excellent, very large artichokes. We simply had to buy them. They were far too big to be served as a starter. What to do? Let’s make an artichoke pie! Other ingredients? Egg? Crème Fraîche? Parmesan Cheese? Pancetta? Herbs, of course, parsley, thyme or perhaps fresh oregano?

Wine Pairing

It’s not straightforward to pair artichokes with wine, due to cynarin, a chemical especially found in the leaves of the artichoke. When the wine and the cynarin meet in your mouth, the natural sweetness of the wine is enhanced, making it taste too sweet. Pair freshly cooked or steamed artichokes with a bone-dry, crisp, unoaked white wine with clear, present acidity. For instance Sauvignon Blanc, Grüner Veltliner or Albariño. 
Cynarin and wine are not a match made in heaven but the good news is that cynarin seems to protect your liver and even helps it regenerate.
We enjoyed a glass of white Rioja made by Vivanco. This is a bright, intense white wine with aromas of citrus fruit and green apples. Fresh, tasty and a great match with the Artichoke Pie.

What You Need
  • For the Dough
    • 100 grams of Flour
    • 50 grams of Water
    • 10 grams of Olive Oil
    • 1 gram of Salt
  • For the Filling
    • 2 large Artichokes
    • 1 shallot
    • Olive Oil
    • 1 Egg
    • Crème Fraîche
    • Fresh Thyme
    • Freshly Grated Parmesan Cheese
    • Black Pepper
What You Do
  1. Combine flour, salt, water and olive oil
  2. Make the dough, kneed for a minute or so and store in the refrigerator for at least 30 minutes
  3. Clean the artichokes
  4. Steam the artichokes for 45+ minutes depending on the size and let cool
  5. Chop the shallot
  6. Warm a heavy skillet, add olive oil and gently fry the shallot
  7. Transfer to a plate and let cool
  8. Use a spoon remove the ‘meat’ from the leaves (bracts) of the artichokes
  9. Remove the centre choke (the hairs)
  10. Chop the hearts
  11. Strip a generous amount of thyme
  12. Whisk the egg and combine with the artichoke, the shallot, the crème fraîche, the thyme and some freshly grated Parmesan cheese
  13. Add black pepper
  14. Taste and adjust
  15. Coat a 15 cm or 6 inch round baking form with oil (or use a sheet of baking paper)
  16. Roll out the dough with a rolling pin on a lightly floured surface
  17. Place the dough in the baking form and add the filling
  18. Transfer to the oven for 40 minutes on 180˚ – 200˚ Celsius or 355˚ – 390˚ Fahrenheit
  19. Remove the pie from the oven
  20. Brush the outside with olive oil. This will intensify the colour of the pastry
  21. Let cool and enjoy luke warm
A delicious vegetarian Artichoke Pie ©cadwu with lots and lots of steamed artichoke, egg, creme fraiche and thyme.
Artichoke Pie ©cadwu

Risotto with Porcini

Risotto is amongst our favourite dishes, especially risotto with mushrooms. Preparing risotto is not difficult, as long as you pay attention to the cooking process and use the right ingredients.
It’s nearly the end of the porcini-season. We enjoyed them several times this year, but not yet in a risotto. Time to start cooking!

Wine Pairing

We enjoyed a nicely oaked, buttery South African chardonnay with our risotto with porcini. A full-bodied white wine with aromas of tropical fruit and toast. A wine that paired very well with the earthiness of the risotto and its rich flavours.

What You Need
  • 90 grams of Carnaroli or Arborio rice
  • 1 Shallot
  • Olive Oil
  • 150 grams of fresh Porcini
  • Chicken or Vegetable Stock
  • Parmesan Cheese
  • Butter
  • Black Pepper
What You Do
  1. Peel and chop the shallot
  2. Clean the porcini
  3. Slice the porcini; cube smaller parts
  4. Warm the stock
  5. Add olive oil to a pan and glaze the shallot
  6. Add the smaller parts of the porcini
  7. Add the rice to the pan and coat for 2 minutes
  8. Keep the pan on medium heat; be patient
  9. Start adding stock, spoon by spoon and stir frequently
  10. Heat a heavy iron skillet and fry the sliced porcini in butter and oil
  11. In total it may take 15 – 18 minutes before the rice is al dente
  12. 5 Minutes before the risotto is al dente, coarsely cut some of the fried porcini, making sure you have a few nice slices for decoration
  13. Add the coarsely cut and fried porcini to the risotto
  14. When the risotto is ready, transfer the pan to the kitchen countertop and leave to rest for 2 minutes.
  15. Add grated Parmesan cheese and combine
  16. Add butter and combine
  17. Add some black pepper, taste, add more Parmesan cheese and/or butter if so required.
  18. Decorate with slices of porcini
  19. Serve immediately.
PS

We have four other risotto recipes, with squid, with beetroot, with mushrooms and with peas.

Risotto with Porcini is a delicious combination of creamy, rich rice and nutty, umami flavours. Risotto is not difficult to make if you use the right ingredienst and follow the instruction.
Risotto with Porcini ©cadwu