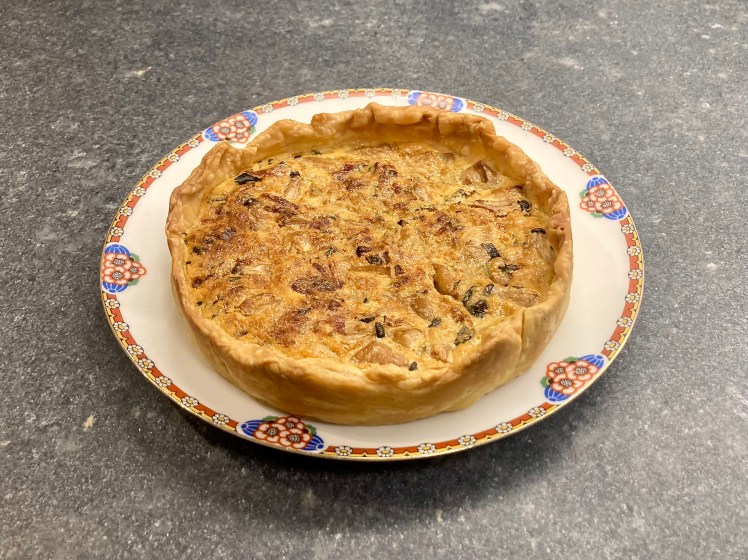
Easy Mushroom Pie

Thyme, oregano, nutty mushrooms and Parmesan cheese: a delicious combination at the heart of this easy mushroom pie. We used ready-made puff pastry, so making the filling is all you need to do.

Oregano (Origanum Vulgare) is typical for the Mediterranean cuisine. The leaves have an intense, earthy, slightly bitter taste. Use it when making tomato sauce, grilled vegetables or a lamb stew. Dried oregano is nearly as tasty as fresh oregano. When buying fresh oregano, make sure you’re not buying marjoram (Origanum Majorana) because its flavour is less intense and a bit sweet. To add to the confusion: oregano is also called wild marjoram whereas marjoram is called sweet marjoram.

Wine Pairing

We enjoyed our easy mushroom pie with a glass of Bardolino, made by Monte del Frà from Italy. The grapes used are Corvina, Rondinella and Molinara. It is a well-balanced, vibrant ruby red wine with lots of fruit and a hint of spices. Medium acidity. In general, you’re looking for a refreshing red wine with lots of fruit that should be served slightly chilled.

What You Need
  • 200 grams of firm Mushrooms, we used small Eryngii
  • 50 grams of Pancetta
  • 3 Eggs
  • 50 grams of Crème Fraîche
  • Parmesan Cheese
  • Thyme
  • Oregano
  • Shallot
  • 2 cloves of Garlic
  • Puff Pastry
  • Olive Oil
What You Do
  1. Warm a skillet
  2. Chop the shallot, the garlic and the oregano
  3. Clean the mushrooms and slice in two if so required
  4. Add some olive oil to the pan
  5. Add slices of pancetta
  6. Fry until crispy
  7. Transfer to a plate with kitchen paper
  8. Add the shallot to the pan and fry on low heat
  9. After a few minutes add the mushrooms and fry over medium heat
  10. After a few minutes add the garlic
  11. Reduce heat
  12. When all nicely done, add the thyme and the chopped oregano
  13. Set aside and let cool
  14. Preheat your oven to 180 °C or 355 °F
  15. Whisk the three eggs
  16. Add crème fraiche
  17. Add freshly grated Parmesan cheese and black pepper
  18. Cut or crumble the pancetta and add to the mushroom mixture
  19. Add the mushroom mixture to the egg mixture, combine
  20. Coat a 19 cm or 7.5-inch round baking tin with thin puff pastry
  21. Add the mixture and distribute evenly
  22. Transfer to the oven for 20-25 minutes or until nice and golden
  23. Allow to cool on a wire rack for a few minutes
  24. Remove from the tin as soon as possible
  25. If the bottom is not done, then transfer back to the oven (without the tin) for 10 minutes and set your oven to 160 °C or 320 °F, lower heat only
  26. Let cool and enjoy at 65 °C or 150 °F
PS

Skip the pancetta for a vegetarian version of this easy mushroom pie. Add extra thyme, oregano and Parmesan cheese.

Easy Mushroom Pie ©cadwu with thyme, oregano, nutty mushrooms and Parmesan cheese. The vegetarian version is as tasty as this one.
Easy Mushroom Pie ©cadwu

Tortang Talong

Perhaps you wonder what kind of fish we prepared for this post. Well, actually, it’s Tortang Talong, a Philippine dish made with charred eggplant. Earlier this year we made banana ketchup and the idea was to serve it with Tortang Talong, but we couldn’t find the right eggplants. For Tortang Talong you need long, purple, slender eggplants, known as Chinese or Japanse eggplants. They not only look different from the oblong eggplant, their taste is slightly sweeter and softer. The shape is key to a moist and homogenous result.

Thanks Monch Weller for introducing us to the delectable sauce and the very tasty Tortang Talong!

Food Pairing

Serve Tortang Talong with banana ketchup as a starter. We could also imagine it as a side dish with fried vegetables, rice and perhaps chicken.

What You Need
  • 2 Chinese or Japanese Eggplants
  • 1 Egg
  • Black Pepper
  • (optional) Salt
  • Oil
What You Do
  1. Grill the eggplants for 5-10 minutes using the wire rack, following the instructions of your oven
  2. Flip and grill for another 5-10 minutes or until charred
  3. Let cool
  4. Peel of the skin
  5. Use a fork to flatten the eggplants
  6. Combine egg, salt (if using) and pepper
  7. Beat the mixture well
  8. Heat a heavy iron skillet
  9. Add oil to the skillet
  10. Dip the eggplant in the mixture
  11. Fry the eggplant
  12. Flip and use a brush to coat the top with the egg mixture
  13. Repeat step 12, two or three times

Three Winter Soups

A few weeks ago, we enjoyed a delicious vegan dinner at Lokaal, a small restaurant in the centre of Gent, Belgium. Friendly service, relaxed atmosphere and nice music. One of the specialties of Lokaal is fermentation, for instance homemade Tempeh from Bulgur. Lots of umami and length. We loved it!
Our dinner at Lokaal started with a nice winter soup made with kale and kohlrabi. We’re not the biggest fans of kale, but in this case it worked very well. The kohlrabi gave a nice, uplifting touch to the soup.

It made us think of other winter soups, like parsnip and Jerusalem artichoke soup, and parsley root soup. Ah, those forgotten vegetables! They bring us new flavours and combinations.

We used vegetable stock for all three soups. It is made with Carrot, Onion, Leek, Celery and Black Pepper (and optional a bouquet garni). Easy to make and lots of flavour. It freezes well, which makes it an even more important asset.

What You Need (Kale and Kohlrabi soup)
  • 500 ml Vegetable Stock
  • 200 grams of Kohlrabi
  • 50 grams of Kale
  • French Mustard
What You Do
  1. Clean the vegetables
  2. Devein the kale
  3. Peel the kohlrabi
  4. Coarsely chop the vegetables
  5. Warm the stock
  6. Add the kohlrabi
  7. Leave to simmer for 10 minutes
  8. Add the kale
  9. Leave to simmer for 10 minutes
  10. Use a blender to make a relatively smooth soup
  11. Add mustard to taste
  12. Serve
  13. PS The soup doesn’t keep well, so not one for the refrigerator
What You Need (Parsnip and Jerusalem Artichoke soup)
  • 500 ml Vegetable Stock
  • 200 grams Parsnip
  • 200 grams Jerusalem Artichokes
  • White Pepper (optional)
What You Do
  1. Clean, peel and coarsely chop the vegetables
  2. Warm the stock
  3. Add the vegetables
  4. Leave to simmer for 15 minutes or until the vegetables are done
  5. Use a blender to make a smooth and creamy soup
  6. Depending on the Jerusalem Artichokes the soup can become fairly thick. Add some stock if so required
  7. Taste (optional: add some white pepper)
  8. Serve
  9. PS You can also enjoy the soup the next day, it keeps well in the refrigerator
What You Need (Parsley Root soup)
  • 500 ml of Vegetable Stock
  • 200 grams Parsley Root
  • 1 small Shallot
  • ½ Leek (white only)
  • 1 small clove Garlic
  • Butter
  • Parsley
What You Do
  1. Warm butter in a pan
  2. Peel and coarsely chop parsley root
  3. Coarsely chop leek and onion
  4. Glaze onion and leek in butter
  5. Add parsley root
  6. Add garlic
  7. Leave on low heat for 5 minutes
  8. Add stock
  9. Simmer for 20-30 minutes or until the parsley root is soft
  10. Blender
  11. Pass through a sieve
  12. Simmer for 10 minutes
  13. Cool
  14. Serve the next day
  15. Decorate with chopped parsley leaves
Kale and Kohlrabi Soup made with vegetable stock. An intriguing combination. The kohlrabi gives this winter soup an uplifting flavour. ©cadwu
Kale and Kohlrabi Soup ©cadwu

Artichoke Pie

A few weeks ago, we were shopping at the Albert Cuyp market in Amsterdam. We saw excellent, very large artichokes. We simply had to buy them. They were far too big to be served as a starter. What to do? Let’s make an artichoke pie! Other ingredients? Egg? Crème Fraîche? Parmesan Cheese? Pancetta? Herbs, of course, parsley, thyme or perhaps fresh oregano?

Wine Pairing

It’s not straightforward to pair artichokes with wine, due to cynarin, a chemical especially found in the leaves of the artichoke. When the wine and the cynarin meet in your mouth, the natural sweetness of the wine is enhanced, making it taste too sweet. Pair freshly cooked or steamed artichokes with a bone-dry, crisp, unoaked white wine with clear, present acidity. For instance Sauvignon Blanc, Grüner Veltliner or Albariño. 
Cynarin and wine are not a match made in heaven but the good news is that cynarin seems to protect your liver and even helps it regenerate.
We enjoyed a glass of white Rioja made by Vivanco. This is a bright, intense white wine with aromas of citrus fruit and green apples. Fresh, tasty and a great match with the Artichoke Pie.

What You Need
  • For the Dough
    • 100 grams of Flour
    • 50 grams of Water
    • 10 grams of Olive Oil
    • 1 gram of Salt
  • For the Filling
    • 2 large Artichokes
    • 1 shallot
    • Olive Oil
    • 1 Egg
    • Crème Fraîche
    • Fresh Thyme
    • Freshly Grated Parmesan Cheese
    • Black Pepper
What You Do
  1. Combine flour, salt, water and olive oil
  2. Make the dough, kneed for a minute or so and store in the refrigerator for at least 30 minutes
  3. Clean the artichokes
  4. Steam the artichokes for 45+ minutes depending on the size and let cool
  5. Chop the shallot
  6. Warm a heavy skillet, add olive oil and gently fry the shallot
  7. Transfer to a plate and let cool
  8. Use a spoon remove the ‘meat’ from the leaves (bracts) of the artichokes
  9. Remove the centre choke (the hairs)
  10. Chop the hearts
  11. Strip a generous amount of thyme
  12. Whisk the egg and combine with the artichoke, the shallot, the crème fraîche, the thyme and some freshly grated Parmesan cheese
  13. Add black pepper
  14. Taste and adjust
  15. Coat a 15 cm or 6 inch round baking form with oil (or use a sheet of baking paper)
  16. Roll out the dough with a rolling pin on a lightly floured surface
  17. Place the dough in the baking form and add the filling
  18. Transfer to the oven for 40 minutes on 180˚ – 200˚ Celsius or 355˚ – 390˚ Fahrenheit
  19. Remove the pie from the oven
  20. Brush the outside with olive oil. This will intensify the colour of the pastry
  21. Let cool and enjoy luke warm
A delicious vegetarian Artichoke Pie ©cadwu with lots and lots of steamed artichoke, egg, creme fraiche and thyme.
Artichoke Pie ©cadwu

Risotto with Porcini

Risotto is amongst our favourite dishes, especially risotto with mushrooms. Preparing risotto is not difficult, as long as you pay attention to the cooking process and use the right ingredients.
It’s nearly the end of the porcini-season. We enjoyed them several times this year, but not yet in a risotto. Time to start cooking!

Wine Pairing

We enjoyed a nicely oaked, buttery South African chardonnay with our risotto with porcini. A full-bodied white wine with aromas of tropical fruit and toast. A wine that paired very well with the earthiness of the risotto and its rich flavours.

What You Need
  • 90 grams of Carnaroli or Arborio rice
  • 1 Shallot
  • Olive Oil
  • 150 grams of fresh Porcini
  • Chicken or Vegetable Stock
  • Parmesan Cheese
  • Butter
  • Black Pepper
What You Do
  1. Peel and chop the shallot
  2. Clean the porcini
  3. Slice the porcini; cube smaller parts
  4. Warm the stock
  5. Add olive oil to a pan and glaze the shallot
  6. Add the smaller parts of the porcini
  7. Add the rice to the pan and coat for 2 minutes
  8. Keep the pan on medium heat; be patient
  9. Start adding stock, spoon by spoon and stir frequently
  10. Heat a heavy iron skillet and fry the sliced porcini in butter and oil
  11. In total it may take 15 – 18 minutes before the rice is al dente
  12. 5 Minutes before the risotto is al dente, coarsely cut some of the fried porcini, making sure you have a few nice slices for decoration
  13. Add the coarsely cut and fried porcini to the risotto
  14. When the risotto is ready, transfer the pan to the kitchen countertop and leave to rest for 2 minutes.
  15. Add grated Parmesan cheese and combine
  16. Add butter and combine
  17. Add some black pepper, taste, add more Parmesan cheese and/or butter if so required.
  18. Decorate with slices of porcini
  19. Serve immediately.
PS

We have four other risotto recipes, with squid, with beetroot, with mushrooms and with peas.

Risotto with Porcini is a delicious combination of creamy, rich rice and nutty, umami flavours. Risotto is not difficult to make if you use the right ingredienst and follow the instruction.
Risotto with Porcini ©cadwu

Beetroot Pie

Let’s enjoy the last fresh beetroots of this season by making a pie with lots of beetroot, cheese and thyme. The pie combines sweetness with savoury and slightly tangy flavours. Best to prepare a day in advance, allowing for the flavours to integrate. We top the pie with Chioggia beetroot because of their beautiful colour and pattern.

Wine Pairing

Caruso e Minini Terre Siciliane Bibbo Zibibbo, doesn’t that sound like a wonderful wine? The wine is produced by the Sicilian company Caruso e Minini, which explains the first part of the name. How about Bibbo Zibibbo? The grape used to make this wine is the Muscat of Alexandria, known as Zibibbo in Sicily. The wine is aromatic with fruity notes (think apricot, hints of almond and orange blossom). You will taste a gentle, dry wine with flavours of dried fruit. The wine has a long and present finish.
In general, we suggest a light, dry white wine with floral and fruity notes. It must have some sweetness to balance the taste of the beetroots.

What You Need
  • For the Dough
    • 100 grams of All Purpose Flour
    • 50 grams of Water
    • 10 grams of Olive Oil
    • 1 gram of Salt
  • For the Filling
    • One Red Beetroot
    • One Chioggia Beetroot
    • Firm Goat Cheese
    • One Red Onion
    • Thyme
    • Black Pepper
What You Do
  1. Clean the beetroots and wrap seperatly in aluminium foil
  2. Transfer to the oven at 180 ˚C or 355 ˚F and cook for 45-60 minutes, depending on the size
  3. Let cool
  4. Combine flour, salt, water and olive oil and make the dough
  5. Kneed for a minute or so and store in the refrigerator for at least 30 minutes
  6. Slice and quarter the onion
  7. Fry the onion on low heat in olive oil until soft
  8. Peel and slice the beetroots
  9. Roll out the dough using a rolling pin on a lightly floured surface. Coat a 15 cm or 6 inch round baking form with oil
  10. Cover the form with the dough
  11. Build the pie, first a layer of red beetroot, followed by grated cheese, onion, lots of thyme and black pepper
  12. Repeat
  13. Top with gioggia beetroot
  14. Brush the top with olive oil
  15. Transfer to the oven for 40-50 minutes on 180-200 ˚C or 355-390 ˚F
  16. Immediately after having removed the pie from the oven, brush the top with olive oil. This will intensify the colour of the crust
  17. Let cool and enjoy the next day; warm is best (preferably 65 ˚C or 150 ˚F)
PS

We didn’t explain Bibbo as part of name Caruso e Minini Terre Siciliane Bibbo Zibibbo . We believe it’s the pet name of Zibibbo.

Beetroot Pie ©cadwu made with fresh beetroots, goat cheese and lots of thyme
Beetroot Pie ©cadwu

Mushroom Ketchup or Catsup

Recently we made Banana Ketchup, a popular condiment in the Philippines. Very tasty by the way! Sheryl (who runs a great blog with recipes and food-related information from a hundred years ago) commented that banana ketchup was new to her. She mentioned recipes for cucumber ketchup and mushroom ketchup in Lowney’s Cookbook, published in 1921.
It seems that mushroom ketchup originated in the UK and that it could be considered the original ketchup. It was used to flavour soups, marinades and meat dishes. The first reference we could find is from 1818 in a book called Apicius redivivus, the Cook’s Oracle by William Kitchiner (pages 475-477). The catsup is made by fermenting mushrooms with salt. Black pepper, allspice and brandy are the other ingredients.

Modern Version

One of the intriguing aspects of mushrooms is that you can use them to thicken a sauce. We used to do this when preparing Daube Provençale. Blender some of the cooked mushrooms until very smooth and transfer the paste back to the pan. The sauce will get a better consitency without becoming velvety or buttery, although the downside is that the mushroom paste reduces the flavour of the dish as a whole.
The recipe for modern mushroom ketchup is about cooking mushrooms and shallot with various spices (mace, clove, nutmeg) and herbs. After an hour sugar and vinegar are added. Blender the mixture until very smooth. The consistency of the ketchup is rather jelly (like wallpaper paste) and its flavour bland. We had to add more spices to make it tastier. Adding a teaspoon of mustard improved the ketchup, somewhat. We combined it with red meat, chicken and potatoes. We were not impressed.

Classic Version

This version focuses on the liquid and that turned out to be a good idea. The result is a tasty condiment, with lots of umami, but not specifically mushroom. It will strengthen the taste of a sauce or a stir fry with various vegetables. We made a beef burger patty with thinly sliced scallion, two teaspoons of mushroom catsup and black pepper. Delicious! We also used the catsup to season meatballs. The catsup emphasized the flavour of the meat and added complexity and length.
You need quite a lot of mushrooms to make it, meaning it’s both intense and expensive! If you’re in the UK, you can buy a bottle of Mushroom Ketchup produced by Geo Watkins.

Etymology

The term ketchup (also spelled catsup) is interesting. It could be related to a sauce with fruits and spices called catchup, or a fish sauce called kichap. It made us think of ketjap, or kecap in Malaysia and Indonesia. This term is related to a Chinese sauce called kê chiap, meaning fermented fish sauce!

Love-Apples

Perhaps you now wonder what the origin is of today’s Tomato Ketchup. The first known recipe for Tomatoe, or Love-Apple Catsup was published in 1812 by James Mease (1771-1846). The love-apples (tomatoes) are thinly sliced. Layers are added to a tin or pot and over every layer a little salt is sprinkled. Leave for 24 hours. Beat the love-apples well, simmer for 30 minutes with mace and allspice. When cold, add chopped raw shallot and brandy. The brandy supports the preservation.

What You Need (classic version)
  • 300 grams of Mushrooms (200 Button Mushrooms, 50 Shiitake, 50 Oyster Mushrooms or another combination of juicy mushrooms)
  • teaspoon of Mace
  • 2 teaspoons of Salt
  • 1/8 cup Rice Vinegar
  • 1/8 cup Water
  • Nutmeg
  • Clove
  • Black Pepper
What You Do
  1. Clean and slice the mushrooms
  2. Add mushrooms and salt to a skillet
  3. Mix very well
  4. Cover and leave on very low heat for 60 minutes
  5. Perhaps add some water to speed up the process
  6. After 15 minutes add mace
  7. After 60 minutes, transfer to a pan
  8. Add vinegar and water
  9. Mix
  10. Leave on medium heat for 20 minutes
  11. Add black pepper, nutmeg and grated clove to taste
  12. Leave on low heat for 5 minutes
  13. Taste and adjust
  14. Pass gently through a sieve
  15. Use cheesecloth to capture all the juices from the mushrooms
  16. Reduce if necessary
  17. Let cool and transfer to the refrigerator

Eggplant Omelette

Having made Banana Ketchup, we were keen to explore what kind of food would combine well with it. Monch Weller wrote us: It’s often paired with fried food here in the Philippines – spring rolls (both meat and vegetable versions), fried chicken, and eggplant omelette.
The ketchup paired nicely with vegetarian rolls, but not as well as hot sweet and sour sauce.
We decided to make an eggplant omelette, known as Tortang Talong in the Philippines. The eggplant is grilled, peeled, flattened, dipped in an egg mixture and fried in oil. The outside crispy and brown, the inside soft and moist. Best to use the long and slender purple variety, for instance Chinese or Japanese eggplant.
Our eggplant was a standard eggplant, large and oblong. Very different in size and shape compared to the one used in the Philippines. We were not sure how we could turn our eggplant into Tortang Talong. Slice it? Fan it? Or mash it and add the eggplant to the egg mixture?

What You Need
  • 1 regular or Italian Eggplant
  • 2 Eggs
  • Small Garlic Clove
  • Black Pepper
  • (optional) Salt
  • Oil
What You Do
  1. Heat your oven to 230°C or 450°F
  2. Poke the eggplant with a fork. This allows for steam to escape
  3. Place the eggplant on lightly oiled aluminium foil
  4. Roast the eggplant for 30-40 minutes, depending on the size
  5. Let cool
  6. Peel of the skin
  7. Mash the eggplant, but not too much
  8. Combine eggs, salt (if using) and pepper
  9. Beat the mixture well
  10. Add the mashed eggplant. We used 2/3 of our eggplant. Combine
  11. Add grated garlic and mix again
  12. Add oil to a small skillet, set to medium heat
  13. Add the mixture and fry until brown
  14. Flip the omelette and fry the other side until brown
  15. Slice the omelette and serve immediately
  16. Serve with banana ketchup
PS

When we can buy a long slender eggplant, we will prepare the original Tortang Talong. To be continued!

Banana Ketchup

A few weeks ago we were reading Monch Wellers food and lifestyle blog. He writes about Via Mare, a Filipino restaurant that opened its doors 50 years ago. In his blog Monch writes about the food Via Mare offers, for instance Spanish Hot Chocolate, Bibingka (rice cake), Crab Omelette with Banana Ketchup, Lumpiang Ubod (spring rolls made with heart of palm) and Puto Bumbong, a glutinous rice dyed violet and steamed in bamboo tubes. We learn so much about the Filipino food culture thanks to Monchs excellent blog!

Why Bananas?

Maria Orosa (1893–1945) was born in the Philippian province of Batangas, some 100 kilometres south of Manilla. She studied food chemistry and pharmacology in the US. She returned to the Philippines in 1922. She was a food chemist, innovator and war hero. She saw the potential of many local products, for instance bananas and soy, and used these to empower the Philippines. She invented Soyalac (a protein-rich powdered soybean product), Darák (bran rice powder rich in vitamins) and Tiki-Tiki cookies. The powders and cookies saved many lives during wartime food shortages in the Philippines.
One of her more frivolous inventions is Banana Ketchup. Why rely on imported tomatoes when it’s possible to make an equally tasty condiment using local bananas?

We loved the philosophy behind the ketchup and began searching for recipes. We noticed that tomato paste is often added, to give the ketchup a more familiar and appetizing colour. We didn’t do this. Afterall, the idea was not to use tomatoes. Plus: what’s wrong with the colour?

Food Pairing

The Banana Ketchup is smooth, its taste long, tangy, spicy and uplifting. The bananas give the ketchup natural sweetness and depth. They also support the spices. A condiment to love.
We asked Monch for his favourite combination. He wrote us: It’s often paired with fried food here in the Philippines – spring rolls (both meat and vegetable versions), fried chicken, and eggplant omelette (which was No. 2 in TasteAtlas’ 50 Best Egg Dishes). We tried it with eggplant omelette and vegetable spring rolls. The ketchup paired perfectly with the moist and more delicate flavours of the omelette.
Thanks Monch for introducing us to this unknown, delectable sauce!

What You Need
  • 2 small ripe Bananas
  • ½ Shallot
  • 2 cloves of Garlic
  • 20 grams fresh Ginger
  • ½ Kashimiri Pepper
  • 1/8 cup Brown Sugar
  • ¼ cup Rice Vinegar
  • ¼ cup Water
  • ¼ teaspoon Turmeric
  • Dash of Cinnamon and Nutmeg plus 1 Clove (replacing dash of All Spice)
  • Oil
What You Do
  1. Chop onion, garlic and ginger
  2. Mash the bananas
  3. Heat oil in a heavy iron skillet
  4. Add chopped onion and glaze, about 5 minutes
  5. Add garlic and ginger
  6. Leave on medium heat, stirring constantly
  7. Add bananas and combine
  8. After a few minutes add vinegar, water, sugar, spices and Kashmiri pepper
  9. When the mixture begins to simmer, reduce heat to low
  10. Leave for 15-20 minutes, stir regularly
  11. Remove from heat and let cool for 10 minutes
  12. Transfer to a food processor and blend until smooth. This may take one or two minutes
  13. Pass through a sieve to get the right velvety smoothness
  14. Leave to cool before transferring the ketchup to the refrigerator
  15. Serve with eggplant omelette (recipe next week!)
  16. The ketchup will remain tasty for up to 3 days.
PS

In general, we find tomato ketchup too sweet, too salty and bland. Have we ever considered making our own tomato ketchup? No, we haven’t. We’re okay with a small bottle of Heinz Tomato Ketchup Zero, in case we have an irresistible craving for ketchup. Heinz doesn’t add sugar and salt to the Zero Ketchup. They add more tomatoes than usual (great) and a sweetener (pity). The taste? Well, still typically tomato ketchup. Fortunately, Banana Ketchup has far more flavour, spiciness and complexity.

Risotto with Peas

Risotto is amongst our favourite dishes, especially one with mushrooms. Preparing risotto is not difficult, as long as you pay attention to the cooking process and use the right ingredients.
Recently a dear friend who lived in Italy for many years told us how to make Risotto with Peas. In the region where he lived (Liguria) this risotto is made without butter. We were not sure about not using butter, so we had it on standby. No need for that: the result was delicious. The rice was creamy thanks to the combination of the starchy cooking liquid and the Parmesan cheese. The peas were cooked to perfection and their taste nutty. The dish as a whole was light and energizing.

Wine Pairing

In general, a dry white wine will pair well with the Risotto with Peas. We enjoyed a glass of lightly oaked Chardonnay produced by Abbots & Delaunay. Aromas of apples and toast; the taste refreshing, long and a touch buttery. 

What You Need
  • 80 grams of Carnaroli or Arborio rice
  • 1 Shallot
  • Olive Oil
  • Fresh Peas
  • Stock (Chicken, Vegetable)
  • Parmesan Cheese
What You Do
  1. Peel and chop the shallot
  2. Shell the peas
  3. Warm the stock
  4. Add olive oil to the pan and glaze the shallot 
  5. Add the rice to the pan and coat for 2 minutes
  6. Keep the pan on medium heat. Be patient
  7. Start adding the stock, spoon by spoon and stir frequently
  8. After 10 minutes add the peas
  9. In total it may take 15 – 18 minutes before the rice is al dente
  10. Transfer the pan to the kitchen countertop and leave to rest for 2 minutes
  11. Add grated Parmesan cheese, combine, add some black pepper, taste, add more Parmesan cheese if so required
  12. Serve immediately
PS

We have three other risotto recipes: one with mushrooms, one with squid and one with beetroot.

Risotto with Peas is a tasty, uplifting dish. A delicious starter.
Risotto with Peas ©cadwu