Mussels with Tomato Sauce

Earlier this month the mussels season started in the Netherlands. Time to prepare Moules Marinière, Mosselen met Look, Mussels in Beer, Mussels with Anise or Mussels with Tomato Sauce. Serve with crusted bread or French fries and you will have a delicious lunch, starter or main course.
Mussel-wise we prefer small ones, they seem to be tastier and juicier. For a lunch or starter we suggest 1 kilo for two persons, when served as a main course it’s 1 kilo per person. Please read our post about mussel basics if you’re not familiar with cleaning and cooking mussels.

Wine Pairing

The sauce is a touch spicy, so we suggest a white wine with more intense flavours. Could be a Picpoul de Pinet, could be a wine made with Verdejo or Albariño grapes. We enjoyed a glass of Bodegas Piqueras Almansa Wild Fermented Verdejo. This is an organic white wine from the Spanish Rueda region. The wine has a beautiful yellow colour. Its aromas are intense and slightly exotic. The wine has a subtle touch of wood, is balanced and has a long finish. A wine that accompanies the mussels plus the spiciness and the acidity of the sauce perfectly.

What You Need

For the Mussels

  • 1 kilo of Mussels
  • Olive Oil
  • 1 Shallot
  • 1 Garlic Glove
  • Bouquet Garni (Parsley, Bay Leaf, Thyme)
  • White Whine

For the Sauce

  • 4 Ripe Tomatoes
  • 1 Red Bell Pepper
  • 1 Shallot
  • Olive Oil
  • 3 Garlic Gloves
  • ½ Red Chili Pepper
  • Red Wine
  • Bouquet Garni (Parsley, Bay Leaf, Thyme)
  • And later on:
    • 2 Ripe Tomatoes
    • Grounded Chili Pepper

What You Do

Make the sauce one day ahead. Wash the tomatoes, the bell pepper and the chili pepper. Remove the seeds from the pepper and the bell pepper and slice. Chop the tomatoes. No need to remove the pits. Peel the shallot and garlic gloves and chop these. Glaze the onion, garlic and chili pepper in olive oil. Ten minutes on low heat. Add the tomatoes, the bell pepper, some red wine and the bouquet garni. Cook for at least two hours. Remove the bouquet garni, transfer the mixture to the blender and make a very smooth sauce. Pass through a sieve. Transfer back to the pan and reduce until it’s a nice, rich sauce. This may take 30 minutes. Cool quickly and transfer to the refrigerator. It freezes very well.

Clean the mussels with a small kitchen knife. Scrape off all the nasty bits. If you don’t do this, these will end up in your sauce and that’s not what you want.

Chop the garlic and the shallot. Warm a fairly big pan and gently glaze the shallot in olive oil. Then add the chopped garlic. Add a glass of white wine and the bouquet garni and cook on low heat for 10 minutes, allowing for the flavours to integrate.
Wash the tomatoes, remove the seeds and slice in nice small cubes. Warm the sauce. The moment you add the mussels to the pan, you add the cubed tomatoes to the sauce. Add some chilli powder to the sauce, just to give the sauce an extra push.
Turn up the heat to maximum and when really hot add the mussels and close the pan with the lid. Listen and observe: you will be able to hear when content of the pan is becoming hot again. You will see steam, more steam. Check the status of the mussels. Close the lid, listen and observe. Overcooking the mussels will make them chewy which is awful. Remove mussels with a slotted spoon, transfer to a warm soup dish and label the warm and spicy tomato sauce over the mussels.
You could add a spoonful of cooking liquid to the sauce, if you want to.

Mussels with Tomato Sauce ©cadwu

Gazpacho

Simple, tasty, refreshing and quick: what more could you ask for on a summer’s evening? We love a cold soup, for instance Ajo Blanco or Avocado and Cucumber Soup.

Gazpacho, another Spanish classic, is not just a mixture of tomatoes, bell pepper, chili, garlic and white onion. It absolutely needs Jerez vinegar and excellent olive oil. The olive oil will give that velvety, rich feeling in your mouth and the vinegar with the chili gives the gazpacho that typical, sharp freshness.
You will need the very best of vegetables: ripe, tasty and with a firm structure.
The bell pepper should, according to some recipes, be a green Cubanelle pepper. Hard to find for us, so we’re happy to use a green bell pepper.

Prepare the Gazpacho 8 hours in advance and serve in cold bowls. 

What you need

  • 4 large, meaty, tasty red Tomatoes
  • ½ white (Spanish) Onion
  • 1 Green Bell Pepper
  • 2 Fresh Garlic Gloves
  • ½ Red Chili
  • 1 small Cucumber (optional)
  • 3 tablespoons Olive Oil
  • 2 tablespoons Jerez Vinegar
  • Pinch of Salt

What You Do

  1. Cut the tomatoes in 4 and remove the seeds
  2. Transfer to a sieve and use the back of a spoon to squeeze out the liquid
  3. Discard the seeds
  4. Chop the tomato chunks, onion, bell pepper, gloves and chili
  5. Use a blender to mix tomato chunks, tomato juice, onion, bell pepper, gloves and chili until you have a fairly smooth soup
  6. Add olive oil and Jerez vinegar and pulse
  7. Taste, add pinch of salt and more olive oil or vinegar if needed
  8. Transfer to refrigerator and let cool
  9. You could decorate with green bell pepper or chopped tomato (provided it’s peeled and seeded).

PS

Most recipes mention passing the mixture through a sieve. This way you will get a smoother, but also thinner soup. That’s probably why these recipes suggest adding white bread to the mixture.

Gazpacho ©cadwu
Gazpacho ©cadwu

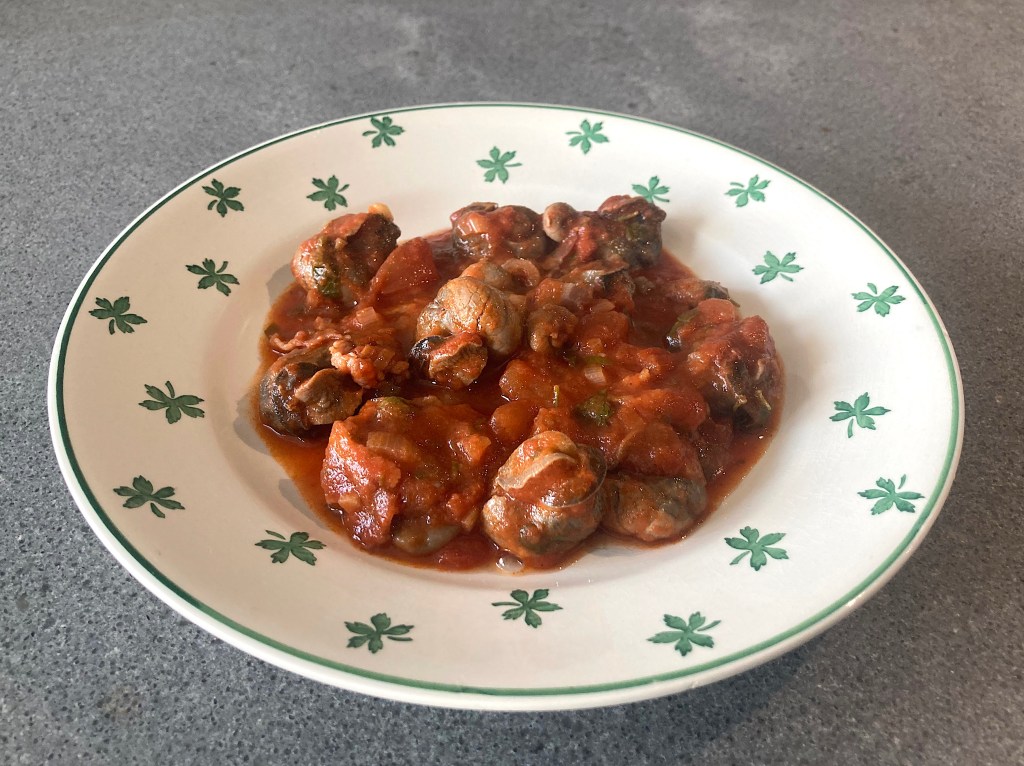
Escargots à la Bordelaise

For some reason we had booked a hotel in Coutras, some 65 kilometres from Bordeaux. A nice enough city, on the borders of the river Dronne, but not as interesting as nearby city Libourne with its castles, parcs and rivers (the Dordogne and the Isle). In all fairness, we could easily have forgotten our stay at Coutras, if it wasn’t for the dinner at La Table Du Buffet. It was a warm welcome, a nice plat du jour made with lots of local products and served with very nice local wine, obviously.
One of the dishes was Escargots à la Bordelaise, made with small snails. The taste was great although we think the snails could have been cleaner, but that’s a minor detail. The dish was a revelation: not the standard combination of snails, butter, garlic and parsley, but a rich tomato and wine sauce that supported the snails perfectly. Delicious with some crusted bread. We decided to prepare the dish as soon as we were back home.

Snails

Buying the right snails is not simple at all. The snail used for the classic Escargots de Bourgogne is called Helix Pomatia. Excellent taste, expensive and hard to find.
There are three alternatives: Helix Aspera (either the small one called Petit Gris or the large one called Gros Gris) and Helix Lucorum. The last one is considered to be less tasty than the other three, but when prepared well, it’s a very nice, affordable alternative.

Sometimes it simply says ‘Escargots’ and ‘Gros’ on the tin. Sounds good, doesn’t it? In most cases these ‘escargots’ are cooked and chopped large (sea) snails. The term ‘Gros’ is supposed to make you think of the Gros Gris. Don’t be fooled: these ‘escargots’ are rubbery, tasteless and a waste of money (and snail).

Fast Snails

And now for the sad part: as you know snails are slow. Very slow. And during winter they are even slower. They simply sleep 3 to 5 months before becoming active again. Some (most?) farmers are not that patient, so they turn up the light and the heat, pushing the snails towards a faster life, forcing them to skip hibernation and become fast snails.
Even the poor snails are turned into manageable products.
Let’s focus on the honest exception: some farms allow the snails to be slow, to sleep through winter, to be their natural self. Hurray!

Wine Pairing

Given the name of the dish (and the flavours of course) we suggest a red Bordeaux wine. Not too complex, not too expensive. We enjoyed a Côtes de Bordeaux produced by Château Cap Saint Martin in Blaye. In general you’re looking for a red wine with grapes such as Merlot, Cabernet Sauvignon, Cabernet Franc and Malbec. Rich in fruit, limited in tannins and acidity.

What You Need
  • 12-18 Snails
  • 50 grams of Pancetta (bacon is also fine)
  • 1 Shallot
  • 1 Garlic Clove
  • Parsley
  • Tomato Sauce
  • Red Wine
  • Olive oil
  • Black pepper
  • Crusted Bread
What You Do
  1. Chop the shallot, the garlic and the parsley
  2. Slice the pancetta
  3. Warm a heavy iron skillet
  4. Gently fry the shallot
  5. After a few minutes add the garlic
  6. Add the pancetta and fry for a few minutes
  7. Add the tomato sauce, some red wine, the chopped parsley
  8. Allow to reduce, thicken and integrate, let’s say 15 minutes. Longer is fine; the consistency of the sauce is important
  9. Add snails and cook for 10 minutes on a very low heat
  10. Serve immediately with crusted bread
Escargots à la Bordelaise ©cadwu

Cooking Soup

We simply love soup! A traditional soup like Londonderry or Queen’s Soup, a rich Tomato Soup, Clam Chowder, perhaps a more challenging soup like Lettuce Soup or a refreshing Ajo Blanco.
If you would look at our shelfs with cookbooks you would expect books like The Ultimate SoupbookThe Essential Soupbook or Soup of the Day. No doubt these are excellent books with great recipes, but we have only one book specific on soup: Cooking Soups for Dummies by Jenna Holst.

Why? Well, to be honest, it is one of these few cookbooks that is truly about ingredients, methods and recipes, with the aim to cook a tasty soup.
Most cookbooks are a collection of recipes. Not this one. The first chapter of the book is about tools and utensils, basically explaining what equipment you need to make a soup. The second chapter is about the ingredients (spices, herbs, basic items) you need and where and how you should store them. Fun to read, good to know, especially because it’s very well written, comprehensive and clear. The third and fourth chapter are about basic techniques, and the fifth chapter explains how to make a broth (chicken, beef, vegetarian, fish, clam). Chapter six is about storing soup (again well written and very helpful) and then we move towards making fresh soup from the garden (Tomato Soup, Sweet Potato Bisque etcetera).

You could skip the background information and only look at the index of recipes. You’ll find lots of interesting recipes, ranging from Mulligatawny Soup to Cantaloupe-Orange Soup, but also less exotic ones like Creamy Potato Leek Soup and Split Pea Soup.

We bought the book many years ago and have always found it helpful and inspiring. What better way to start dinner, or lunch, than with soup? Let’s buy some fresh beets and cook Herbed Beet Soup. Yummy!

Cooking Soups for Dummies is available via your local bookstore or via the well-known channels for approximately US$ 30,00 or € 20,00. You’ll find specific recipes on Dummies.

Fish Cakes

They are so tempting! The crunchy crust, the flaky texture and the flavour, especially when combined with mayonnaise and lemon. When we see them at the supermarket or at the fishmonger, we can’t always resist buying them. But we should resist the temptation because most fish cakes should be called salty potato cakes. Hardly any fish, limited herbs, the structure of mashed potato and lots of salt to disguise the lack of real flavour.

It’s not a lot of work to prepare your own fish cakes, so be brave and ignore the factory-made ones. The recipe is very flexible, you could make a Thai version (Tod Mun Pla) with lemon grass, red curry, onions and garlic, a traditional version with stockfish, or cakes with salmon, with shrimps etcetera. To be served with Tartar sauce, sweet chili sauce, dill sauce or perhaps hoisin. We prefer Jean Beddington‘s fish cakes (served with a beetroot chutney) or a more traditional version that focuses on the fish, with herbs and black pepper in a supporting role, breaded with our home-made breadcrumbs.

Wine Pairing

Let’s be flexible, a nice glass of beer or a not too complex white wine, it’s all fine. The salad, its dressing and the lemon will be rather present. Perhaps a Verdejo, Pinot Blanc or a Picpoul de Pinet?

What You Need

  • For the Cakes
    • 225 grams of Haddock
    • 100 grams of Potato
    • 1 egg yolk
    • Parsley
    • Chives
    • Black Pepper
    • Butter
  • 1 Egg
  • Breadcrumbs
  • Olive Oil and Butter
  • Salad with a dressing made of Olive Oil and White Wine Vinegar
  • Mayonnaise
  • Lemon

What You Do

It’s best to make the mixture one day ahead. This allows for the flavours to integrate.
Gently fry the haddock in butter. You’re looking for a light golden color, just to give it some extra flavour. When nearly done, transfer to a plate and let cool. Cook the potato until soft. Let cool. Use a fish knive to make fish flakes. Use a fork to mash the potato. Chop lots of parsley and chives. Combine fish (and its juices), potato, egg yolk, herbs and a generous amount of black pepper. Let cool and store in the refrigerator until the next day.
Beat the egg, add a few drops of lemon to the mayonnaise and heat a heavy iron skillet or a non-stick pan. Make 4 fish cakes. Coat them with egg, then cover with breadcrumbs and fry in butter and/or olive oil on all sides. In total 6-10 minutes. Serve with a salad, mayonnaise and a wedge of lemon.

PS

Making your own breadcrumbs is simple and worthwhile. The breadcrumbs at the supermarket are made of cardboard; yet another product you shouldn’t buy. Toast slices of old bread and let cool. Cut in smaller bits and then use a cutter or blender to make the crumbs. Done. They keep very well in the freezer.

Omelet with Artichoke

We love artichokes! It’s such fun to serve a steamed artichoke with a nice dipping sauce made of mayonnaise, whole grain mustard and some lemon juice. Thoroughly relaxing food. And when we have time on our hands, we prepare them à la barigoule.
Recently we wrote about la Cuisine Niçoise d’Hélène Barale. In this very informative book about the traditional food of Nice, you will find a recipe for an omelet with artichokes. We liked the idea, did our shopping and followed the instructions. Unfortunately, sorry Madame Barale!, we were not too happy with the result. The recipe suggests frying the omelet on medium heat on both sides. We think that’s a bit too much: in our case the flavours of the fried egg overwhelmed the subtle taste of the onion, artichoke and garlic. We tweaked the recipe (see below) but that shouldn’t stop you from buying the book and preparing the original.

The taste of the omelet is sweet thanks to cynarine, an intriguing chemical especially found in the leaves of the artichoke. Cynarine will enhance even the slightest trace of sweetness, in this case the sweetness of the onions and the cooked garlic. The taste of the artichoke is also nutty and bitter in a gentle way, which works really well with the eggs.

Wine Pairing

The cynarine will also enhance any sweetness in your wine, so you need a bone-dry, crisp, unoaked white wine with clear, present acidity. For instance a Sauvignon Blanc, Grüner Veltliner or Albariño.

What You Need

  • 1 Large Artichoke
  • 1 Shallot
  • 1 Garlic Clove
  • 2 Eggs
  • Olive Oil
  • Black Pepper

What You Do

Clean the artichoke, steam for 45 minutes depending on the size and let cool. Use a spoon to remove the ‘meat’ from the leaves (bracts) of the artichokes. Use a fork to make a chunky mash of the heart. Set aside.
Chop the shallot. Warm a heavy iron skillet, add olive oil and gently fry the shallot. Add the artichoke, mix and leave for 10 minutes on low heat. Mash the cooked garlic and add to the mixture. Add some black pepper. Beat two eggs, a bit longer than usual. Add the eggs to the mixture and allow to set, very slowly, making sure the omelet is baveuse (moist, warm and soft).

Artichoke à la Barigoule

It’s the time of year to enjoy artichokes: steamed, as a salad, in a pie or perhaps à la Barigoule. This is a rather intriguing recipe from the French Provence region. There are lots of variations, so we looked in books like La Cuisinière Provençale and La Cuisine Niçoise d’Hélène Barale to find the ‘original’ recipe.

Obviously you want to know what ‘barigoule’ means. According to Hélène Barale ‘barigoule’ means thyme, which is odd because she doesn’t add thyme to her Artichoke à la Barigoule. Is it perhaps derived from the Latin word mauruculai (meaning morel according to some and saffron milk cap to others) as the Larousse suggests? But what is the link between artichokes and mushrooms?

Three Versions

We found three different ways of preparing Artichoke à la Barigoule: cooked with onions, white wine and carrot, stuffed and preserved with lots of citrus. The stuffed one is probably the original version because the artichoke is stuffed with a mixture of mushrooms, thyme and garlic. Which makes the Larousse explanation more likely.

Preparing Artichokes a la Barigoule is quite a bit of work and the result, we must admit, looks like an old fashioned underbaked meatball. We could imagine you serve the artichoke halfway the recipe. If you do, best is to use smaller artichokes.

Wine Pairing

It’s not straightforward to pair artichokes with wine. According to various researchers this is due to cynarin, a chemical especially found in the leaves of the artichoke. When the wine and the cynarin meet in your mouth, the natural sweetness of the wine is enhanced, making it taste too sweet. So you have to pair artichokes with a bone-dry, crisp, unoaked white wine with clear, present acidity. For instance Sauvignon Blanc, Grüner Veltliner or Albariño. 

What You Need

  • Artichokes
  • Cooking liquid
    • Shallot
    • Carrot
    • Olive oil
    • White wine
    • Water
    • Thyme
  • Filling
    • Mushrooms
    • Egg yolk
    • Garlic
    • Shallot
    • 2 Strips of Bacon
    • Thyme
    • Black Pepper
  • Excellent Olive Oil

What You do

Remove outer leaves and stem of the artichokes. Add oil to a large pan, gently fry the chopped shallot and the chopped carrot. After 10 minutes or so add white wine, thyme and some water. Leave to simmer for 10 minutes. Add the artichokes to the liquid, close the pan and allow to cook and steam on low heat for 45-60 minutes or until nearly done. You could decide to stop here and serve the artichoke with the (reduced) sauce.
Let the artichokes cool, remove the leaves and the centre choke (the hairy part).  Use a spoon to remove the ‘meat’ from the leaves (bracts) of the artichokes. Set aside. In a small skillet heat some oil, add chopped shallot, glaze, add sliced bacon, mushrooms, garlic and thyme. Leave for 10 minutes until done. Add the artichoke meat from the leaves, stir, add the egg yolk and mix. Add freshly grounded black pepper. Use a food processor to make the mixture smoother, but not too smooth. Fill the artichokes with the mixture. It should look like an oversized golf ball on top of the bottom of the artichoke. You will probably have too much filling, which is fine. Gently transfer the artichokes to the pan with cooking liquid and allow to steam and warm for 30 minutes. Now transfer the artichokes to a warm oven (60 ˚C or 140 ˚F).  Add the reaming mixture to the liquid, use a powerful blender to create a sauce. Pass through a sieve and blender some more. Set the blender to low speed and add excellent olive oil. Taste and adjust. Serve the filled artichokes on a small plate with the sauce.

Clam Chowder

We have fond memories of the food we enjoyed when in New England: local oysters, lobster, Boston cream pie and of course clam chowder. Ah, yes, fond memories indeed.
Since then, clam chowder has become one of our favourite starters. Unfortunately, most restaurants (even in New England!) turn the clam chowder into a potato soup and even worse: they used canned clams. Help! 

The main ingredients of New England clam chowder should of course be lots of fresh clams plus vegetables, bacon, cream and potato. The soup must be about clams, with all the other ingredients in a supporting role.

We’re not from New England, so our clam chowder is far from original. But being Dutch we love our seafood and most certainly do we love our kokkels, also known as the common cockle. You can find a probably more original Manhatten version (meaning: without cream) in The Silver Palate Cookbook.

Finding the right potato is a bit of a struggle, also because some recipes suggest using waxy potatoes, so potatoes that remain firm. Not a good idea because it means that the potato doesn’t thicken the soup and the potato is far too present. We prefer using a starchy potato, one you would use for a purée, mash or mousseline. If you can find one with a golden colour, that’s even better. If you’re familiar with vichyssoise, then use the same potato.

What You Need

  • 500 grams of Clams, preferably washed
  • Chopped Carrot, Celeriac, Onion and Leek
  • Bouquet Garni (Parsley, Bay Leaf, some Thyme)
  • 4 strips of Bacon
  • White Wine
  • Water
  • 200 grams of Starchy Potato
  • 50 ml Cream
  • Olive Oil
  • White pepper

What You Do

Check the clams: discard broken ones or ones that will not close. Add a little olive oil to a pan and then chopped carrot, celeriac, onion and leek. Leave for 20 minutes until soft and sweet. Add the chopped bacon, fry for a few minutes until slightly crispy. Now add white wine, water and the bouquet garni. Leave for another 20 minutes. Turn up the heat, add the clams quickly and certainly not too long. If you heat them too long, then they will become rubbery when heated for the second time. Use a slotted spoon to remove the ingredients from the stock. Keep the bacon, the clams (without the shells) and the bouquet garni. Discard all other ingredients: onions, leek, celeriac, carrot and shells. Transfer the bacon and the bouquet garni back to the liquid. Add the chopped potato. Let simmer until the potato has broken down. Use a fork to thicken the soup. Add cream. Feel free to add a bit more, it’s all about taste and consistency at this stage. If you’re not happy with it, then you could add some potato starch. Keep the soup warm for 10 minutes or so, turn up the heat, add the clams and quickly heat them. Add some freshly grounded white pepper. Serve immediately.

Clam Chowder ©cadwu
Clam Chowder ©cadwu

Beet Greens Pie

Such a cheap and delicious vegetable: beets! Grilled, cooked, braised, combined with other vegetables or on its own, as a salad or straight from the oven. And so many varieties! Deep red, orange (chiogga), purple, golden and even white. All these beets have one thing in common: they come with leafs, with greens. Most retailers (and their customers) are not interested in the greens and therefore the leaves are discarded before the beets reach the shop. Which is a pity because they are as tasty as the beets. Use the greens in a salad, prepare them like you would prepare spinach or, even tastier, use the leaves as main ingredient of a pie.

Tourte de Blette

Some time ago we published the recipe for Tourte de Blette. When preparing it we were inspired by a dear friend who bases her Tourte on the Italian Torta Verde del Ponente Ligure. This is a very similar dish with zucchini, chard, basil, sage, rise, onion, Grana Padano or Parmesan and eggs. The dough of the Torta Verde is easy to work with and the result is both tasty and crunchy. It works really well for our Tourte de Blette so we decided to use it for this pie as well.

Wine Pairing

A not too complex white wine will be a great idea. You could also drink a glass of rosé with it, for instance a Côtes de Provence. Drinking a beer with your pie is also an excellent idea.

What You Need

  • For the Dough
    • 100 gram of Flour
    • 50 gram of Water
    • 10 gram of Olive Oil
    • 1 gram of Salt
  • For the Mixture
    • Greens of 3 or 4 Beets
    • One Shallot
    • Olive Oil
    • 50 grams of Cooked Rice
    • 1 or 2 Eggs
    • 50 gram Freshly Grated Parmesan Cheese
    • Black Pepper

What You Do

Cook the rice and leave to rest.  Combine flour, salt, water and olive oil. Make the dough, kneed for a minute or so and store in the refrigerator for at least 30 minutes.
Remove the leaves from the stem and chop the stems. Slice the leaves coarsely. Best is to have the stem slices the size of the cooked rice. Same for the shallot. Warm a large heavy skillet, gently fry the shallot. After 10 minutes add the chopped stems. Leave for 10 minutes and then add the leaves. Cook for a few minutes until done. Transfer to a plate and let cool.
Slice the mixture using a kitchen knife. Whisk the two eggs. Combine the vegetables, the egg, the rice and the freshly grated Parmesan cheese. Add black pepper.
Cut the dough in two, one part slightly bigger than the other. The bigger part will be the bottom, the smaller part the top. Roll out the bigger one with a rolling pin on a lightly floured surface. Coat a 15 cm or 6 inch round baking form with oil (or use a sheet of baking paper). Place the first disk in the baking form, add filling and close with the second disk of dough. Fold the edge of the top piece of dough over and under the edge of the bottom piece of dough, pressing together. Make holes in the top, allowing for the steam to escape. Transfer to the oven for 40 – 50 minutes on 180˚ – 200˚ Celsius or 355˚ – 390˚ Fahrenheit. Immediately after having removed the pie from the oven, brush the top with olive oil. This will intensify the colour of the crust. Let cool and enjoy luke warm.

Halibut with Morels

Seasonal eating is such a great idee. Simply buy (locally produced) seasonal fruit, vegetables and mushrooms, enjoy fresher and better tasting ingredients, reduce your carbon footprint and support your local community. And it creates lots of tasty opportunities: celebrate the beginning of the truffle season, the start of the asparagus season, the first red wine from the Beaujolais region – all good fun.

Part of the concept (at least, we think so) is commemorating the end of a season. In the Netherlands the morel-season ends early May. This year was a particularly good year for morels, we had some beautiful, tasty ones, for a reasonable price. But now it’s time to prepare the last morel dish of the season. And the last one with Ramson! A very tasty dish, one that requires a bit of work, but the result is absolutely yummy!

Wine Pairing

The richness of the dish requires a full-bodied white wine, for instance a glass of Chardonnay; one that has a touch of oak and vanilla plus a lightly buttery finish. Our choice would be the Chardonnay of La Cour des Dames

What You Need

  • Halibut
    • Halibut (slice with skin and bone preferred)
    • Olive Oil
  • Morels
    • 50 grams of Morels
    • Olive Oil
  • Sauce
    • Shallot
    • Olive Oil
    • Fish Stock
    • Noilly Prat
    • Crème Fraîche
    • Butter
    • White Pepper
  • Ramson (Wild Garlic)

What You Do

Clean and half the morels. Fry these gently in a heavy iron skillet for at least 10 minutes.
In parallel heat a small heavy iron skillet, gently fry the chopped shallot. When soft, add the garlic and one or two ice cubes of fish stock. Add a splash of Noilly Prat. When warm, blender the mixture, pass through a sieve and return to the pan. Add some crème fraiche. Warm through and through.
In parallel fry the halibut in a separate (non-stick) pan. First on the skin side, then turn the fish, remove the skin and turn again. The result should be golden. Whilst still in the pan, remove the bone. This gives you two portions of fish per person.
Slice a few leaves of ramson lengthwise, removing the vein.
When the fish is opaque, it’s time to add a bit of butter to the sauce and a touch of white pepper.
Serve the fish on top of the sauce, add the morels and the leaves.

PS

We served the halibut with morels on plates designed by Walter Gropius and produced by Rosenthal; a classic plate in Bauhaus Style.

Halibut with Morels ©cadwu