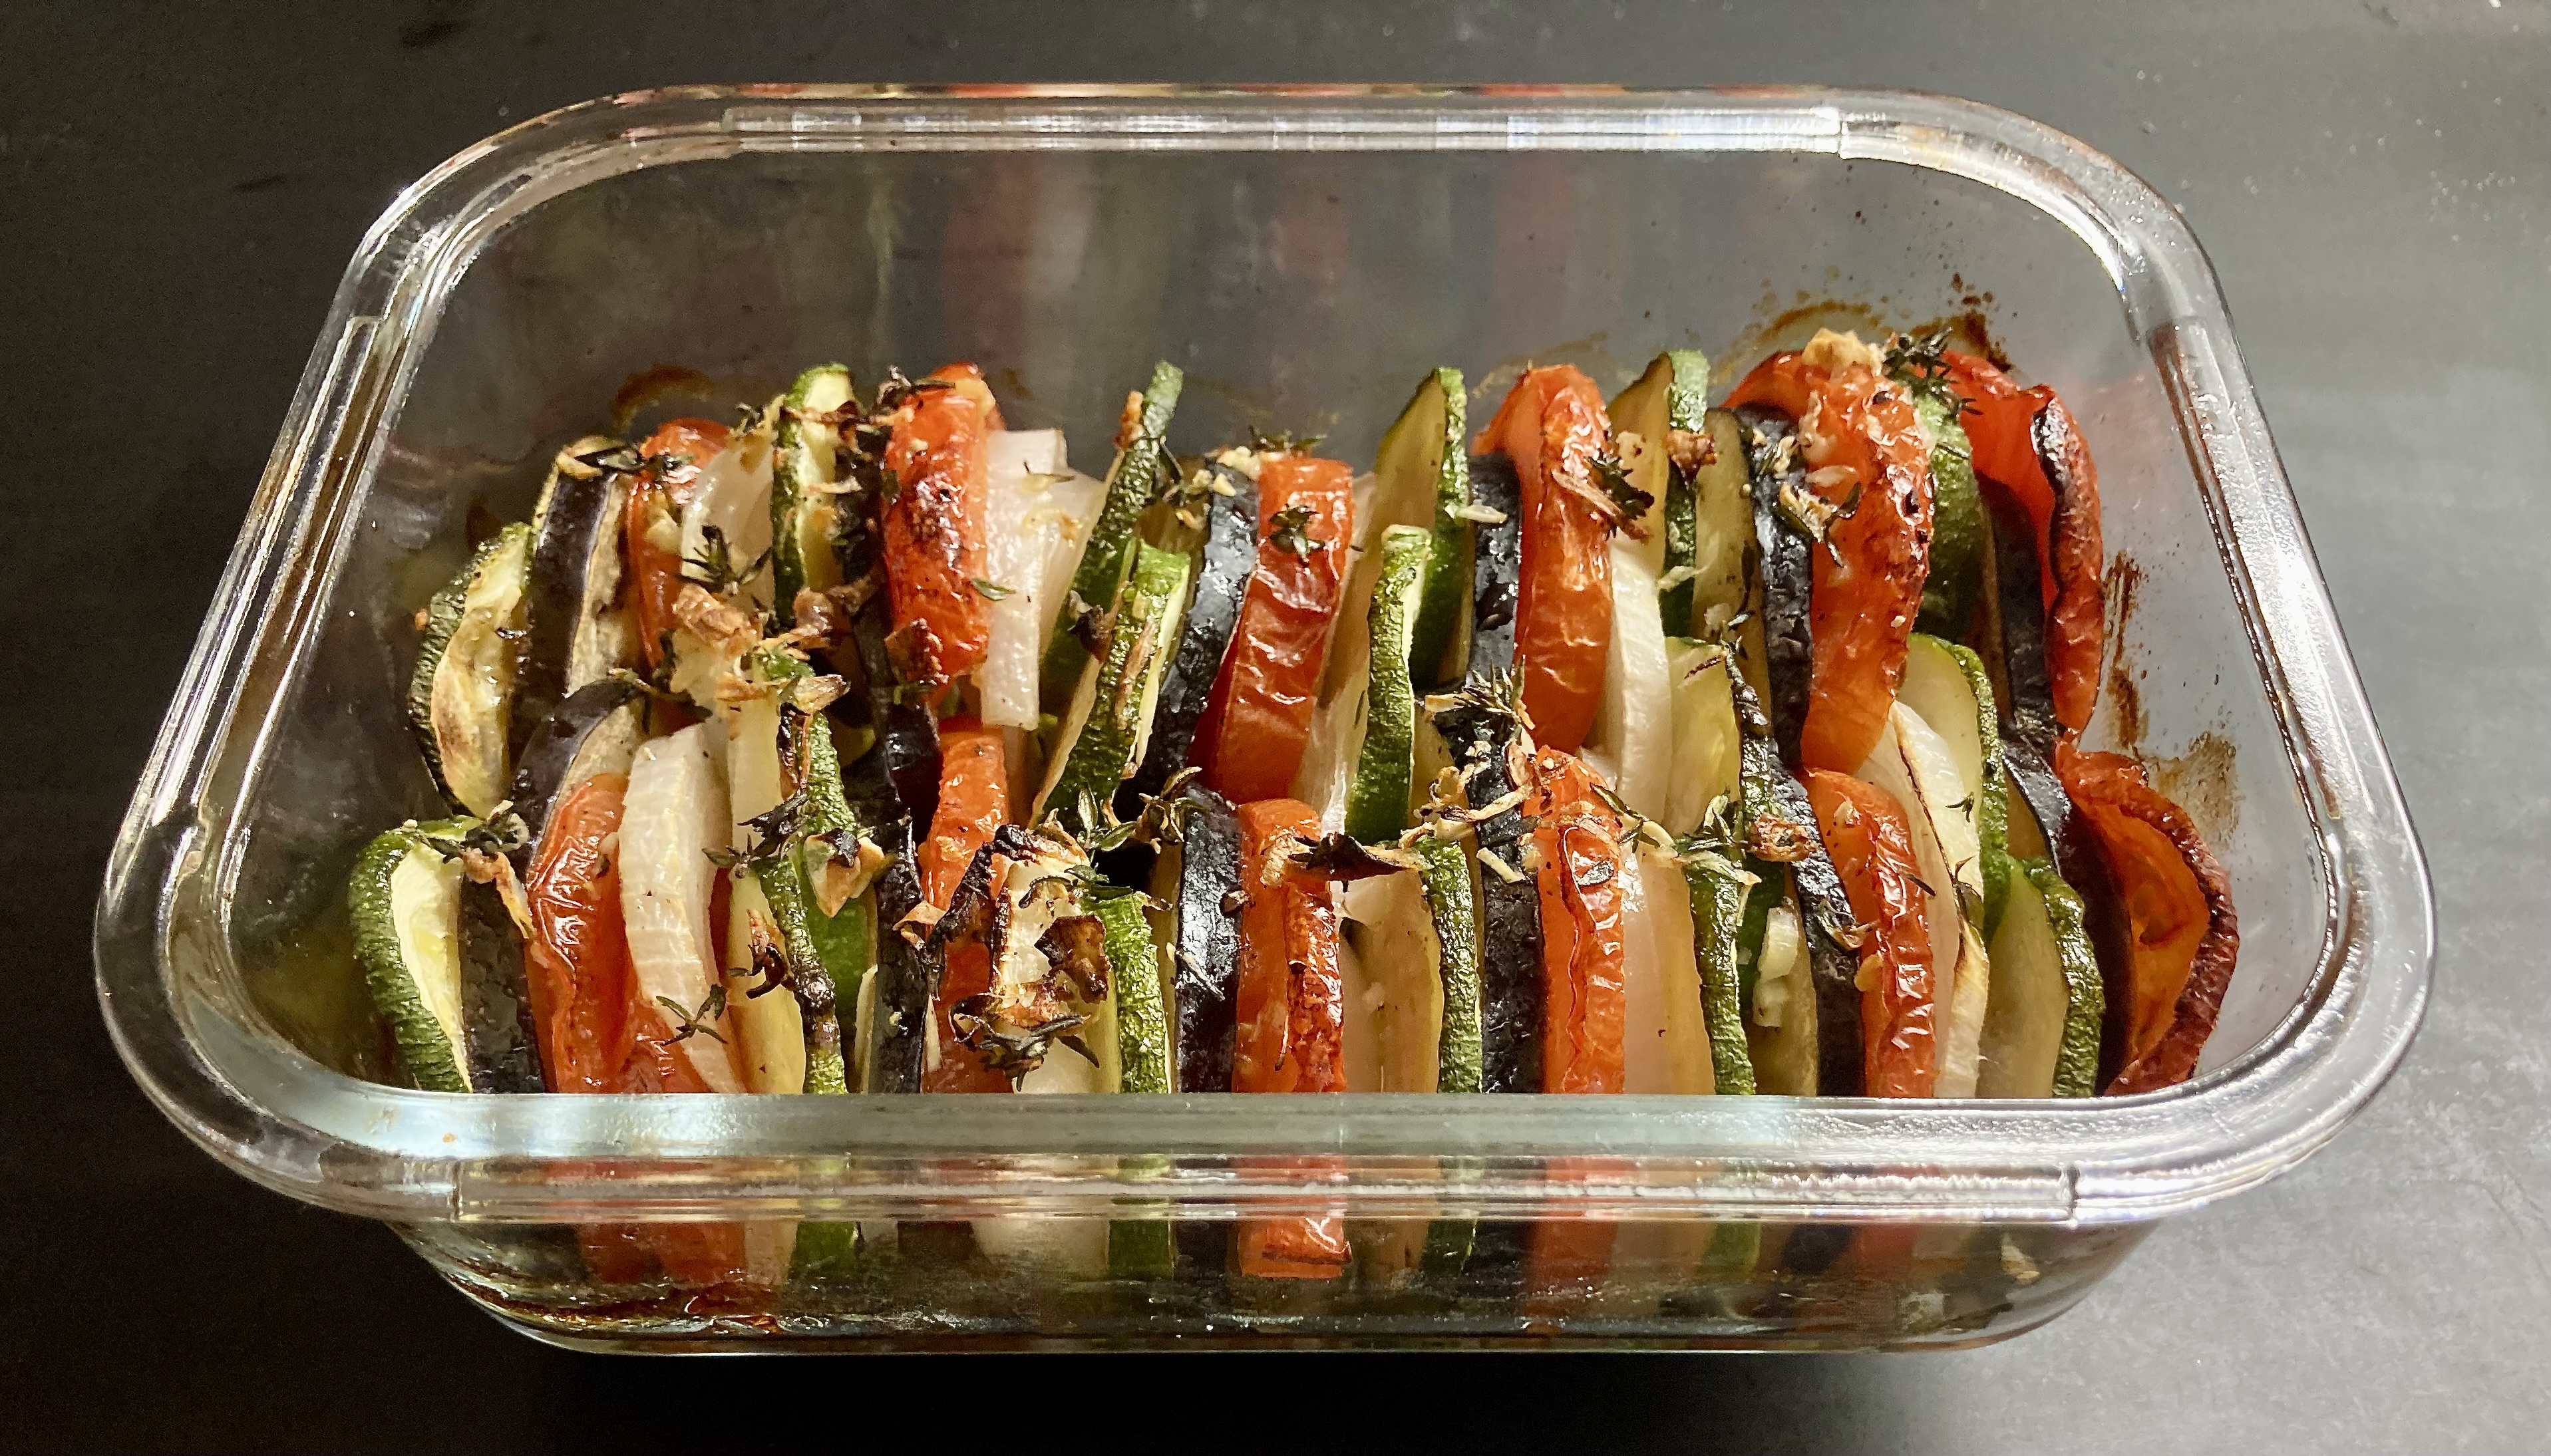
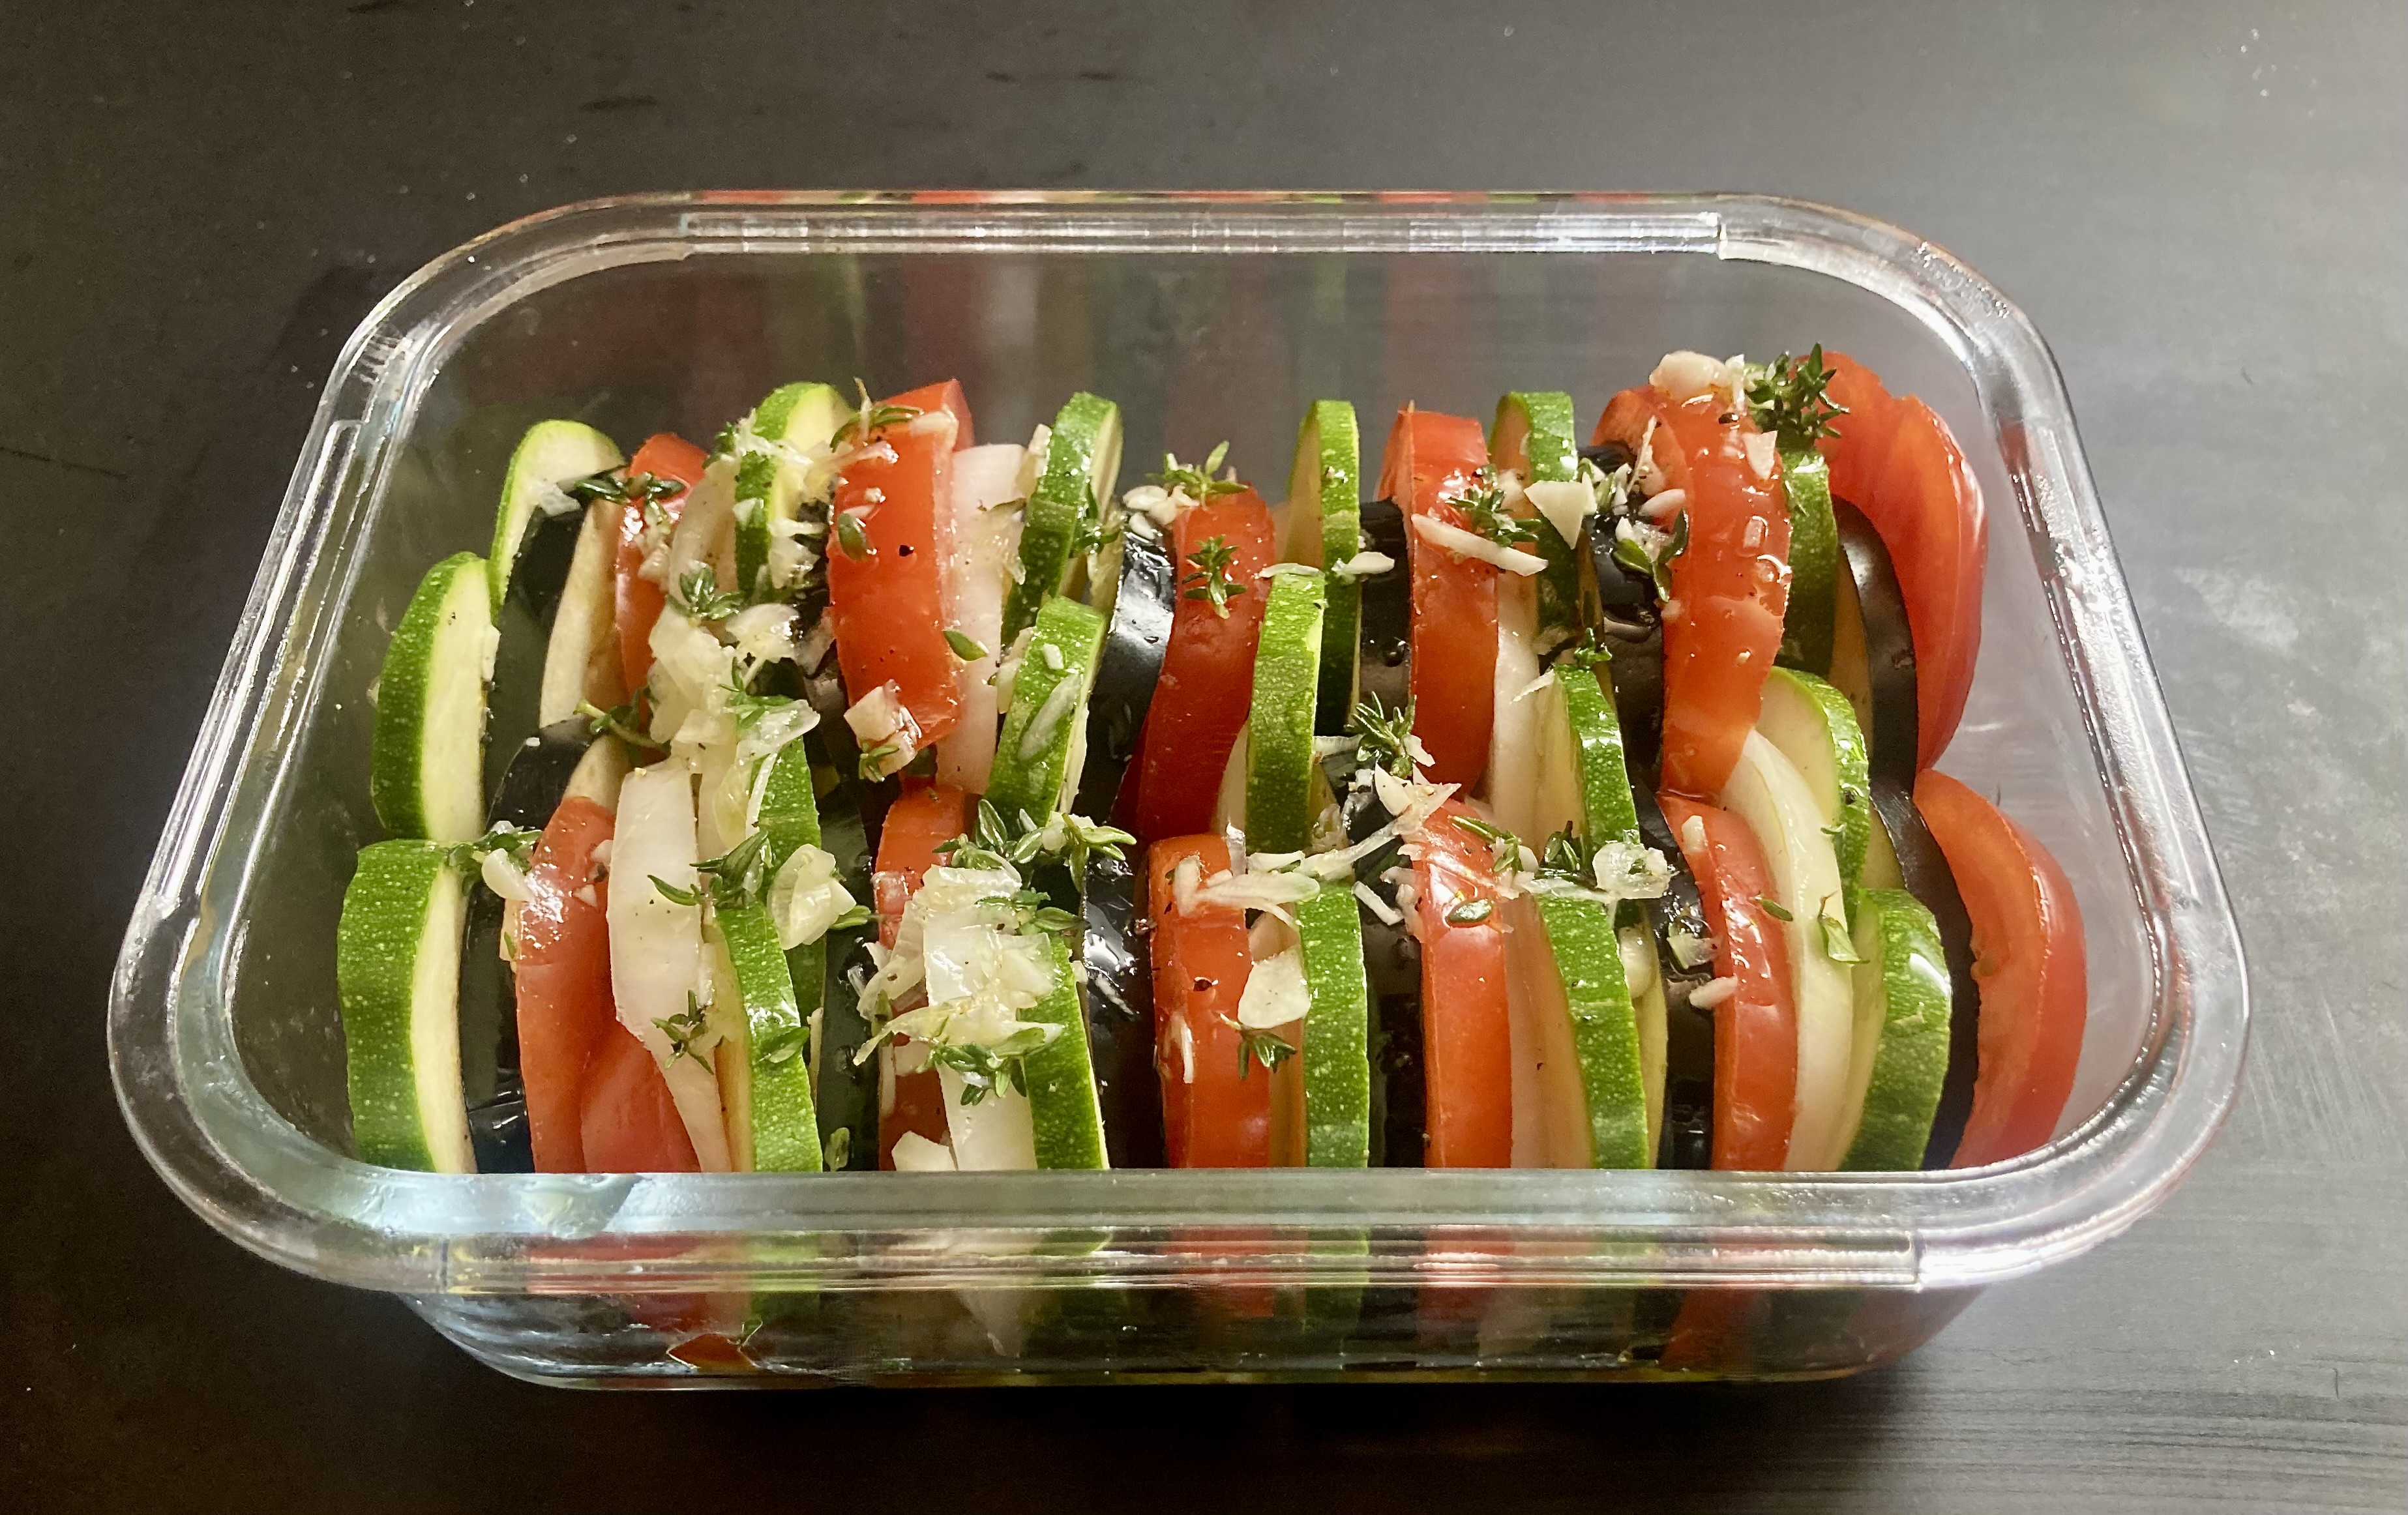
Asparagus

Both White and Green Asparagus are seasonal products. Waiting for the season to begin is part of the fun of enjoying asparagus.

Green Asparagus

Preparing Green Asparagus is simple. Wash them and cut off 1 or 2 centimetres or so from the bottom. You could steam or cook them but you risk getting soggy asparagus. Better to prepare them in a skillet or in the oven. They will only take 10-15 minutes. Great to combine with basil and black olives. You could also grill them, see below.

White Asparagus

Buying and preparing White Asparagus requires a bit more work, but once you know what to do, it’s not difficult at all.

Fresh

Make sure the white asparagus are fresh. Just look at the bottom, where they have been cut off. If the cut looks dry, wrinkly or even moldy, then don’t buy them. If you want to be sure they are super fresh, then rub two asparagus together. If you hear a squeaking sound, then they’re super fresh.

Peeling

Peel White Asparagus, using a peeler, as you would potatoes. In the old days White Asparagus would be peeled twice, but nowadays we like a bit of texture.
Cut off 1 or 2 centimetres from the bottom. If your White Asparagus are fresh, it’s just a matter of removing the original cut.

Cooking

The most popular approach is to cook White Asparagus. Add the asparagus to a pan with plenty of cold water. Wait for the water to just begin boiling, keep it simmering for 1 minute, then transfer the pan to the work top. Wait for 10 minutes before removing the asparagus from the water. If you prefer them a bit softer, then leave them in the hot water for 5 more minutes.
Many add butter, sugar, salt, lemon and/or the skin of the asparagus to the water. We could imagine adding the skin. Adding sugar is a big NO for us.
You could use a special asparagus pan when cooking the asparagus, but actually there is no need for it. As long as the pan can accommodate the asparagus, you’re fine.

Steaming

We prefer steaming White Asparagus for 20 minutes in our Russell Hobbs. The taste of the asparagus will be more intense and richer.

Wine Pairing

In general a Pinot Blanc, Riesling or Dry Muscat from the Elzas will be very nice with your asparagus.

Recipes

Over the years we have prepared asparagus in many ways. Bon Appétit!

PS

You’re probably aware of the side effect of eating asparagus, the typical smell when peeing. It doesn’t happen to everyone, and it also depends on the type of asparagus. The sulphurous by-products (the result of your body digesting the asparagus) that cause the smell, will disappear within a few hours. Could take a bit longer, but nothing to worry about, it’s perfectly harmless.

Potato, Fennel and Wild Garlic

So many names for this great plant: Ramson(s), Wild Garlic, Bear Leek, DaslookAil des OursBärlauchRamsløgAglio Orsino, Allium ursinum, it is one of the highlights of spring. Powerful, pure and tasty. It can be harvested from the wild, but fortunately some green grocers also sell Wild Garlic. The taste is a combination of onion and garlic, but much greener, longer lasting and with a touch of bitterness at the end. You can turn the leaves into a strong pesto, but better use it as herb with for instance potatoes or gnocchi. It is also great when used in a dish with white asparagus and morels. The flowers are also edible and are a great decoration for savory dishes and salads.

We combine Wild Garlic with potatoes and fresh fennel. The anise-taste and the light crunchiness of the fennel go very well with this rich, lightly onion flavoured potato mash.

What You Need

  • Potato
  • Butter
  • Cream
  • Fennel
  • Wild Garlic
  • Black Pepper
  • Salt (optional)

What You Do

Dice the peeled potatoes and cook until ready to mash. Very finely dice some fennel, let’s say one tablespoon per one large potato. Add cream, butter and diced fennel to the mashed potato, mix and leave on very low heat. Remove the veins from the wild garlic leaves and tear the leaves, as you would do with basil. Add some of them to the mash, add black pepper and perhaps a pinch of salt. Leave for a few minutes, add more butter or cream if so required and more leaves. If you’re happy with the consistency and the taste, it’s time to add some more torn leaves to the mash. Serve immediately.

PS

Other elements on the plate are Saucisse de Morteau, Frankfurter and petit farci. More about the latter in one of our next posts!

Carrot Salad with Fennel Seeds

Inspired by the Portuguese and Moroccan cuisine we make a very tasty, quick and easy carrot salad. Ideal to accompany fish or a rich stew. The salad is full of flavours: fennel and carrot obviously, but you could also taste chervil and perhaps tarragon. Light, refreshing and the texture of the carrot is inviting.

We prefer preparing the salad with winter carrots because they seem to have more flavour and structure than the regular ones.
We use fennel seeds in this recipe. Alternatively, you could use cumin (always great with carrots) or coriander (cilantro) seeds.

What You Need

  • One Winter Carrot
  • Olive Oil
  • White Wine Vinegar
  • One Garlic Clove
  • Fennell Seeds
  • Parsley
  • Black Pepper

What You Do

Prepare 24 hours before serving.
Clean and thinly peel the carrot. Cook for 5-10 minutes until al dente. Let cool. Quarter lengthwise and slice. Make a dressing by combing olive oil and vinegar (ratio 2:1 or 3:1). Peel the garlic clove and finely chop. Take ¼ teaspoon of fennel seeds and use a mortar to crush the seeds until you have powder. Add the fennel seed powder and the garlic to the dressing and combine. Taste and adjust. Chop a nice amount of parsley. Add the carrots and the parsley to the dressing and combine. Use cling film to seal the bowl and transfer to the refrigerator. Gently mix the salad every 2-4 hours.
Just before serving add some fresh black pepper.

Artichokes Roasted In the Oven

We love artichokes, as a salad, stuffed, with pasta, always a treat. We saw young, small, purple artichokes on the market and decided to take a different approach. Let’s roast them in the oven with lots of fresh thyme, rosemary and bay leaf.
The bitter, nutty taste of the artichokes was clearly present, and it was delicious in combination with the mouthfeel (the olive oil) and the aromatic herbs. Compared to steamed artichokes the roasted ones come with stronger but not too strong flavours.

The artichokes were clearly young because there was no centre choke (the hairy part), which meant that we could eat most of the artichoke, including the stem.

Wine Pairing

Normally pairing artichokes and wine is a real challenge. According to various researchers this is due to cynarin, a chemical especially found in the leaves of the artichoke. When the wine and the cynarin meet in your mouth, the natural sweetness of the wine is enhanced, making it taste too sweet. Meaning you must pair artichokes with a bone-dry, crisp, unoaked white wine with clear, present acidity. Roasting the artichokes in the oven seems to reduce the impact of the cynarin. We suggest serving the artichokes with a medium bodied, dry red wine, not too complex. Could be Merlot, perhaps Malbec or Carménère.

What You Need

  • Young, Small Artichokes
  • One Garlic Clove
  • Fresh Thyme, Rosemary and Bay Leaf
  • One Lemon
  • Olive Oil

What You Do

Heat your oven to 150 °C or 300 °F. Press the lemon and add the juice to a bowl of cold water. Slice the artichokes lengthwise in two. Add them to the water. Check if they have a centre choke. If so, try to remove. Let the artichokes soak for a few minutes. In the meantime peel the garlic and chop, coarsely. Add a generous amount of olive oil to your baking dish, dry the artichokes somewhat, add them to the dish, add the garlic, the sprigs of thyme and rosemary, the bay leaf. Mix. Sprinkle with more olive oil. Cover with aluminium foil and transfer to the oven for 15 minutes. After 15 minutes increase the temperature to 180 °C or 355 °F. Leave for 30 minutes. Check if the artichokes are ready. The trick is simple. If you can remove a leave without too much trouble, they are ready, if not, give them 5 more minutes. You could also check the stem, it should be soft. Remove the foil and leave in the oven for another 5-10 minutes. In parallel fry some merguez sausages.

PS

Artichokes require eating with your hands. Given the olive oil you may need an extra napkin or two.

Sand Carrots

We were chatting to our favourite greengrocer. Anything special this week? Yes, absolutely, we’ve got Carottes des Sables, also known as sand carrots. The carrots grow in sand in the French Normandy region. The sand has been fertilized with seaweed for many years. The carrots grow slowly and don’t develop a fibrous core, as other carrots do. Furthermore, they are not stored in cool warehouses. Immediately after the harvest they are transported to the greengrocer or the kitchen, covered with sand, to keep them fresh and aromatic. A culinary treat, appreciated by Michelin star chefs.

The carrots are simply delicious and look wonderful. The colour is vibrant orange. We tasted carrot as carrot should taste, crunchy, a touch sweet and fresh.

You could braise the carrots in stock with star anise and finish with butter. We decided to keep it simple and give all credits to the carrot. We served them with a pork medallion with apricots and prunes. A combination that worked very well.

Wine Pairing

The sweetness of the carrots is leading. We opened a bottle of St. Amour, one of the ten crus of the Beaujolais, produced by Maison Jean Loron. An elegant red wine with aromas of strawberries, cassis and chocolate. The tannins are soft and pleasant. The taste is a wonderful balance of strawberries, raspberries and blueberries.

In general you’re looking for a light or medium bodied wine, with character and fruity aromas. Could be a Malbec, perhaps a blend of Syrah and Grenache?

What You Need

  • Sand Carrots
  • Butter

What You Do

Wash the carrots carefully, slice, add to a pan with a bit of water and butter. Cook until you’re happy with the firmness of the carrot. By then the water should have evaporated. You could serve them with fresh parsley, cilantro, cinnamon or black pepper. We were perfectly happy with this simple preparation.

Mashua

This edible, very productive plant (Tropaeolum Tuberosum ) is originally from the Andes. It grows very well in colder climates, it’s not very demanding and comes back year after year thanks to its tubers. Other names include Capucine TubéreuseKnollige Kapuzinerkresse en Knolcapucien.
We saw Mashua Tubers in our local bio supermarket and we bought them, without having a clue how to prepare the tubers.

The leaves are supposed to taste like Indian Cress (same family) and the deep orange-red trumpet flowers will do very well in a salad. The leaves can also be turned into pesto or prepared like spinach. The tubers (vibrant yellow with an intriguing purple pattern) are often used in stews and soups. They can be eaten raw in a salad, grated or thinly sliced. Not our favourite. The taste is radish like, but sharper and not very elegant.
The taste and the texture of the cooked mashua tubers took us by surprise: delicate cocoa but not sweet, moist and with a pleasant structure thanks to the peel.

We combined our Mashua with chicken and shiitake, a combination that worked very well, although we must admit we were a bit overwhelmed by the Mashua!

Wine Pairing

A medium bodied, fruity, non-oaked red wine will go very well with the Mashua. A glass of Merlot perhaps?

What You Need

  • For the Mashua
    • 5 Mashua Tubers
    • Cumin
    • Shallot
    • Olive Oil
  • For the Chicken
    • 2 Organic Chicken Thighs
    • 50 grams of Shiitake
    • Olive Oil
    • Black Pepper

What You Do

Wash the mashua (don’t peel them) and cook for 5 minutes. Let cool. Slice the tubers lengthwise in two. Dry with kitchen paper. Peel the shallot, quarter and slice. Warm a small skillet. Add a generous amount of olive oil to the pan, glaze the shallot for a few minutes, add cumin (crushed seeds preferred) and then add the halved mashua. Leave for 30+ minutes until just a bit soft. Turn them occasionally to coat the roots with the flavours of the oil, the shallot and the cumin. No need to colour them. Add some extra cumin 5 minutes before serving.
In parallel, fry the chicken thighs and transfer to the oven (60 °C or 140 °F). Clean and slice the shiitake, add to the pan and fry. Add the chicken, allow to integrate. Add black pepper to taste.

  • Mashua ©cadwu
  • Mashua Cooked ©cadwu

Deviled Eggs with a Twist

Easy to make, tasty, and most people love them. You only need a few simple ingredients such as hard boiled (organic) eggs, mayonnaise, Dijon mustard, vinegar (or lemon juice) and black pepper. Sprinkle some paprika on top and they’re ready.

Alas, we’re not huge fans of paprika. Why would you ruin lovely ingredients like egg, mayonnaise and mustard by adding a spice that is at best a touch sweet and in most cases bland?

Paprika (powder) is made from dried red peppers and probably originates from Mexico. When it was brought to Europe, local versions were created, for instance a hot Hungarian version (essential when making goulash) and a smoked Spanish version (pimentón, key ingredient of chorizo and paella). Local peppers were used, including red bell pepper, and the flavours ranged from mild and sweet to hot. By the way, the term ‘deviled’ refers to the spiciness of the dish.
Unfortunately, nowadays factory produced paprika seems to be used for its red colour only.

We combine a bit of everything by adding roasted bell pepper. It adds depths, smokiness, complexity and flavour.

What You Need

  • 6 organic Eggs
  • Mayonnaise
  • Dijon Mustard
  • Lemon Juice
  • Red Bell Pepper
  • Black Pepper
  • Parsley (optional)

What You Do

Grill the bell pepper in your oven until nicely burned, perhaps 10 minutes. Transfer to a plastic container and close the lid. Wait a few hours before peeling the bell pepper. Use a sharp knife to mash the bell pepper. It’s fine if the mash has a bit of structure.
Boil the eggs and let cool. Slice the eggs lengthwise, remove the yolk. Use a fork to crumble the yolks (mimosa) and then combine with mayonnaise, mustard and mashed bell pepper. Add lemon juice and black pepper to taste. Remember the stuffing should be ‘devilish’. Add mixture to the egg whites. Decorating with parsley gives an extra twist to the deviled eggs.

Deviled Eggs ©cadwu
Deviled Eggs ©cadwu

Crostini

You don’t want to spend hours in the kitchen when serving drinks and you want to enjoy a warm appetizer (snack, finger food, quick nibble)? What to do? Of course: serve crostini! You can prepare them in advance and the only thing you need to do is put them under the grill for 3-5 minutes. A nice crunchy appetizer with a rich taste and intense aroma.

We use taleggio, a semi-soft cheese from Italy with a mild taste. It melts easily, so you need to keep an eye on your oven! If you can’t get hold of taleggio, then use mozzarella instead and add a bit more flavour to the mushroom topping.

What You Need

  • For the Mushroom Topping
    • Button Mushrooms and Shiitake
    • Garlic Cloves
    • Olive Oil
    • Thyme and Rosemary
    • Black Pepper
    • (Excellent) Olive Oil
  • For the Crostini
    • Old, stale Bread (Baguette preferred)
    • Garlic (optional)
    • Excellent Olive Oil
  • Taleggio

What You Do

One day before serving the crostini: clean and chop the mushrooms. Finely chop the rosemary, the thyme and the garlic. Fry the mushroom in olive oil in a heavy iron skillet. Reduce heat, add herbs and garlic. Continue on low heat for 10-15 minutes. Transfer the mushroom mix to a plate and let cool. Transfer to a kitchen aid and on low speed add some olive oil. Taste and add some black pepper. You’re looking for a coarsely chopped mixture, one that you can easily distribute over the crostini. Store in the refrigerator.

Also one day before serving the crostini: slice the bread and toast it. Halve a garlic clove, very gently rub the top of the toasted bread with the garlic and then brush with olive oil. An alternative is to preheat your oven to 180 °C or 350 °F, brush both sides with olive oil and bake until golden, 15 to 20 minutes. Perhaps you need to turn the slices over once. Store in a plastic container.

A few hours before serving the crostini: slice the taleggio (with crust!), top the bread with the mushroom mixture and then with a slice of cheese.

Set your oven to grill, transfer the crostini to the top of your oven, wait for a few minutes and serve immediately.

Crostini with Mushrooms and Taleggio ©cadwu

Salad of Small Artichokes

The season of artichokes varies depending on the variety and where you are based. In Italy it’s from mid-winter until early spring, in other countries from March to June, or September and October. And in other countries they peak in August. Best is to decide based on quality and price. An artichoke should feel heavy, look fresh and the leaves should be closed. If the leaves are wide open, the artichoke is older and it could be dry with lots of choke (the hairs) and dry inner leaves.

Don’t cook artichokes in boiling water. They must cook for 45+ minutes and during the long cooking process they will lose most of their flavour. Best is to steam artichokes.

Serve large artichokes as a relaxing starter or use them to make Artichoke Barigoule or a Pie. We use smaller ones to make a salad.  You can serve it to accompany an aperitif, or with some bread as a starter. Make sure you have plenty of dressing!

Wine Pairing

It’s not straightforward to pair artichokes with wine. According to various researchers this is due to cynarin, a chemical especially found in the leaves of the artichoke. When the wine and the cynarin meet in your mouth, the natural sweetness of the wine is enhanced, making it taste too sweet. So you have to pair freshly cooked or steamed artichokes with a bone-dry, crisp, unoaked white wine with clear, present acidity. For instance, Sauvignon Blanc, Grüner Veltliner or Albariño.
We enjoyed a glass of Château Pajzos Tokaj Furmint 2019. This dry, white wine made from the well-known Hungarian Furmint grape is fresh, clean and slightly floral. It supports the Salad of Artichokes beautifully.

What You Need

  • 6 small Artichokes
  • Olive Oil
  • Vinegar
  • Mayonnaise
  • Mustard
  • Garlic
  • Thyme
  • Black Pepper

What You Do

Remove the stem of the artichokes and steam the artichokes for 45 – 60 minutes, depending on the size. Remove and let cool. Peel of the first layers of the outer leaves. Make the dressing by turning the mustard and the crushed garlic into a smooth paste. Then gently add the other ingredients and whisk well to make it really smooth, thick dressing. Cut the artichokes in 6 or 8 parts. Add to the dressing, mix well, coating all artichokes. Sprinkle lots of thyme and mix again. Put in the refrigerator for at least 3 hours. Mix again, taste, add some more thyme and serve!

Mackerel Paté

A late afternoon, you’re in a rush, on your way to the supermarket, something to eat for dinner plus something to enjoy with crackers and a glass of white wine. That’s the moment to be tempted to buy ready-made tapenade, guacamole or fish paté. It’s easier, much quicker and you don’t need to worry about ingredients and recipes. Very true. On the other hand, we also know that most of these ready-made products contain far too much salt plus additives you simply don’t want to eat.

Making your own guacamole is simple, making your own mackerel paté is even simpler.

What You Need

  • 1 Smoked Mackerel Fillet
  • Greek Yoghurt
  • Mayonnaise
  • 5 Cornichons
  • Black Pepper
  • Lemon Juice

What You Do

If you use the brown fat of the mackerel, then your paté will be a touch bitter and you’ll still taste mackerel hours after you’ve eaten it. Therefore, we remove the brown fat and disgard it. Use a fork to divide the fillet in smaller chunks, remove any bones left. Add to a bowl. Thinly slice the cornichons. Add cornichons, a splash of lemon juice, black pepper, one small tablespoon of yoghurt and two small tablespoons of mayonnaise and mix, using a fork. Taste and adjust. Use cling foil to seal the bowl, transfer to the refrigerator and let cool. Serve with thinly sliced bread or crackers.

Mackarel Paté ©cadwu