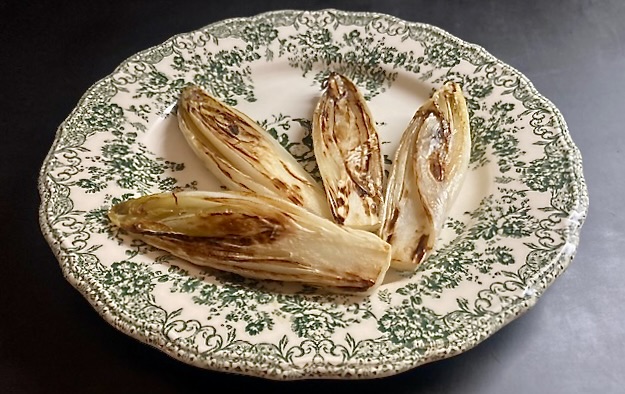
Tortang Talong

Perhaps you wonder what kind of fish we prepared for this post. Well, actually, it’s Tortang Talong, a Philippine dish made with charred eggplant. Earlier this year we made banana ketchup and the idea was to serve it with Tortang Talong, but we couldn’t find the right eggplants. For Tortang Talong you need long, purple, slender eggplants, known as Chinese or Japanse eggplants. They not only look different from the oblong eggplant, their taste is slightly sweeter and softer. The shape is key to a moist and homogenous result.

Thanks Monch Weller for introducing us to the delectable sauce and the very tasty Tortang Talong!

Food Pairing

Serve Tortang Talong with banana ketchup as a starter. We could also imagine it as a side dish with fried vegetables, rice and perhaps chicken.

What You Need
  • 2 Chinese or Japanese Eggplants
  • 1 Egg
  • Black Pepper
  • (optional) Salt
  • Oil
What You Do
  1. Grill the eggplants for 5-10 minutes using the wire rack, following the instructions of your oven
  2. Flip and grill for another 5-10 minutes or until charred
  3. Let cool
  4. Peel of the skin
  5. Use a fork to flatten the eggplants
  6. Combine egg, salt (if using) and pepper
  7. Beat the mixture well
  8. Heat a heavy iron skillet
  9. Add oil to the skillet
  10. Dip the eggplant in the mixture
  11. Fry the eggplant
  12. Flip and use a brush to coat the top with the egg mixture
  13. Repeat step 12, two or three times

Eggplant Omelette

Having made Banana Ketchup, we were keen to explore what kind of food would combine well with it. Monch Weller wrote us: It’s often paired with fried food here in the Philippines – spring rolls (both meat and vegetable versions), fried chicken, and eggplant omelette.
The ketchup paired nicely with vegetarian rolls, but not as well as hot sweet and sour sauce.
We decided to make an eggplant omelette, known as Tortang Talong in the Philippines. The eggplant is grilled, peeled, flattened, dipped in an egg mixture and fried in oil. The outside crispy and brown, the inside soft and moist. Best to use the long and slender purple variety, for instance Chinese or Japanese eggplant.
Our eggplant was a standard eggplant, large and oblong. Very different in size and shape compared to the one used in the Philippines. We were not sure how we could turn our eggplant into Tortang Talong. Slice it? Fan it? Or mash it and add the eggplant to the egg mixture?

What You Need
  • 1 regular or Italian Eggplant
  • 2 Eggs
  • Small Garlic Clove
  • Black Pepper
  • (optional) Salt
  • Oil
What You Do
  1. Heat your oven to 230°C or 450°F
  2. Poke the eggplant with a fork. This allows for steam to escape
  3. Place the eggplant on lightly oiled aluminium foil
  4. Roast the eggplant for 30-40 minutes, depending on the size
  5. Let cool
  6. Peel of the skin
  7. Mash the eggplant, but not too much
  8. Combine eggs, salt (if using) and pepper
  9. Beat the mixture well
  10. Add the mashed eggplant. We used 2/3 of our eggplant. Combine
  11. Add grated garlic and mix again
  12. Add oil to a small skillet, set to medium heat
  13. Add the mixture and fry until brown
  14. Flip the omelette and fry the other side until brown
  15. Slice the omelette and serve immediately
  16. Serve with banana ketchup
PS

When we can buy a long slender eggplant, we will prepare the original Tortang Talong. To be continued!

Banana Ketchup

A few weeks ago we were reading Monch Wellers food and lifestyle blog. He writes about Via Mare, a Filipino restaurant that opened its doors 50 years ago. In his blog Monch writes about the food Via Mare offers, for instance Spanish Hot Chocolate, Bibingka (rice cake), Crab Omelette with Banana Ketchup, Lumpiang Ubod (spring rolls made with heart of palm) and Puto Bumbong, a glutinous rice dyed violet and steamed in bamboo tubes. We learn so much about the Filipino food culture thanks to Monchs excellent blog!

Why Bananas?

Maria Orosa (1893–1945) was born in the Philippian province of Batangas, some 100 kilometres south of Manilla. She studied food chemistry and pharmacology in the US. She returned to the Philippines in 1922. She was a food chemist, innovator and war hero. She saw the potential of many local products, for instance bananas and soy, and used these to empower the Philippines. She invented Soyalac (a protein-rich powdered soybean product), Darák (bran rice powder rich in vitamins) and Tiki-Tiki cookies. The powders and cookies saved many lives during wartime food shortages in the Philippines.
One of her more frivolous inventions is Banana Ketchup. Why rely on imported tomatoes when it’s possible to make an equally tasty condiment using local bananas?

We loved the philosophy behind the ketchup and began searching for recipes. We noticed that tomato paste is often added, to give the ketchup a more familiar and appetizing colour. We didn’t do this. Afterall, the idea was not to use tomatoes. Plus: what’s wrong with the colour?

Food Pairing

The Banana Ketchup is smooth, its taste long, tangy, spicy and uplifting. The bananas give the ketchup natural sweetness and depth. They also support the spices. A condiment to love.
We asked Monch for his favourite combination. He wrote us: It’s often paired with fried food here in the Philippines – spring rolls (both meat and vegetable versions), fried chicken, and eggplant omelette (which was No. 2 in TasteAtlas’ 50 Best Egg Dishes). We tried it with eggplant omelette and vegetable spring rolls. The ketchup paired perfectly with the moist and more delicate flavours of the omelette.
Thanks Monch for introducing us to this unknown, delectable sauce!

What You Need
  • 2 small ripe Bananas
  • ½ Shallot
  • 2 cloves of Garlic
  • 20 grams fresh Ginger
  • ½ Kashimiri Pepper
  • 1/8 cup Brown Sugar
  • ¼ cup Rice Vinegar
  • ¼ cup Water
  • ¼ teaspoon Turmeric
  • Dash of Cinnamon and Nutmeg plus 1 Clove (replacing dash of All Spice)
  • Oil
What You Do
  1. Chop onion, garlic and ginger
  2. Mash the bananas
  3. Heat oil in a heavy iron skillet
  4. Add chopped onion and glaze, about 5 minutes
  5. Add garlic and ginger
  6. Leave on medium heat, stirring constantly
  7. Add bananas and combine
  8. After a few minutes add vinegar, water, sugar, spices and Kashmiri pepper
  9. When the mixture begins to simmer, reduce heat to low
  10. Leave for 15-20 minutes, stir regularly
  11. Remove from heat and let cool for 10 minutes
  12. Transfer to a food processor and blend until smooth. This may take one or two minutes
  13. Pass through a sieve to get the right velvety smoothness
  14. Leave to cool before transferring the ketchup to the refrigerator
  15. Serve with eggplant omelette (recipe next week!)
  16. The ketchup will remain tasty for up to 3 days.
PS

In general, we find tomato ketchup too sweet, too salty and bland. Have we ever considered making our own tomato ketchup? No, we haven’t. We’re okay with a small bottle of Heinz Tomato Ketchup Zero, in case we have an irresistible craving for ketchup. Heinz doesn’t add sugar and salt to the Zero Ketchup. They add more tomatoes than usual (great) and a sweetener (pity). The taste? Well, still typically tomato ketchup. Fortunately, Banana Ketchup has far more flavour, spiciness and complexity.

Satureja or Savory

The traditional way of eating Fava Beans in the Netherlands is by combining them with an herb called ‘bonenkruid’. The name isn’t very helpful, it translates into ‘bean herb’, so it’s ‘beans with bean herb’. The tradition is based on the idea that the herb would help your body digest the fava beans and that it would compensate for the bitterness of the inner skin of the beans.

Given its name we didn’t pay too much attention to ‘bean herb’, until we saw it in France, where it’s called ‘sarriette’. In English it’s ‘satureja’ or ‘savory’. It turns out to be a very tasty herb, related to rosemary and thyme. It is one of the main herbs in Herbes de Provence, together with marjoram, rosemary, thyme, and oregano.

Its history goes back to Roman times, when it was one of the main ingredients of Garum (or Liquamen), the fermented fish sauce that was used to flavour food. Amongst the herbs used in garum are cilantro, dill, fennel, celery, mint, thyme, oregano and clary sage. The Romans also used satureja as an aphrodisiac.

In her book Van Soeter Cokene Professor Van Winter describes a recipe from 1430 for Crustade, a pie with veal, various herbs (satureja, sage, parsley, hyssop) and spices such as cinnamon, saffron, cloves and mace. According to Van Winter one of the first recipes to combine (green) herbs with spices.

Our ‘bonenkruid’ has much more potential than we expected!
We decided to combine it with slowly baked waxy potatoes. They will be very crunchy on the outside and soft on the inside. The satureja makes it into a very light, uplifting side dish, great with Coq au Vin or a hearty stew.

What You Need
  • Waxy Potatoes
  • Satureja
  • Olive Oil
  • Butter
  • (optional) Black Pepper
What You Do
  1. Peel the potatoes, wash and cook until not yet done
  2. Let cool
  3. Heat a heavy iron pan
  4. Add butter and olive oil
  5. Chop the satureja
  6. Slice the potatoes, not too thin, add to the pan and fry on medium heat
  7. Turn the slices every one or two minutes. The potatoes should become very crispy, a touch golden but not brown
  8. When ready to serve, add ¾ of the satureja and mix
  9. Add black pepper (if using)
  10. Serve and add the remainder of the satureja
PS

Making your own garum is perhaps not the most obvious thing to do. We made it once, many years ago. It turned out to be a very tasty and subtle condiment, despite the fairly present aroma.

Satureja ©cadwu
Satureja ©cadwu

Field Peas

Field Peas (Pisum sativum subsp. Arvense, Austrian winter pea, Kapucijner in Dutch or Blaue Speiseerbse in German) are well known as dried or canned peas. Typical winter-food. The season for fresh Field Peas is relatively short (6 weeks in June and July) so we were happy to buy them earlier this week, for a reasonable price. Last year they were incredibly expensive because of a very poor harvest. Ask your greengrocer for Field Peas and explore another forgotten vegetable. One that has been around for over 7000 years!

Fresh Field Peas are tasty, sometimes a bit dry and should be eaten young. Best is to combine them with rich flavours and butter or oil. We could imagine adding Satureja to a dish with Field Peas. We combined the peas with bacon and served them with Boudin Blanc and mustard.

Wine Pairing

A not too complex red wine will be great with the rich flavours of this dish. We enjoyed a glass of Rioja made by Campo Viejo. The wine is made with tempranillo grapes. It’s an aromatic, fairly bold, dry red wine with pleasant tannins. 

What You Need
  • 500 grams of fresh Field Peas
  • Olive Oil
  • 100 grams of Bacon
  • Black Pepper
  • (optional) Boudin Blanc and French mustard
What You Do
  1. Shell the peas
  2. Cook or steam the peas 5 minutes or until al dente
  3. Drain and let cool
  4. Add olive oil to a warm heavy iron skillet
  5. Add peas and bacon to the pan and fry on medium heat for 10 minutes
  6. Stir to combine the flavours
  7. In parallel fry the boudin blanc
  8. Add black pepper and serve with French mustard
A dish with fresh Field Peas, Bacon and Boudin Blanc ©cadwu
Fresh Field Peas ©cadwu

Zucchini with Taleggio

Zucchini, or courgette, is a favourite summer vegetable. Just think about sliced Trombetta’s, or Stuffed Flowers, or a combination with Farfalle and Fennel. Recently we bought beautiful round zucchinis, ideal to stuff and serve as a side dish. We’ve made these many times, with herbs like rosemary, thyme, oregano and Parmesan cheese. Tasty and not difficult to make. However, we think there’s room for improvement. How would it taste if we would use a richer, fatter, more aromatic cheese? We looked in the fridge. Perhaps Appenzeller? Or a traditional Dutch cheese? We decided to use Tallegio, a semi-soft cheese from Italy made from raw cow milk, with a mild taste. It melts easily, which makes it very suitable for this dish and for instance crostini.

Wine Pairing

The zucchini will be a great accompaniment with grilled lamb or chicken. You could also combine the zucchini with pasta or rice, making for a vegetarian meal.
We decided to drink a glass of red wine from the Douro region, produced by Quinta do Crasto. The wine is made from traditional Douro red grape varieties: tinta roriztouriga nacionaltinta barroca and touriga franca. The wine is fresh, fruity and very pleasant. Its colour is deep ruby and the wine has aromas of ripe red fruit.
In general, we suggest a red wine with flavours and aromas of red fruit and with light tannins.

What You Need
  • 2 round Zucchinis
  • One Garlic Clove
  • Thyme
  • Black Pepper
  • Taleggio
  • Olive Oil
What You Do
  1. Remove the top of the zucchinis
  2. Preheat your oven to 180 °C or 355 °F
  3. Use a teaspoon to remove the inside of the zucchini, also of the cap. Be careful not to damage the skin of the zucchini
  4. Use a knife to chop the ‘meat’
  5. Add olive oil to a pan
  6. When warm, add the meat and fry/glaze for a few minutes
  7. Finely chop the garlic and add to the pan
  8. Finely chop the thyme
  9. Add thyme and black pepper. Mix and leave on low/medium heat for a few minutes
  10. Let cool
  11. Fill the bottom half of the zucchini with the mixture
  12. Add a slice of taleggio
  13. Fill the zucchini with the mixture
  14. Add a second slice of taleggio on top
  15. Transfer the stuffed zucchinis and the tops to the oven and fry for 15 minutes or until golden
  16. Serve with the top on the zucchini
PS

The winemaker, Quinta Do Crasto, provides excellent background information. Interesting to read about the weather, the harvest, the production and the timing.

Zucchini with Taleggio ©cadwu

Tuberous Chervil

Earlier we wrote about mashua and oca, two forgotten vegetables. This week we enjoyed tuberous chervil, another forgotten vegetable, also known as turnip chervil and bulbous chervil. Popular throughout continental Europe in the 19th century, but now hard to find. The tubers we bought had a length of approximately 4 cm and a thickness of 2 cm. They are white on the inside. The tuberous chervil is very tasty, easy to prepare, and its flavour will make you think of chestnuts, without a hint of bitterness.
As more often, these winter vegetables were replaced by potatoes: cheaper, easier to handle and easier to grow.
The ‘chervil’ in the name does not mean it’s the tuber of the chervil plant (like parsley and parsley root are related). It’s included because the leaves of tuberous chervil (see picture below) look like the leaves of chervil. The two are not at all related.
According to some sources tuberous chervil can be eaten raw. We tried it, of course, and yes, edible, but not great. We prefer to turn the tubers into a purée, with cream, butter and nutmeg. We combined the purée with lamb chops and with scallops. The second combination didn’t work, as if bringing the two together diminished the individual flavours. The first combination was delicious, the sweetness of the meat with the chestnut flavour, the freshness of the puree with the fatty lamb.

Wine Pairing

We enjoyed a glass of red wine from the Bordeaux region with our purée and lamb, produced by Château Picon. A very nice, affordable wine, with some dark fruit and acidity. In general, we suggest a not too complex red wine, made with for instance cabernet sauvignon and/or merlot grapes.

What You Need
  • 250 grams of Tuberous Chervil
  • Butter
  • Cream
  • Nutmeg
  • Black Pepper
What You Do

If the tuberous chervil are young and fresh, you don’t need to peel them. The ones we bought were a bit older, so we peeled them. Wash and cook for 5-10 minutes until soft. Drain. Mash using a fork, add butter and cream. Use a spoon to make the purée. The tubers love both, so you will probably need to add a bit more than expected. Keep warm on low heat, add black pepper and freshly grated nutmeg to taste. Quickly fry the lamb chops, add lots of herbes de Provence or a combination of thyme and oregano and serve with the purée.

Smoked Salmon and Egg Salad

The joy of preparing food together, the joy of eating tasty and simple food, the joy of sharing. It’s one of the themes of Together: Our Community Kitchen, our suggestion for this year’s Christmas cookery book. It was written by a group of residents, gathering in the aftermath of the Grenfell Tower fire in London. They began cooking food for their families, friends and neighbours. Food that helped restore hope and provided a sense of home.

The recipe for this tasty salad is simple, quick and fun to make. It is rich, with warm flavours, a bold structure and of course lots of salmon. The egg yolks are set, but only just, adding to the great mouthfeel. Take some crusted bread, put the salad on top of it, perhaps a bit extra?, and enjoy!

Wine Pairing

A glass of dry sparkling wine will be great. A glass of Sauvignon Blanc or Chardonnay will also fine, as long as the wine is acidic enough to balance the fat from the fish and the egg. We enjoyed a glass of Sicilian white wine made by Baglio di Grìsi with the local grillo-grape. This full-bodied wine has the right level of acidity and minerality. Excellent with the salmon and the egg.

What you need
  • 2 Organic (or Demeter) Eggs
  • 100 grams organic Smoked Salmon
  • Chives
  • Mayonnaise
  • Crème Fraîche
  • Mustard
  • Lemon
  • Black pepper
What You Do

Boil the eggs until slightly set. Peel and let cool. Coarsely slice the salmon. Same with the eggs. Chop the chives. Combine one tablespoon of mayonnaise, 2 teaspoons of crème fraîche, 1 teaspoon of mustard, chives, a few drops of lemon and black pepper. Add the salmon and combine. Add the egg and gently combine. Now it’s a matter of tasting. Perhaps you want to add more mayonnaise, crème fraîche or lemon. Let cool and serve with crusted bread.

We wish you a wonderful 2025 with lots of culinary adventures!
Mr. Cook and Mr. Drink

Burdock

Wintery weather in Amsterdam, cold and sunny. Time to enjoy some seasonal vegetables, such as beet root, fennel, leek, kale, turnips and Brussels sprouts. Our favourite vegetable and fruit stall on the market sells Burdock. We all know about forgotten vegetables (such as rutabaga, kohlrabi, parsnips and Jerusalem artichoke), but Burdock is not one of them. It’s an ignored vegetable.
According to chef Alan Bergo in his excellent book The Forager Chef’s Book of Flora, Burdock root is delicious with a mild and slightly nutty flavour. Native in Europe and Asia, and introduced worldwide. He offers six recipes with Burdock, using the flower stalks in summer and the root in winter. One of the recipes is for Kinpira Gobō, a common side dish in Japan in which Burdock is combined with carrots, lotus root, mirin and sesame seeds. All his Burdock-dishes look delicious. Which raises the question why we don’t eat Burdock more often. 
We prepare a Japanese dish called Ume Gobō (ごぼうの梅煮) which translates to Burdock with Plums, which is basically what it is.
We served our Ume Gobō with Tamagoyaki, which turned out to be a very tasty, uplifting combination.

Wine Pairing

We enjoyed a glass of Crémant d’Alsace, produced by Arthur Metz. A very pleasant dry sparkling wine, with hints of apple, almonds and peach. Excellent combination with the Ume Gobō and the Tamagoyaki. In general, we suggest a not too complex unoaked white wine.

What You Need
  • 250 ml of Dashi
  • 1 Burdock Root
  • 3 salted Plums
  • 2 teaspoons of Mirin
  • 2 teaspoons of light, reduced sodium Soy Sauce
What You Do

Wash the burdock to remove the dirt. If necessary use a knife. Trim off the ends. Warm the dashi and slice the root in 5 cm long chunks. Quarter these lengthwise. If the root is thick, slice again. Transfer the chunks immediately to the dashi to stop the root from discolouring. Remove the pits of the plums and add one plum to the dashi. Use a cartouche to cover the vegetables. Leave to simmer for approximately one hour. By then all the liquid should be evaporated and the vegetables relatively soft. You could cook it longer if you prefer them really soft. Keep an eye on the pan, you may have to add some extra dashi.
Finely chop the remaining plums and add the paste-like substance to a bowl with mirin and soy sauce. Mix. When the burdock is lukewarm, it’s time to add the chunks to the bowl and mix.

Burdock with Salted Plums ©cadwu

Cordyceps

Bright orange mushrooms that look like spaetzle? Interesting. We pick one up and look carefully: a long stem but without a cap with spores. Odd. We ask if they are edible, and the obvious answer is “yes”. We buy 100 grams and decide to look for details and recipes in our mushroom cookery books when at home.
Hm. No mention of Cordyceps. We visit the Forager Chef (Alan Bergo) and read about the background of the Cordyceps (or better: Ophiocordyceps). Parasite mushroom, infects insects, controls them, takes over, kills and then sprouts a fruiting body from their head. The fruit we just bought…
Fortunately, the Cordyceps we bought are grown on substrates that are not made of insects, which make them less scary. Normally when we find a new mushroom on the market, we taste it raw, but not today.
We quickly wash our hands and watch this BBC video as suggested by Chef Bergo. Interesting, but we prefer the culinary aspects of mushrooms.

Use

In traditional Chinese medicine dried and powdered cordyceps are used. Today it is considered to be superfood, supposedly boosting your vitality and endurance. Fresh cordyceps are used in Chinese soups and hot pots. Chef Bergo uses them in a dish with linguini. He writes: “The cordyceps weren’t mind blowing, but they definitely weren’t bad”.
We decide to make an Asia-inspired salad, with stir fried cordyceps, obviously. The salad tasted great. It was nutty, mild, fresh and the texture of the mushrooms worked beautifully with the crunchy radishes. 

Wine Pairing

Best to drink a white wine with a touch of oak, perhaps a chardonnay. We tried something different, a wine made with a grape called Bouquet 1359. The wine is produced by French winery Abbotts & Delaunay. The grape was developed by Alain Bouquet. It is somewhat similar to the chardonnay grape but more resistant and easier to use in an ecologic environment. It comes with aromas of brioche and yellow fruit; the taste is fresh, long and slightly nutty. 

What You Need
  • 100 grams Cordyceps
  • 1 Scallion
  • Bok Choy
  • White Radishes or Daikon
  • Walnut Oil
  • Jerez Vinegar
  • Light Soy Sauce (we used Tsuyu)
  • French Mustard
  • Olive Oil
What You Do

Clean the mushrooms if necessary. Cook radishes or daikon for 4 minutes in boiling water. Let cool quickly and slice or quarter. Finely slice one or two bok choy stems, depending on the size. Heat a skillet, add some olive oil and fry the mushrooms. After 1 minute add the sliced bok choy and the pre-cooked radishes. Toss, leave for 1 or 2 minutes and allow to cool. Transfer to the refrigerator. When ready to serve, make a dressing by combining walnut oil, soy sauce, Jerez vinegar and a touch of mustard. The mustard will emulsify the dressing. Taste and adjust. Happy? Then add the dressing to the salad, mix and serve as a side dish or small appetizer.

Inspiration

If you’re into video games you will have recognised cordyceps as inspiration of the action-adventure game The Last of Us, which was the inspiration for the American post-apocalyptic drama television series with the same tittle and produced by HBO.
The 2016 movie The Girl with All the Gifts was also inspired by cordyceps. Two Pokémon species are also based on Ophiocordyceps.

Nasty Details

A few days later we opened Merlin Sheldrake’s impressive book Entangled Life. He explains that the fungus doesn’t turn the insects into zombies but controls it like a puppeteer master. He describes how a specific species of Ophiocordyceps is focused on giant ants. The fungus infects the ant and from that moment on it controls the insect. In the end 40% of the body weight of the ant is mycelium (the network created by the fungus). Through the mycelium the fungus controls the ant. When the Ophiocordyceps is ready to propagate, it steers the ant to a height of approximately 25 cm, ideal for the fungus and its spores. The ant then bites into the main vein of a leaf and locks its jaws. The ant is now in an ideal position for the fungus. This is the moment the fungus kills the ant and the fruit begins to grow.
Very pleased our cordyceps were grown on a substrate of grains!

PS

More mushroom recipes on our mushroom page.