Apricot Chutney

One For The Cupboard

Something you have to have in your cupboard (or refrigerator in our case): chutney. Why? Because once in a while you don’t feel like making a sauce when you eat duck, rib eye or grilled lamb chops. Or because you want to eat something nice, simple and vegetarian, like rice with lentils and, there we are, chutney.
If there would be a top three of main ingredients for chutney it would read mango-tomato-apricot. The basic recipe is the same for all three; it’s a matter of adjusting the quantities and choosing the spices.
Chutney needs to integrate, much more than jam or marmalade. So cook it for an hour or so and leave it in a jar for at least a week before using it. The fact that it needs to integrate will create a hopefully nice surprise when opening the jar. If not, there is little you can do (eat more quickly, give a jar to a not too close friend et cetera).
We use just a bit of sugar so our chutney needs to be stored in the refrigerator. Too much sugar (200 grams on 1 kilo of mango for instance) will only hide the taste of the mango. Chutney is a balance of sweet (fresh fruit, onion, garlic, cinnamon), sour (vinegar), bitter (the skin of the apricot or tomato), spiciness (ginger, red chilli, garlic) and depth (cardamom, nutmeg, cumin). Too much sugar will only disturb the balance. Cooking is about pairing tastes and textures, not about creating a simple, one-dimensional product.
Why would we make apricot chutney if it’s our number 3? Simple: we like the touch of bitterness that comes with the apricot.
When making mango chutney, try using unripe mangos. The chutney will be much tastier and complex!

What You Need

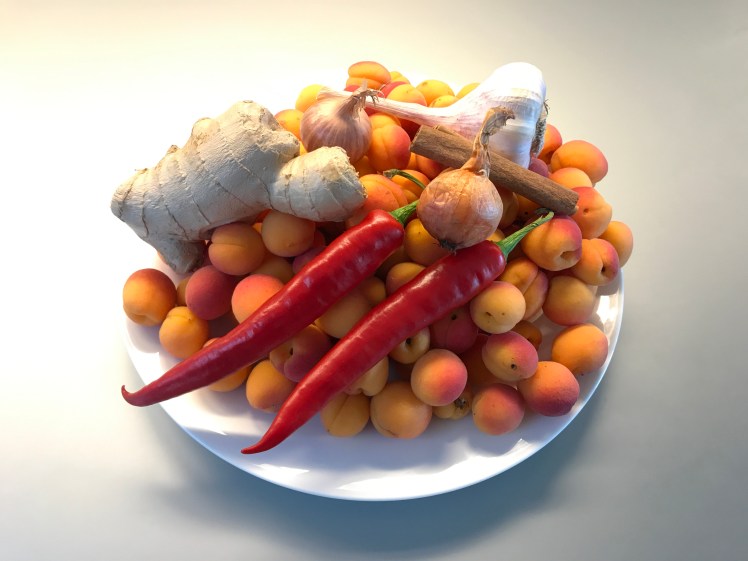
  • 1 kilo stoned Apricots (meaning 1,25 kilo of Apricots)
  • 2 Shallots
  • Olive Oil
  • 2+2 gloves Fresh and Cooked Garlic
  • 1 Red Chilli
  • 100 ml Vinegar
  • 100 ml Water
  • 50 grams of Sugar
  • Fresh Ginger
  • Spices such as
    • Cardamom
    • Mustard Seed
    • Coriander
    • Cinnamon
    • Nutmeg
    • Cumin

What You Do

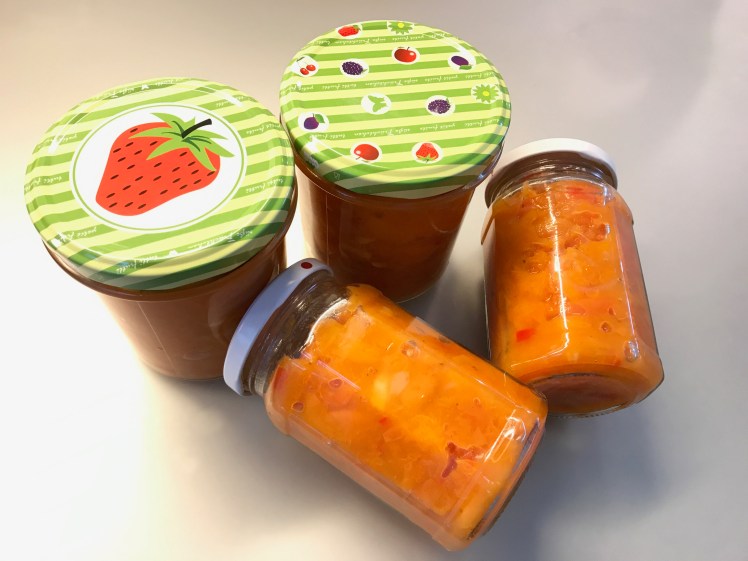
Stone and quarter the apricots. Cut the shallots in 4 and slice (not too thin). Slice the fresh garlic. Same with the seeded red chilli. Cut let’s say 5 cm of ginger in small bits. Start by glazing the shallots for 10 minutes in olive oil, making sure they will enhance the sweetness of the chutney. Then add all other ingredients to the pan, mix, add the grated ginger, the spices of your choice, mix and bring slowly to a simmer. We used vinegar and water given the acidity of our apricots. If your apricots are really sweet and ripe use 200 ml of vinegar. Spices wise we prefer using cardamom, cinnamon, and a touch of cumin and nutmeg. Leave to simmer for at least one hour. Stir occasionally but gently. After an hour increase the heat and transfer to very, very clean glass jars. Close the jars, leave them to cool a bit, then put in cold water and later on transfer to the refrigerator.


Duck Breast with a Green Pepper Corn Sauce

Ignore The Obvious

Duck is often combined with a sweet ingredient. Think fruit (orange, clementine, apple and even peach), with honey, Port Wine or Marsala. All these combinations make sense because the idea is to relate to the taste of the duck. In this case we ignore the obvious and combine it with a green pepper corn sauce. The thyme is the bridge between the duck and the sauce. The garlic brings a touch of sweetness to the sauce. The combination works beautifully!
Green pepper corn is available dried and in brine. We prefer the brine version because it integrates better with the other ingredients of the sauce. The dried corns work well after leaving them in a nice vinegar for 24 – 48 hours.

Wine Pairing

A simple Bordeaux wine will work very well. But Syrah, with its hint of spiciness, will be the perfect wine with this dish. If available go for an Australian Syrah because of the full-bodied character.

What You Need

  • 2 small Breasts of Duck or 1 large one
  • Thyme
  • Chicken stock
  • Garlic
  • Single or Double Cream
  • Green Pepper Corn in Brine (slightly crunched)
  • Mustard

What You Do

Check the breast of duck for remainders of feathers. Remove the vein on the meat side of the breast (and the odd membrane you don’t like). Cut the skin (not the meat!) in a crosshatch pattern, let’s say 1-2 centimeter apart. Doing this helps the fat render and it will give a crispy result. Put thyme in the pattern. Put on a dish, cover and transfer to the fridge. Leave in the fridge for a few hours, making sure it’s nice, firm and cold.
Fry the duck in a hot, non-sticky skillet for 10-12 minutes on the skin side. Reduce the heat after a few minutes. You don’t need oil or butter, the duck fat will do the trick. Now fry for 2-3 minute on the meat side and remove. Cover with aluminum foil is such a way that the crispy skin is not covered. The foil should only cover meat.
Remove most of the fat from the pan, but not all. Add chicken stock, garlic and thyme. Stir and add the crunched green pepper. We like their taste so we tend to add quite a few. Now start building the sauce by adding juices from the duck. Maybe you want to add a bit of mustard. This will not only add complexity to the sauce, it will also make it thicker. Add the cream but please remember that cream needs a few minutes to integrate in the sauce. If you add cream last-minute, you will, indeed, taste cream.
After 10 – 15 minutes it’s time to carve the duck. Make sure to add all the juices to the sauce. Cut the duck in slices (we like fairly big slices, you may prefer thinner ones) and place these on top of the sauce when serving.
If you have a bit of extra time, pass the sauce through a sieve, removing the thyme and other bits, before adding the green pepper.

Grilled Swordfish with a Spicy Tomato Sauce

Red List

Before we start cooking, be aware that Swordfish is on the Greenpeace red list, so try to find the origin of your swordfish. Having done that assess the quality of the swordfish. No doubt it was frozen, so an extra reason to look carefully and smell. As always: if fish smells like fish, then don’t buy it.
If swordfish looks it has been pre-prepared (sometimes salt or smoke are used) or the flesh is not transparent: don’t buy it. For some reason you need to be extra critical when buying swordfish. But once you’ve found good, fresh swordfish, you have found yourself a great starter.
Also note that swordfish is a predator. Some organisations mention the risk of mercury when eating swordfish, so don’t eat it too often we would say.

If you scan the various recipes for swordfish, you will notice the massive use of marinades. We would not suggest using a marinade when preparing swordfish. The fish has a delicate, slightly sweet taste, which begs for a clever combination, not for a taste bomb like a marinade.
Often the fish is brushed with a mixture of oil and lemon. Sorry, wrong idea. Lemon is probably used to hide a fishy taste (in which case you shouldn’t have bought the fish). The lemon juice will burn when grilling because of the sugar in the juice, so your grilled stake will not just be grilled, it will also show traces of burned sugar. Not tasty, not healthy, not pleasant.
There are only three things you need to do pre grilling swordfish: prepare your tomato sauce, transfer the steak 30 minutes prior to grilling from the fridge to a plate and brush generously with a decent olive oil.

Wine Pairing

We enjoyed our grilled swordfish with a glass of Radacini from the Codru region in Moldova. The wine is made from chardonnay grapes and comes with a beautiful yellow colour. It made us think of apricots and maybe a touch of vanilla. It is not oaked, which is an exception for chardonnay. A wine with a round, velvety taste, but also fresh and fruity. The mouth feel is coating. The velvety aspect goes really well with the fish and the fruitiness is a great combination with the sweetness of the sauce. As an alternative go for an un-oaked, fruit-forward chardonnay.

What You Need

  • Steak of Swordfish
  • Olive Oil
  • Shallot
  • Chilli
  • Red Bell Pepper
  • 2 Garlic gloves
  • 2 Anchovies fillets
  • 2 Tomatoes
  • Bouquet Garni (Sage, Thyme, Rosemary, Parsley)
  • Capers (in brine)

What You Do

Start by slicing the shallot and glaze it gently in olive oil. Cut half of the bell pepper and the chilli in smaller chunks and add to the pan. Stir and then add the garlic. Cut the tomatoes in quarters, add the tomato meat to the sauce and press the remainder through a sieve, making sure you get all the lovely juices. Add the juice to the sauce. Add the bouquet garni and the anchovies. Leave on small heat for two hours.
Remove the bouquet garni, blender the sauce very well and make sure it is a spicy combination of tomatoes and a touch of bell pepper.
Brush the steak generously with olive oil, heat your grill (we use a Le Creuset pan, see picture) and grill for maybe 8 minutes. The meat of swordfish is firm and needs longer than you would expect when grilling fish.
Serve the fish on a hot plate with the tomato sauce. The capers are crucial; they add a bit of acidity, which works really well with the spiciness of the sauce and the gentle sweetness of both the fish and the tomatoes.

PS In case your swordfish looks great but is from the wrong region according to Greenpeace, simply buy the fish, enjoy eating it and donate some money to Greenpeace.


Haddock with Shiitake

One of the Most Popular Fish

Well known of course as one of the most popular fish used for Fish and Chips. And when you mention Haddock, Cod is never far away. According to many recipes and foodies the two are very similar in terms of taste and way to prepare.
That’s where we disagree. We think Haddock has a much more delicate taste compared to Cod. Plus its structure is more compact. When frying Cod it’s not difficult to see and feel what the cuison is. The compact structure of Haddock implies that you have to test the cuison in a different way. Frying haddock requires your constant attention.

Shiitake is more and more widely available, which is great! The nutty taste with the firm structure makes them ideal for this dish. Powerful but not overwhelming. The classic White Mushroom (or the chestnut coloured variation) will not do the trick; too soft and not sufficiently intense. The Shiitake brings umami to the dish.

The white wine sauce is actually enriched with Classic Dry Noilly Prat, our favourite vermouth. Why favourite? Because Noilly Prat comes with a touch of bitterness, with umami, bringing the sauce and the Shiitake together. The vermouth is made with a number of botanicals, including chamomile. The white wine will bring acidity, but the dish also requires a hint of sweetness. The vermouth will enhance the natural sweetness of the Haddock. We use fish stock to create the sauce, obviously. Spend some money on buying a jar of excellent stock (or make your own).

So on your plate you have an intriguing combination of fish and mushrooms, with all five tastes represented. Nice isn’t it?

Wine Pairing

Our choice was a bottle of Pinot Grigio made by MezzaCorona. This is a dry and crispy wine with a beautiful deep yellow colour. It’s an elegant wine with just the right acidity to relate to both the fish and the sauce. The producer mentions hints of chamomile.

What You Need

  • 200 grams of Haddock (without the skin)
  • 100 gram of Shiitake
  • Shallot
  • Parsley
  • Butter
  • Olive Oil
  • Fish Stock
  • Noilly Prat
  • Dry White wine
  • White pepper

What You Do

Start by cutting the shallot. Fry gently in butter for a few minutes. Clean the Shiitake with kitchen paper and slice. Check the fish for bits you don’t want to eat. Add wine and Noilly Prat to the shallots and let the alcohol evaporate. Then add parsley and some fish stock. Leave for a few minutes and taste. Maybe add a bit more vermouth or fish stock. Be careful with the white wine. In parallel fry the fish in butter and olive oil. Both sides should be beautiful golden brown. Gently fry the shiitake in olive oil. When not yet completely ready (check the flexibility, feel how warm the fish is) transfer the fish to a sheet of aluminium foil. Don’t close it; you only want to keep it warm. Pass the sauce through a sieve and be ready to blender the sauce. Add all juices from the two pans and from the aluminium wrapping. Blend the liquid. You could add a small chunk of ice-cold butter to thicken the sauce. We didn’t.
Serve the fish on top of the sauce and add the shiitake. Perhaps a touch of white pepper.

Panna Cotta

Such a lovely and simple dessert! Provided of course it’s made the right way. So no milk, no yoghurt, no cream cheese, no whipped cream and most certainly no whipped egg white! Just cream. Cooked Cream. And preferably cream with lots of fat because then you will need less gelatine.
You can serve the panna cotta after a few hours (or the next day) with a rich strawberry or raspberry sauce, but we prefer to enjoy the panna cotta with a bit of candied orange zest, simply because we want to balance the sweetness and richness of the panna cotta with the acidity and bitterness of the orange. Home made is preferred, see the recipe for an Orange Flan.

What You Need (For 4)

  • 500 ml fresh Cream
  • 3,5 leaves of Gelatine (5,25 grams)
  • 1 Vanilla Bean
  • 25 gram Sugar
  • Candied Orange

What You Do

The recipe is for 4 panna cotta (actually should we say 4 panne cotte).
Slowly bring the cream to the boil. Add the seeds of the vanilla but also add the remainder of the bean. Now keep close to boiling for 15 minutes. Stir when necessary. Remove from the heat and while stirring add the sugar until totally resolved. Now pass through a sieve to make sure you remove all the bits you don’t want. Follow the instruction of the gelatine and add the leaves. Stir well until homogeneous. Cool the liquid somewhat before filling the forms. We used a silicone mold. Nice and easy! The only thing you need to do is to make the mold a bit moist with water. Let the panna cotta cool and then store in the refrigerator until set. Don’t forget to seal with cling foil, otherwise your panna cotta will absorb aromas from other food in the refrigerator.

Panna Cotta © cadwu
Panna Cotta © cadwu

This Week was Special-A

This week on Friday and Saturday the annual Amsterdam Symposium on the History of Food took place at the main auditorium of the University of Amsterdam. Such a pleasure to listen to great papers presented, discussing the origin of umani or the history of Byzantine taste (presented by Anouk Everts). The key-note was delivered by Peter Klosse. He made many interesting points with regard to taste and flavour. His analysis of Mouth Feel is food for thought and discussion.
PS Garum as used in the Byzantine kitchen is a fish sauceIt is made from fermented fish (sardines for instance) and salt. It goes back to Roman times. Fun to make, actually….

Johannes van Dam prize

Yotam Ottolenghi received the prestigious Johannes van Dam prize. The jury, chaired by professor Louise O. Fresco, mentioned Yotam’s impressive contribution to current Dutch and International cuisine. The prize is named after culinary writer and critic Johannes van Dam who was not only known for his reviews of restaurant but also for his massive collection of books on food and drinks. Mr. Ottolenghi was very pleased to receive the prize (as you can see in the picture!)

Joop Witteveen prize

Antwerpen a la carte was the winner in the Academic category, the Joop Witteveen Prize. A book that discusses not only the history of food in the port city of Antwerpen, but also today’s role of a (hungry) city in the area of food production and consumption. Main authors are Ilja van Damme and Leen Beyers. The book is linked to an exposition at the MAS in Antwerp.
More information about the papers can be found on the website of the conference.

Omelet with Oyster Mushrooms and Nasturtium

Try This at Home

Oyster mushrooms were among the first mushrooms to be cultivated. They grow very well on straw so great to grow at home. See pictures!
The vast majority of oyster mushrooms are grey, but we have seen and tasted the yellow and sensational pink oyster mushroom. Since you can eat oyster mushrooms raw, the pink and yellow variety is great in a salad. Oyster mushrooms can be a bit watery, which impacts the taste. A pity because the taste is delicate and soft anyway. Not a mushroom to combine with more powerful mushrooms like shiitake. Oyster mushrooms cook quickly, so great to use in a stir-fry or a soup. You can try using them in a stew, but make sure your chunks are not too small.

Wine pairing

A crisp, floral white wine goes very well with this omelet. Best would be a Pinot Grigio or a combination of Chardonnay and Viognier.

What You Need

  • 250 grams Oyster mushroom
  • 3 Eggs
  • 1 Spring Onion
  • Butter
  • Olive Oil
  • Black Pepper
  • Chives
  • Nasturtium

What You Do

Harvest your oyster mushrooms or buy really fresh and tasty ones. Tear the mushroom into smaller but not too small chunks. Slice the spring onion in small rings. Fry the oyster mushrooms in olive oil and butter for 3 minutes or so until slightly cooked. Add the white of the spring onion. Perhaps you want to add some butter to the pan. Now make sure the pan is nice and hot. Whisk the eggs well, add the green of the spring onion and add to the pan. After a few seconds reduce the heat to very low and wait 5 to 10 minutes until the egg is nearly set. Take your time but keep an eye on the surface and the consistency. Check with your fingers if the omelet is beginning to set. A good omelet must be baveuse so Timing is All. There is no alternative to baveuse!
Serve the omelet on warm dishes with black pepper, chives and nasturtium (not just for fun, also for the peppery taste of the nasturtium leaves).

Guineafowl with Morels and Gnocchi

Guineafowl

Preparing guineafowl can be a bit of a challenge. Easily overcooked and easily prepared the wrong way. Given its size you could think it should be prepared like chicken but that’s not the case. Compare chicken with guineafowl and notice the difference: the meat of a guineafowl has much more structure, it’s fatter and firmer.
Cooking quineafowl requires some liquid (oil, butter, wine, stock) but not too much. Cooked like coq au vin it’s a disaster. Spit-roasted guineafowl? Not a good idea.

In The River Cafe Classic Italian Cookbook (written by Rose Gray and Ruth Rogers) you will find a great recipe of guineafowl with grappa, junipers, white wine and pancetta. The combination of grappa and junipers is amazing and the idea to have these two support the guinea fowl is simply stunning. The combination emphasises the wild and nutty taste of the guinegowl. Buy the book and start cooking!

Dried mushrooms: expensive and actually not very tasty. Not even close to the real thing. With the exception of dried morels: these are as tasty as fresh ones.
Also important: unlike most mushrooms, morels are to be found (and bought) in Spring. So the best season to cook this dish is in Spring, but given dried morels are equally tasty, it doesn’t really matter.

Wine Pairing

We enjoyed our guineafowl with a glass of Bergerac, La Vaure, 2015. This is a full-bodied wine with a hint of oak, red fruits and great flavours overall. Made from Merlot and Cabernet Sauvignon. A mature Bergerac with a lasting taste.

What You Need

  • 2 legs of Guineafowl
  • 10 gram of dried Morels
  • Butter
  • Olive Oil
  • Chicken Stock
  • Mustard
  • Cream
  • Black Pepper
  • Gnocchi

What You Do

Pre-heat the oven to 180 ˚Celsius. Add the two legs of guinea fowl to a shallow dish with butter and olive oil. Cook for 10 minutes. In the mean time add the morels to hot water. Soak for 15 minutes. Turn the legs upside down after 10 minutes. Cook for another 10 minutes. Turn them a second time, skin up. Add the morels to the dish, leaving the skin free. In parallel start preparing the sauce using chicken stock and some morel-water, but not too much. Taste the water before adding. The legs should be ready after 30 minutes. Add the cooking juices to the sauce, grill the legs quickly if the skin is not yet nicely coloured and keep the morels warm. Add mustard and pepper to the sauce, stir well, add some cream and allow to heat through and through for 5 minutes. Taste the sauce and if necessary add more mustard or morel-water.
Serve with gnocchi.


Salad of Oyster Mushrooms, Pancetta and Chives

The Challenges of Oyster Mushrooms

Finally! After weeks of patience you’ve just harvested your home grown Oyster Mushrooms. Or for those among us with less patience: you’ve just bought some A+ Oyster Mushrooms.
Let’s discuss some misunderstandings about oyster mushrooms.
First of all, yes, they can be eaten raw (especially the pink and yellow variety), but as always with mushrooms, some people simply don’t agree with them. Cooking is a way of removing the toxic element.
Second aspect, oyster mushrooms do have a taste of their own. It’s delicate and it combines really well with eggs, chives and pancetta, but mind the balance.
And finally, they are (indeed) a bit soggy. So don’t try to fry them and don’t use them in a sauce where you want a certain consistency. Use this aspect of the oyster mushroom, don’t fight it.

This recipe is clearly inspired by the wonderful salade paysanne, which is a combination of ingredients such as mesclun, egg, bacon, potatoes, oil and vinegar. (and never pine nuts, balsamic vinegar, tomatoes and mayonnaise).

Wine Pairing

You can serve the salad as a lunch with a glass of Pinot Grigio or a nice rosé from the Provence region, but why not be a bit bold and serve it with a red wine? Our suggestion would be a Pinot Noir or a Beaujolais Cru (so not nouveau or village).

What You Need

  • Oyster Mushrooms
  • Mesclun
  • Pancetta
  • Quail Eggs
  • Olive Oil
  • Butter
  • Chives
  • Black Pepper

What You Do

Tear the oyster mushrooms into smaller bits, following the lamellae. Don’t use a knife. Make sure the mesclun is ready to eat. Cut the pancetta into smaller bits. Don’t use bacon because the saltiness of the bacon will overpower the mushrooms.
In parallel gently fry the oyster mushrooms in olive oil and butter, just to give them warmth and allow for the taste to develop. Remove from the pan and set aside, preferable on a warm plate. In a second skillet fry the pancetta in olive oil. Add olive oil and white wine vinegar to the remaining juices of the oyster mushroom and create a warm vinaigrette. This way you capture the juices and taste of the mushrooms. In a third pan cook the quail eggs until just set. When using fresh chicken eggs cook them until runny or even better, poach the eggs. We prefer using quail eggs given the size of the salad and the more present taste of the quail eggs.
Create the salad by tossing the mesclun, pancetta, chives, black pepper and half of the mushrooms with the vinaigrette. Serve with the other half of the mushrooms on top of the salad, sprinkle some chives on top. Serve with crusted bread.


Londonderry Soup

Sunday afternoon, my mother in the kitchen, asking us what we would like to eat as a starter. Would we like vegetable soup with broken vermicelli or Londonderry soup? My favourite! Londonderry soup! Monday meant school but Sunday was all about Londonderry Soup!
My mother seemed less keen to prepare Londonderry soup because, depending on the chili and the curry, it could be too spicy to her taste. The vegetable soup was more predictable.
As always in life, things change. I moved to another city, she became less interested in cooking and so here we are today: I haven’t tasted the soup for years. Time to start cooking.
The Londonderry soup I tasted as a child seems to be a Dutch and Belgium phenomenon. And a rather undefined one. Some use veal stock, others chicken. Some add mushrooms, others rice. Also used are chili, sambal, cayenne pepper, parsley, egg, meat balls et cetera. And to make things even more confusing, in the UK it’s known as a pea soup. Which is not at all what my mother used to prepare. Plus no-one seems to know what the origin is of the name.
So we decided to follow the recipe my mother included in her ‘kookschrift’, which is a notebook with recipes she learned as a young woman.

What You Need

  • Light Stock (Veal or Chicken)
  • A Shallot
  • Curry Powder
  • Chili
  • Equal amount of Flower and Butter
  • Button Mushrooms
  • Single Cream

What You Do

  1. Start by glazing the chopped shallot in butter
  2. Add the chili (my mother used 4 small slices, but feel free to use more!) and the curry powder
  3. The curry powder should be spicy and powerful
  4. Make sure the curry is fried, allowing for the flavors to develop
  5. Add the flour and start making a roux
  6. Add the warm stock, step by step, take your time, and create the soup
  7. Leave it for 15 minutes to integrate
  8. In parallel gently fry the very small mushrooms (so called button mushrooms)
  9. Pass the soup through a sieve
  10. Use a spoon to capture all the flavors of the shallot and the chili
  11. The soup should be completely smooth
  12. Now things become unclear in my mother’s recipe. She suggests adding white wine just before serving (which will add acidity plus the taste of alcohol which is not great) or single milk or cream. Milk will only weaken the taste of the curry. Cream however will give a velvety mouthfeel when tasting the soup, which is great in combination with the spicy curry. So we added a touch of single cream
  13. Leave the soup for 5 minutes on low heat, allowing for the cream to cook
  14. Just before serving add the gently colored button mushrooms

Thanks Mum!